


Search Results for ""
495 Results Found.What is this website?
This page, and the other pages hosted on the same site, are the 1000 Already Answered Questions FAQ for Diamond-Star Motors vehicles. The name is often abbreviated to 1000AAQ.
It was initially developed by Sean Costall who gathered and entered much of the info you see now. 10 years ago, this was fantastic, but times have changed. New methods have been found to increase HP and what was amazing 11 sec DSMs are now 7 second AWD DSMs.
This site has a new look, new functionality and we aim to make it the ultimate place to get information about your [DSM].
QA #1
Last Updated:
2015-08-10 08:04
Isn't this the Talon Digest?
No. The Talon Digest is (or, at least, was) an email mailing list. This is a website. DO NOT send email intended for the Talon Digest to any address shown on this website.The talon digest is no more. Not even the wayback machine has copies (thanks to robots.txt)
All reference to the talon digest will be removed. Todd Day, you did an amazing job back in the day. Unfortunately, it is time to move on. Should you ever recover a backup, we will be glad to integrate information into the DSMBible.
"The Talon Digest has been unofficially discontinued since September 20, 2002 when the last issue was mailed out. I say "unofficially" because there was no announcement from the list moderator that he was going to cease operations. Rather, the hiatus was expected to be temporary and brief.
At this time the fate of the Digest is not known. It is likely, however, that it will never resume operations. The same might be true of the main www.dsm.org site, and the Talon Digest archives, both of which have been in and out of service. This is unfortunate, since these sites were the central rallying point for all DSMers in search of information.
With the demise of the main Digest, Forums have taken over as the primary communications method among DSM owners.
It must be noted that the Talon Digest existing by the desire of the list owner, Todd Day. Todd spent more than ten years in meticulously daily editing of dozens of submissions, creation of unique and customized mailing list software, and construction of some of the best DSM websites ever to be seen. He rarely ever took a "day off" from these tasks, even when away from home. The workload he experienced can only be compared to that of a full-time IT position for a medium-sized business, yet he received no payment for these services, and still managed to keep a full-time conventional occupation, race his car, co-ordinate other DSM website, disassemble the unique code of the DSM ECU, create his own ECU customization business, and have a good time doing it.
Those who might be dismayed at the demise of the Digest and decline of www.dsm.org should consider three points very seriously:
Firstly, Todd's decade-long dedication is unquestionably one of the greatest - if not THE greatest - donation of time and effort, by any individual, anywhere, at any time, to the DSM community. Anyone who suggests otherwise is obviously ignorant of history and does not deserve a reply.
Secondly, his efforts directly resulted in the DSM resources that exist today, including this FAQ, the VFAQs, and the subregional boards with their UBB systems. Todd literally started it all.
Thirdly, these resources all exist because someone wishes them to exist. Those who whine about how valuable resources such as the archive search, pics.dsm.org and the main website are gone (or in decline) would be better off devoting their efforts to helping to restore these resources to the DSM world."
R.I.P. Talon Digest
QA #3
Last Updated:
2015-08-05 12:52
What is this website for?
The purpose of the DSMFAQ website is to provide owners of Diamond-Star Motors (DSM) cars an additional on-line resource for locating information. This site contains answers to many of the most frequently asked questions regarding DSM cars, their operation, modifications, performance and so on.
These pages are not the only on-line resource for DSM owners. If you Google DSM Forum, you will find a vast library of information. Some of which you will find here.
QA #4
Last Updated:
2016-05-30 11:12
What kind of information is here?
The website is broken into several sections, each with a specific focus of information. The subjects include answers to common questions involving common problems, recalls, operation, modifications, performance, racing, equipment, wheels, tires, instrumentation, and so on. Since the content of the site might change at any time, please use the search above to target specific keywords.
If you would like to share the QA, ensure the URL you use contains the question # in the url. It shouldn't change.
Example: http://dsmfaq.com/q/9
As of the last update, the information presented at this site is specific to the Mitsubishi Eclipse, Eagle Talon, and Plymouth Laser cars built between 1990 and 1999. There are more answers concerning 1990-1999 cars, and none concerning the 2000+ Eclipse. Please note that this is not a result of prejudice or bias - it is simply that there are more "frequently asked questions" about older cars than newer cars.
Regarding 3G cars, the 1000AAQ site is a part of Club DSM, a club that largely does not support the 2000+ Eclipse models. Please visit http://www.club3g.com/ for information regarding that generation.
QA #9
Last Updated:
2016-05-30 11:14
How do you know what you are displaying is correct?
Everything you read on the net should be suspect information. This site is no exception. A healthy skepticism is the hallmark of critical thinking. In other words, unless you know us personally, you don't know that what we're saying is likely to be correct. Even if you know us personally, we could still be wrong! Nobody's perfect!
As the editors of these pages, we personally are not going to guarantee the accuracy of any of this information. If you have not already read the legal disclaimer link at the top of this website, do it now. You are responsible for your own actions (and car).
However, we believe that the information here is correct. We have worked hard to make this site as complete and comprehensive as we can. There may be errors, omissions or plain outdated content that were accidentally introduced through our good-faith efforts, and for those we apologize.
Most of the information presented on this site is an amalgamation of information presented from various sources. These sources include forums, various spots on the Internet, and various printed references such as newspapers, technical manuals and shop manuals.
As with everything you read on the net, you need to have independent verification before you can be confident the information is correct. At the very least, we advise you have at least three independent Internet sources which agree with each other before you come to any conclusions. If you can find at least three sources that corroborate each other, and can't find any dissenting sources, chances are the information is correct.
The information presented here can be verified by doing the necessary research. That is how these pages were created. There are many other sites on the net that can verify the information; many are linked into this FAQ. So check them out!
QA #10
Last Updated:
2016-05-30 11:28
There are broken links on your site! Should I e-mail you about it?
Yes, please do. webmaster(AT)dsmfaq(DOT)com
Please keep in mind that we only maintain the DSMFAQ site itself. This site links to hundreds of other external websites that are not under our control. If you find a broken link on one of these websites, or find that a link to another site is down, it is not within our power to correct the problem. In these cases you have to contact the owner of the problem site for a remedy.
We will do our best to do some preventative linkchecking and update content letting you know the external link is down before you click on it. This is another reason very important content hosted by other sites should be archived here.
Special note: As of the time of this writing, the main site of www.dsm.org is experiencing a number of problems. The site owner no longer actively maintains the site, and certain sections of it are no longer available. As a result, the "Search for this topic now!" icons on this site are likely broken. I do not have time to take them all out right now. www.dsm.org still lives, but it will never be updated. There are a billion broken links that we need to deal with. Some content is lost forever. Let's make sure this loss of content never happens again.
QA #11
Last Updated:
2016-05-30 02:22
There is incorrect/missing information on your site! Should I e-mail you about it?
Yes, please do. webmaster(AT)dsmfaq(DOT)com
We are not perfect, and independent verification or correction of the information presented on this website is always helpful. Please provide a complete explanation as to why you believe any existing information is incorrect and at least 3 links to different sites pertaining to the correct information.
Special note: As of the time of this writing, the main site of www.dsm.org is experiencing a number of problems. The site owner no longer actively maintains the site, and certain sections of it are no longer available. As a result, the "Search for this topic now!" icons on this site are likely broken. We are working on removing all broken links between 2015 and 2016.
QA #12
Last Updated:
2016-05-30 02:24
How can I find out more information on my [DSM]?
Unfortunately www.dsm.org has fallen into disrepair. The site owner no longer actively maintains the site, and certain sections of it are no longer available. As a result, the "Search for this topic now!" icons on this site are likely broken.
The canadian forum is hanging on by a thread. Most other regions, cities and nations have their own dsm url. Click www.google.com/?gws_rd=ssl#q=DSM+forums to search google for DSM sites.
A few of the most popular are www.dsmtuners.com and www.dsmtalk.com. If you are canadian, hop on to http://ca.dsm.org/ under Bulletin Board (old school lingo for Forum).. We are still kicking.. just not sure for how long.
P.S. DSMFAQ (originally 1000AAQ) are both purely 100% canadian grow sites. While DSMFAQ does have a few american content editors, the website programming rests within the great white north. Eh.
QA #13
Last Updated:
2016-05-30 02:27
Is there information on other makes of automobiles here?
Aside from information as it relates to DSM cars, no. It would be impossible to maintain any type of FAQ with such a broad scope. There is some information that may be generally applied to all cars, but most is DSM-specific and of little interest to non-DSM owners.
Google is your friend. :)
QA #14
Last Updated:
2016-05-30 02:27
How can I find out more information on my [non-DSM]?
Try the various Internet search engines for sites that may have information relating to your car. Many car makes have club websites similar to Club DSM that provide information and support to vehicle owners.
Whatever you do, don't ask us. We do not know anything about other cars, or resources for other cars. We do not answer questions about other types of vehicles. Google is your friend / uncle.
QA #15
Last Updated:
2016-05-30 02:28
What is the Ultimate Bulletin Board (UBB) system?
The Ultimate Bulletin Board (UBB) system is a software package that re-creates the original-style bulletin board systems (bbs) of days gone by. It is a way to create a web-based forum, accessible through the internet, that allows members to post messages to each other. The UBB system is an Infopop product.
UBB's are Forums, and from here on, shall be refered to as Forums.
History Lesson: The DSM-related forums of today are not the Talon Digest of yesterday. The Talon Digest was an e-mail based mailing list. There was only one. It was text-only and did not allow images or attachments. (This was a conscious decision by the list moderator.) Each post was submitted to an automated mailing server for checking and possible moderation by the list owner, who maintained an extremely high standard of conduct and content. The software used was a mixture of public domain and software specially-developed by the list moderator himself. The submitted posts were e-mailed as a single formatted list to all mailing list members at the same time ("digest" format). All of the digests were eventually collected and archived for searching and browsing.
By contrast, the Forums of today are plentiful and varied. Many allow attachments. The level of moderation varies from virtually nonexistent to virtually military. Most are public, some are private. Some maintain archives of useful technical information.
What we know for sure is, if you find usefull information that should be properly archived, request us to add the content to this site. We allow archive.org to archive this site as well we will produce montly dumps of the data. There are always 2 admins in charge of the site so if 1 dissapears (like dsm.org), the site isn't locked down and goes into disrepair.
QA #17
Last Updated:
2016-05-30 02:31
How do I get membership to [a Forum]?
Similar Questions:
What are the rules for [a Forum]?
Where are these [Forums]?
Generally, look for a signup option. You will need to answer all required questions to register. Once registered, you have access to post and may also be able read stuff unregistered users cannot.
Have fun exploring.
Start with: Club DSM Canada, DSMTuners and DSMTalk. The last two are the two largest user base forums.
Here is a full listing of online DSM sites/forums by Country: (Last checked May 2016)
We highly recommend checking country based ones as they have the largest user base.
Canada
- http://ca.dsm.org/
- British Columbia - http://www.bcdsm.org/forum/index.php
- Quebec - http://forum.dsmquebec.org/
Europe
- Hungary - http://dsm.clubforum.hu/welcome.do
United States
- Chicago - http://www.chitowndsm.com/forum
- Cincinnati - http://cinci.dsm.org/modules.php?name=Forums (no new posts since 2007)
- Colorado - http://www.rmdsm.org/
- Florida (Orlando) - http://www.orldsm.com/forum.php
- Texas (Dallas) - http://www.dallasdsm.org/forums/
- Wisconsin - http://www.dsmsupport.com/
Germany
UK
- New England - http://ew.newengdsm.org/forums/
QA #18
Last Updated:
2016-05-30 08:02
What exactly is a DSM?
Technically, a DSM is a car built by Diamond Star Motors, a joint venture between Mitsubishi and Chrysler. More details about DSM are here.
For the purposes of the Talon Digest, the definition of a DSM has been extended somewhat;
[Note: From time to time, debates on the definition of a 'DSM' emerge on the Digest. These debates usually center around a record-breaking car which, because it does or does not have a certain component or feature, 'should' or 'should not' be considered a 'DSM' in the 'true' sense of the word.
Such judgements are entirely subjective and cannot be resolved, except by arbitrary rules; resist the temptation to reopen any such debate as moderators and membership are tired of hearing about it. All race results that can reasonably be deemedrelated to DSMs are reported - whoever is king in your own mind is best kept to yourself.]
In further news, the now-merged DaimlerChrysler corporation purchased a 34% stake in the now-ailing Mitsubishi Motors corporation in April, 2000. This is not to be taken as a re-emergence of DSM, however - the DSM marque is now consigned to the pages of history.
QA #19
Last Updated:
2016-05-30 05:08
What is an FAQ?
A FAQ is a file of Frequently Asked Questions, which is exactly what it sounds like - common questions on a subject, and their answers. This file you are reading now is a FAQ. Most FAQs provide a great deal of useful information.; novices are strongly encouraged to read FAQs to familiarize themselves with the basics of their chosen field of interest.
FAQs exist for several reasons:
- To provide a quick and efficient resource for newcomers to the subject.
- To keep the subject matter of mailing lists and newsgroups fresh and interesting.
- To prevent repetition of 'simple' questions from irritating and/or boring more experienced readers.
FAQs exist for thousands of subjects on the net, not just on DSMs. Most newsgroups, mailing lists and discussion boards have a FAQ. A collection of FAQs on many subjects may be found at the Internet FAQ Consortium, and here. A DSM-specific FAQ Locator is used to be available but is now out of service.
Maybe we could point faqs.dsm.org to this website?
QA #20
Last Updated:
2016-05-30 07:59
What is a VFAQ?
A VFAQ is a recent term, which stands for Visual Frequently Asked Questions. A VFAQ is simply a FAQ with pictures, sound and/or video clips that provide more detail on the subject matter. Tom Stangl is credited with coining the term VFAQ.
Currently, VFAQs are available at www.vfaq.com, also hosted by Tom. VFAQs deal almost exclusively with the repair, maintenance and performance upgrades of the DSM cars. These comprehensive guides provide step-by-step instructions on how to install many common DSM performance upgrades.
The Brad Bauer's VFAQ site is not longer operational but can be seen on the internet archive site: https://web.archive.org/web/20010721150657/http://www.myzero.com/
QA #21
Last Updated:
2016-05-30 08:17
What is a TSB?
TSB means 'Technical Service Bulletin', a document issued by car makers to dealers that describes known problems and their solutions. See the Glossary for more information. The National Highway Traffic Safety Administration makes their TSB database available on the net, as well as recall information.
QA #22
Last Updated:
2016-05-30 08:18
What is a $2 Tech manual / $2TM?
Chrysler used to produce a technical manual for the DSMs, that dealt less with nuts and bolts and more with the theory of operation of virtually every major component on the auto. Unlike the shop manuals, it tells you not what, but why. This manual used to sell for a mere $2.00, and is now referred to as the $2 Tech Manual.
Unfortunately for the DSM community, the $2 manual was only offered for the 1990 model year and was subsequently dropped from production. All is currently lost, though, as Vineet Singh's DSM Backup Manual CD-ROM is offline. It included the $2TM and tons of other great info.
The best places for documents at the moment is: http://lilevo.com/mirage/
I have never seen the Vineet CD-Rom, all this content may be what was on it.
QA #23
Last Updated:
2016-05-31 11:09
What is bracket racing?
Wikipedia:
Bracket racing is a form of drag racing that allows for a handicap between predicted elapsed time of the two cars over a standard distance, typically within the three standard distances (1/8 mile, 1,000 foot, or 1/4 mile) of drag racing.
You can also check out Michael Beard's Guide to Bracket Racing.
QA #24
Last Updated:
2016-05-31 11:13
What is AutoX?
Similar Questions:
What is Autocross?
'Autox' is an abbreviation for 'autocross'. It is a form of road racing done on a closed course, designed to test the overall skills of the driver, and the overall performance of the vehicle driven. There are autox courses and events all over the continent, including many events in parking lots!
There also exists rallycross, which is like an autocross but on dirt instead of pavement, making it more like a rally (cross-country racing).
Many autocross events in the United States are hosted/directed by the Sports Car Club of America (SCCA), and are run under SCCA rules that put cars with different modifications into different competitive classes. A copy of the SCCA rules is available here; you can also order them from the SCCA. The SCCA also runs rally and other motorsport events.
For more information, look at the DSM Autocross pages, hosted by Dennis Grant. There is more autox information in the Corrado Club Water Cooled VW Performance FAQ,
QA #25
Last Updated:
2016-06-01 10:11
What is a Shootout?
The Shootout is an annual racing event hosted by Dave Buschur, one of the premiere DSM mechanics in the world. It is considered THE event for the DSM racing community.
The Shootout 2016
Stay up to date by following the events on the following pages
Facebook Event: https://www.facebook.com/events/1581104848837429/
Check https://www.facebook.com/BRShootout for more information about past years.
Support, attendance and participation in the Shootout grows every year. 1998 saw a record 110 vehicles participate in a variety of drag racing and autocross racing events. Also in attendance were several vendors and significant media coverage. There are some pictures available from 1995, and 1998.
While there are more and more Evo's and GT-R's showing up , the last reported numbers from 2013 Shootout is 5000 attendees.
Owing to the popularity of the Shootout, the term is occasionally used by other groups running racing events, as in "The Olde West DSM Shootout". Except for the attendance of DSM enthusiasts, these various events have no relation to the Annual Shootout.
QA #26
Last Updated:
2016-05-31 11:40
What is a MBC?
MBC (Mechanical Boost Control) is a VBC. - A fancy name for a simple bleeder valve. A device (air pressure regulator, aquarium valve, ice-maker valve, etc.) that bleeds off a bit of boost pressure that is supposed to be going to the wastegate control valve, thus delaying the opening of the wastegate. For more information on Manual Boost controllers on Wikipedia
Hallman MBCs tend to be well liked.
QA #27
Last Updated:
2016-05-31 11:41
What is a BISS?
Similar Questions:
How do I adjust the BISS screw?
Base idle set screw. This is used to set the basic idle point for your car, around which the ECU will attempt to control the engine speed. Failure to have the BISS set properly can lead to all kinds of weird idle problems.
Excerpt from: http://www.dsmtuners.com/threads/biss-screw-adjustment.425941/
Adjusting the BISS1G (since some 1G questions popped up):
To adjust the BISS properly, you need to lock the timing, ground the diagnostic port, and then adjust the BISS until your RPMs are around 750-800rpm (or whatever you have it set to via Link, chip, etc.). If you don't ground the diagnostic port, the ECU will see the BISS adjustment as a change in idle airflow and will attempt to use the ISC to compensate for it. Keep screwing the BISS, the ECU keeps adjusting the ISC with no apparent change in idle rpm...until it runs out of adjustment range.
The other alternative for ECMLink users (as Brian suggested) is to leave it ungrounded and adjust the BISS while watching ISCPosition, until it reads between 30 and 37 or so.
1G BISS Adjustment
For a 2G:
The concept is similar, but I'm not sure about how the OBD-II handles locking the ISC out of the loop. According to the VFAQ, it requires a scan tool, but I've never played with a 2G so I'll leave it at that. The ECMLink method should work the same on both though.
2G BISS Adjustment
Those who need one will find it listed as Mitsubishi part #MD614948, available from any Mitsubishi dealer.
QA #28
Last Updated:
2016-05-31 01:38
What is a FMIC?
Front-mount intercooler.
Intercoolers can vary dramatically in size, shape and design, depending on the performance and space requirements of the entire supercharger system. Common spatial designs are front mounted intercoolers (FMIC), top mounted intercoolers (TMIC) and hybrid mount intercoolers (HMIC). Each type can be cooled with an air-to-air system, air-to-liquid system, or a combination of both. Typically DSM use Air to Air.
It is important to note that FMICS: The larger the tank, the longer the piping, the more lag.
Meth/Water injection will not cool intake temps as well without an FMIC, but you CAN run without FMIC. Some have had limited success.
Also, an FMIC will add a little intimidation factor to your [DSM].
QA #29
Last Updated:
2016-06-01 07:22
What is a BOV?
BOV stands for blow-off valve, sometimes called a pop-off valve or compressor bypass valve. This is a spring-loaded valve mounted in between the turbocharger and throttle body that opens at a preset pressure. It's function is to provide an escape route for pressurized air trapped in the intake system when the turbocharger is spinning and the throttle place suddenly closes. Although many turbocharged cars lack a BOV, its presence makes the car more driveable. Opinion on whether it improves turbocharger longevity is divided.
The original DSM BOVs were designed to open at about 30 psi or so. Unfortunately for 2G owners, Chrylser replaced the metal 1G BOV with a plastic one that begins to leak at about 15 psi. This is a major problem for those 2Gers looking to up their boost, since the BOV will start to leak a lot of useful boost pressure back into the atmosphere. For this reason, 1G BOVs are a popular upgrade on 2G DSMs.
Hardcore 1Gers might also find the stock BOV to leak under higher boost pressures (more than 20 psi). To correct this problem, some owners crush their BOVs slightly, so they will open only at higher pressures.
BOV crushing doesn't seem to help the valve hold more boost. See What is a crushed BOV?
QA #30
Last Updated:
2016-05-31 02:38
What is a crushed BOV?
Owners of highly boosted cars have discovered that the stock 1G BOV tends to begin to open too early. This causes a pressure leak in the intake system that limits boost. The valve tends to leak somewhat at lower boost levels, then opens fully when it's supposed to. This low-level leakage is the problem. The 1G BOV will usually hold pressures to about 22 psi, so this problem usually only appears on cars with upgraded turbochargers.
[2G owners have this problem, times two - the stock 2G BOV can just hold stock boost levels, and tends to start leaking at around 15 psi. 2Gers don't crush their BOV because it's plastic and won't crush. Instead, 2Gers often replace their unit with a stock 1G BOV to eliminate the leakage problem. This works until they too reach the limits of the 1G BOV.]
One DIY solution proposed to fix this problem is to crush the BOV. This means exactly what it says - stick the valve into a vise or clamp and squish it so it doesn't open as early. This is really a cheap & dirty method of increasing the spring force holding the BOV shut, and saves the operator from having to install an expensive aftermarket BOV. This techique can, however, restrict the amount of air that can pass through the BOV when it is wide open, making it a less efficient BOV, and therefore not as good as an aftermarket unit.
Although the technique is simple, individuals should use caution in applying it since various BOVs and crushing techniques are different. The essential technique is to crush the BOV so that it begins to open when 18-20 inHg of vacuum is applied to the reference port. Pristine BOVs will begin to open much earlier than this. Crushing should be done a little at a time until the BOV responds properly. Over-crushing a BOV may result in poor performance.
As with most information available about this modification, this debate remains incomplete. Regardless, owners of stock turbochargers need not concern themselves, as the stock 1G BOV works just fine with stock turbos.
The Last Word: Ray Peters supplied this helpful info on this subject:
"My submission concerns the theory of crushing the BOV. My studies of this concluded that crushing it only solves the open at idle problem and has nothing to do with pressure it will hold. In fact the boost pressure HOLDS the BOV closed plus the spring tension. IMO it is impossible for the valve to leak with all that force on it.
Now the other case, idle and closed throttle operation of the valve. The pressure difference between the intake manifold and the upper intercooler pipe determines when the valve is open. So at idle and when there is more than 15 Inches Hg pressure difference across the throttle plate, the valve begins to open. Crushing the valve slightly increases the spring pressure and raises this difference to just over 20 IN Hg. However the down side is it limits flow because the valve cannot travel fully anymore, and increases the pressure spike against the turbo.
I believe this was done as a workaround so one could dump to atmosphere while using a suck through air measurement device (stock airflow meter or equiv). I tested extensively on both a 1G and a 2G and found this information to be true and correct."
Basically, stop being so cheap - buy a real BOV. [Thanks, Ray!]
QA #31
Last Updated:
2016-05-31 02:48
What is ABS?
ABS - Anti-lock Braking System
A computer-controlled system that can "sense", in a braking situation, when one or more wheels have stopped turning, yet the vehicle is still moving. The computer will then quickly release and re-apply the brakes repeatedly, thus giving the driver more control of the vehicle.
QA #32
Last Updated:
2016-06-01 01:23
What is AWS?
AWS - All Wheel Steering
A system that actively turns the rear wheels (usually no where nearly as much as the front wheels) in the same direction as the front wheels to aid in high-speed cornering and to improve the overall "feel" of the car. The Mitsubishi Galant VR-4 and 3000GT VR-4(Stealth R/T) have AWS systems.
QA #33
Last Updated:
2016-05-31 08:23
What is an AFC?
Similar Questions:
What is a Super-AFC / S-AFC?
What is a Super-AFC II / S-AFCII?
What is a AFC NEO?
Air-fuel converter, an aftermarket tuning computer sold by A'PEXi. It is similar in some ways to the PMS and VPC but is generally considered less elaborate. The Super AFC was the basic toy to get but was removed from Apexi's website in 2006. As of 2015, AFC NEO is the new thing.
The original AFC is now known as the "knob-style" AFC. It had physical adjustment knobs on the front for 5 ranges. The "Super-AFC" uses a digital display and pushbuttons to alter settings in 8 RPM ranges, and has separate settings for high throttle and low throttle. The deprecated "Super-AFC II" is similar but adds more RPM ranges and other features to the devices.
Honestly, for the price, get ECMLINK. Lose the AFC route.
QA #34
Last Updated:
2016-05-31 08:25
What is an EGR?
EGR - Exhaust Gas Recirculator
An emission-control system that directs some exhaust gases back into the intake manifold to reduce the formation of nitrous-oxide (NOx) pollutants. EGRs typically operate off manifold vacuum, and therefore only operate in the off-idle state up to WOT.
QA #35
Last Updated:
2016-05-31 09:38
What is an EVC?
EVC - Electronic Valve Control
This device is a basic closed-loop process controller. Its operation is very similar to an electronic cruise control device. You input a desired boost level, and it monitors the actual realtime boost pressure. It then adjusts wastegate opening to maintain a stable boost pressure (supposedly) as engine load and RPM changes. Without a closed-loop control that incorporates an integral correction factor, boost pressure will always vary *somewhat* depending upon engine load and speed. The EVC isn't perfectly "tuned" for all possible engine/turbo configurations, and it is prone to under/over correction at times. The wastegate control is achieved by modulating a solenoid that regulates the amount of air that reaches (and thereby opens) the wastegate.
There are many styles of EVC. Importnat to note that ECMLINK V3 can now control boost as well by using the stock boost control selenoid wires and an aftermarket selenoid.
QA #36
Last Updated:
2016-05-31 09:40
What is a FCD?
Similar Questions:
What should i not do to prevent fuel cut?
FCD - Fuel-Cut Defencer
In In Diamond Star applications, this comes with the PFC. In most cases, it appears that you can't buy it separately. The operating principle of the device is that of a frequency limiter. It is connected to the output of the Air-Mass sensor pin 2 on turbo TLE's - pin 1 on Galant VR-4's). The output frequency from the FCD tracks the input frequency until it reaches the limit setting... the output frequency then stays the same even if the input frequency (coming from the AMS) continues to increase. By fooling the ECU into believing that Mass Airflow never exceeds a predetermined amount, fuel cutoff is avoided. Unfortunately, fooling the ECU into believing the engine is consuming less air than it really is, results in a leaned-out mixture once limiting has begun. Because the turbo DSM's are set up to run quite rich on the top end, no harm is done expect possibly in extreme circumstances.
(NOTE: Other "hacks" have been discovered that will serve the same basic purpose: Removing the lower honeycomb section, enlarging the lower AMS inlet, and adding resistors/pots to the baro sensor and thermistor circuits are all somewhat effective techniques.)
Important: Do not use any device to eliminate fuel cut. Fuel cut is there for a reason. If you are hitting fuel cut the ECU believes that you are moving more air than the fuel system can safely deliver. If you are having to eliminate fuel cut with some sort of defender either you have an inadequate fuel system, inadequate tuning tools, or a leak somewhere.
DO NOT decrease air counts without adding more fuel per air count. this will cause you to just run lean all the time and cause exactly what fuel cut tries to prevent. so....
DO NOT put in a fuel cut defender.
DO NOT run a 2g maf on a 1g without a way to balance it out.
DO NOT just lean out your afc to unsafe afrs.
DO NOT turn down your gm maft to unsafe afrs.
DO NOT try and put in larger injectors without fuel management.
DO NOT try to up the fuel pressure without fuel management.
QA #37
Last Updated:
2016-06-01 08:29
What is a FCON?
Similar Questions:
What is a PFC?
PFC - Programmed Fuel Computer (also PF-CON, FCON)
With ECMLINK, this is to be avoided and is here for archival prupose only.
HKS sells this "piggy-back" computer, and its purpose is to fool the stock ECU into delivering more fuel under certain conditions. It's important to note that this "piggy-back" computer (as they call it) does not exactly work *with* the stock ECU the way that HKS ads might lead you to believe. The PFC doesn't share any data or address lines with the ECU, the only connection it has is thru the lines that originally ran directly to several engine sensors. By altering the signals from these engine sensors, the ECU is "fooled" into delivering an different quantity (usually more) of fuel.
There are limitations with this system, because the factory ECU it still is in final control and has the same limitations.
It should NOT be viewed as a substitute for an self-contained engine computer/control system. A true aftermarket engine control computer will provide vastly greater function and flexibility. The major advantage of the PFC-FCON is that it is fool-proof and very easy to install.
QA #38
Last Updated:
2016-05-31 09:42
What is PSI?
Similar Questions:
What is Hg?
What do 'psi' and 'Hg' stand for?
PSI (or P.S.I, psi or p.s.i) is an acroynm for pounds per square inch, a measurement of pressure that is often used in automotive circles. The metric equivalent for psi is the Pascal, although most psi measurements equate better to kiloPascals (kPa). Other units for pressure include the bar and the atmosphere (atm). For the mathematically minded, 1 bar = 14.504 psi = 100 kPa = 0.9869 atm.
'Hg' is the chemical symbol for mercury. It is sometimes used as an incorrect version of inches of mercury (inHG) or millimeters of mercury (mmHG), the unit of measurement for vacuum. This unit was derived from the technique of measuring vacuum by pulling mercury up a glass tube. Vacuum, which is simply negative pressure, is also commonly measured in bars, inches of water (inH2O), and Pascals (Pa). In this case, 1 bar = 29.53 inHg = 401.463 inH2O.
QA #39
Last Updated:
2016-05-31 09:43
What is JDM?
Similar Questions:
What is a JDM engine?
What is a JDM transmission?
JDM is an acronym for Japanese Domestic Market. It refers to parts that are normally only available in Japan.
A JDM engine is, therefore, an engine that is normally sold in the Japanese market only. Such 4G63-based engines are now routinely imported by some shops as direct replacements for American-spec engines. This is done because JDM engines often come with larger 16G turbos and other enhanced parts not available on American factory engines.
Buyer beware, however: not all JDM engines are equipped with these superior parts, and some configurations may require extra work to put into an American car. In many cases, even the importing shop may not know what they have until they get it and inspect it very closely. Protect yourself and verify that the JDM engine is, in fact, the best option.
Someone who refers to a "JDM transmission" is often referring to the JDM-spec Galant VR-4 transmission that was made available in Japan with a "FWD-to-AWD switch". This transmission comes with extra bolts installed that allow the owner to change from FWD to AWD with a small amount of wrenching.
As with the JDM engines, JDM transmission authenticity is always in question unless the unit can be inspected in person by the buyer. The chances of getting the correct part are increased if you are dealing with an expert, DSM-centric shop with experience on the JDM components. While many shops like to claim expertise, the fact remains that unless they have done it before, they probably don't know the differences.
QA #40
Last Updated:
2016-05-31 09:43
What is MCCC?
Mopar Combustion Chamber Conditioner. Many DSMers use it to clean out carbon deposits from their engines. Those who need it will find it listed as Mitsubishi part #4318001, available from any Mitsubishi dealer.
QA #41
Last Updated:
2016-06-06 11:59
What is a PMS?
With ECMLINK, this should be avoided and is here for historical value only.
A PMS is a Performance Management System, a piggyback engine management computer made for DSMs and other vehicles. As with the AFC and VPC, many DSMers use the PMS as a gateway to higher performance. The good news is that the PMS is more flexible than the VPC, allowing more precise tuning - the bad news is that the PMS is more flexible than the VPC, allowing the operator many more ways to screw up.
QA #42
Last Updated:
2016-05-31 09:45
What is a VIN?
Similar Questions:
What information is in the vehicle identification number (VIN) of a [DSM]?
Many questions of this type can be answered by the following reference:
https://en.wikipedia.org/wiki/Vehicle_identification_number
A V.I.N. is a Vehicle Identification Number, a unique identifier which is assigned to every automobile at the factory. It is essentially a serial number for your car, and contains a lot of information about the vehicle.
First-generation (1990-1994) VIN numbers are formatted as follows:
Digit(s)MeaningValue(s)
1 Country code
4 = USA
? = Canada
2 Make
E = Eagle
P = Plymouth
A = Mitsubishi
3 Vehicle type
3 = Passenger car
4 Seatbelt type
B = Manual (1G)
C = Automatic (1G)
A = Driver & passenger airbags (2G)
5 Line code
S = FWD (1G)
T = AWD (1G)
K = Eclipse FWD (2G)
L = Eclipse AWD (2G)
X = Eclipse Spyder (2G)
6 Price code
2 = Low
3 = Medium
4 = High
5 = Premium
6 = Special
7 Body code
4 = 3-door hatchback
5 = 2-door convertible
8 EngineT
1.8 NT (1G)
R = 2.0L NT (1G)
U = 2.0L T (1G)
Y = 2.0L NT (1G)
F = 2.0L T (2G)
G = 2.4L NT (2G)
9 Check digit
1-9, A-Z
10 Model year
N = 1992
V = 1997
11 Plant code
E = Diamond-Star Motors (1G) / Mitsubishi Motor Manufacturing of America (2G)
12-17 Serial number
000001 to 999999
Other DSMs have similar VIN encoding. Check the shop manual of a particular year for more information.
QA #43
Last Updated:
2016-05-31 09:46
What is WWD?
WWD stands for "Wrong Wheel Drive"
AWD DSM owners used this term to poke fun of FWDers to RWDers, and vice versa.
QA #44
Last Updated:
2016-05-31 09:47
What is an 'interference' engine?
An 'interference' engine is an engine where the valves and pistons occupy the same space, but not at the same time. The other engine style is a 'non-interference' engine - this design provides enough room between the pistons and the valves so that they never occupy the same space. Non-interference engines are sometimes called 'free-running' designs.
Interference engines are a fairly common engine design. All diesel engines are interference designs, and many imports. Domestic engines have tended towards non-interference designs. Although all engines use timing belts, they are more crucial on interference engines; should the timing belt malfunction, the valves and pistons will likely collide.
While this may seem like a stupid engine design, there are reasons why an engine may be designed as an interference engine. Higher compression ratios are possible, leading to better fuel economy, power, and emissions quality.
Interference engines have the inherent risk of major engine damage due to timing belt failures. See Why is it so important to change the timing belt on a [DSM]?
QA #45
Last Updated:
2016-05-31 09:48
What is a balance shaft belt?
The balance shaft belt (known as timing belt B to the dealership) is a small auxiliary belt running right next to the main timing belt. It is about 10 mm wide, while the main timing belt is almost 30 mm wide. It is normally called the balance shaft belt because it operates a small, asymmetrical shaft inside the engine called a balance shaft. It can also be referred to as the 'silent shaft belt', since 'silent shaft' is synonymous with 'balance shaft'.
The function of the balance/silent shaft is to smooth out unwanted engine vibrations. The shaft is unevenly weighted. If you were to take a roll of paper towel and cut off half of the 'towel' part without cutting the cardboard center tube, you would have the general shape - more mass on one side than on the other.
The balance shaft belt spins this offset weighted shaft inside the engine block. As it spins, the shaft tends to pull the engine towards the side with the weight on it. As the engine moves forwards, the shaft pulls it backwards, and vice versa. In this way, the engine shake is reduced. Since the shaft helps 'balance' the engine, it may be called a balance shaft. It can also be called a silent shaft, since it not only doesn't drive anything but it also helps quiet the engine down.
There are actually two balance shafts on a DSM engine. One is separate, and is run by the balance shaft belt, while the second shaft is integrated into the oil pump. Both spin in phase with each other.
Balance shafts are not strictly necessary to engine operation, and many engines lack balance shafts altogether. Removing them can increase engine output, as the engine doesn't waste energy spinning the shafts. The engine will run rougher as a result, but most people find the change bearable. Most people also agree that the engine must be properly balanced if you want to remove the balance shafts, to eliminate the possibility of long-term engine damage.
The balance shaft belt is often a culprit in major engine failures. See Why is it so important to change the balance shaft belt on a [DSM]?
QA #46
Last Updated:
2016-05-31 09:49
What are Big Brakes?
Similar Questions:
Has anybody ever upgraded the brakes on a [DSM]?
Has anybody ever used brakes from a Stealth on a [DSM]?
My brake rotors are stuck on the car! Is there a fix?
What size bolts are needed to get the rotors off my [DSM]?
See Tom Stangl's VFAQ page. It describes the brake changes and what to do if your rotors appear frozen on the car. [For reference, the required bolts to free stuck front rotors are 8mm in diameter, 1.25mm pitch. Tom Stangl recommends you don't count on them, since often the rotor ends up cracking into pieces instead of breaking off the hubs, so be prepared for the worst.]
For 1G models prior to 1993, and all 1G and 2G non-AWD models, "Big Brakes" refers to upgrading the front brakes to 1993-94 AWD front brakes, which are larger and have more powerful calipers. These larger dual-piston brakes were also used on non-turbo Stealth and Mitsubishi Diamante cars. for the details on this common upgrade.
Sometimes people use this term to describe 1G aftermarket upgrades too, such as Baer 4 piston brake kits, but this is not commonplace on the Talon Digest.
For 2G AWD, this refers to replacing the front brakes with larger non-DSM brake kits, containing 13" rotors and 2 or 4 piston calipers. Brakes from Mustangs and Corvettes have been considered, as well as Baer 4 piston kits.
Some people have looked at moving the front brakes from the 95+ AWDs to the 1G cars, but reportedly nobody has done so yet. The swap is complicated by the fact that some 2G calipers use a different brake line fitting, which requires the use of different brake lines. Other than that, they should bolt on in the same manner as the 1993-94 brakes. One enterprising Digest member has looked at Mazda Turbo II calipers, but has not yet mounted them nor matched them with rotors. Apparantly the mounting brackets are not compatible, either.
While it is true that "big brakes" are Stealth brakes (non-turbo), what most people want to know when they inquire about the Stealth parts is if it is possible to use the extra-large brakes from the turbo Stealth models on their DSM. These massive four-piston monsters are a very hard fit to the DSM family. At a minimum, one would need 17" wheels before even contemplating the upgrade, as the stock 16" rims are likely to hit the brakes themselves.
Fortunately for 1G owners that find even 'big brakes' inadequate, Martin Queckenstedt has found a BIG big brake package from Baer. The kits price out between $800 and $1250 $USD, and combine lightweight 1 or 2 piece 12"-13" rotors with dual piston calipers. Those interested can look up the "Sport" and "Track" kits on the Baer website. There are also other aftermarket 4-piston caliper kits available.
Some potentially useful Mitsubishi part numbers for the big brake upgrade:
- RMB 699 450 Remanufactured Caliper Kit LH
- RMB 699 451 Remanufactured Caliper Kit RH
- MR 493-985 Pad Set
- MR 389-652 Shim Kit
- MR 389-599 Clip Set
The above-mentioned kits include the mounting bracket for the caliper and new caliper mounting bolts.
QA #47
Last Updated:
2016-05-29 03:06
What is fuel cut?
Similar Questions:
What causes fuel cut?
Why do we get fuel cut?
Fuel cut is cessation of fuel delivery and spark generation by the ECU. It is a pre-programmed response designed to save the turbocharger from utter destruction in the event of a catastrophic wastegate malfunction.
Crankbender@DSMTuners: Fuel cut IS NOT due to low of fuel pressure, too small of injectors, high flowing exhaust, high flowing intake, or large turbos. Fuel cut is actually caused by the ECU seeing more air entering the engine than it was originally programmed to use. This likely cooresponds with an injector duty cycle which is unsafe or unattainable. So basically fuel cut is caused by the MAF seeing too much air. Do not ask what too much air is.
Since fuel cut is caused by the ECU seeing too much air we get fuel cut by increasing the air flow through the MAF.
You can read the answer to How do I prevent fuel cut? in this FAQ.
There is also a thread on DSMTuners Fuel Cut: What is it? How do I fix it? [merged]
Old Links: For more details, read the ECU Primer, specifically the chapter on fuel cut.
QA #48
Last Updated:
2016-06-01 08:32
What is a speed sensor?
The 'speed sensor' is a little reed switch inside the speedometer assembly. Its function is to tell the ECU the vehicle speed. Since the speedometer is driven by a spinning magnet, the switch 'clicks each time the magnet passes by. The ECU then counts the 'clicks' and knows the vehicles speed.
Those curious about reed switch construction and operation can refer to the Reed Switch Wikipedia Entry
QA #49
Last Updated:
2016-06-01 08:39
What is a chopped/cut/hacked aircan/airbox?
Similar Questions:
Why would I want to chop/cut/hack/remove my aircan/airbox?
What performance gain can I expect from chopping/cutting/hacking/removing my aircan/airbox?
How do I cut/chop/hack/remove my airbox?
A 'chopped' aircan is simply one where a significant part of the can has been cut away - in other words, there is a big hole in it. The cut-away portion can be from 1/4 to 3/4 the size of the air can. Some people remove the airbox altogether, and use other methods to attach the air filter to the mass airflow sensor (MAS).
The theory is simple - the stock airbox, with its 'horn' or 'snorkel' air vent at the front, is a significant restriction to the free flow of air into the engine. Cutting or removing the can eliminates the restriction, allowing more air to flow into the engine. There are several FAQs on how to modify or remove the air can.
In recent years some controversy has arisen concerning this modification. The airbox snorkel may be restrictive, but it also ensures the air drawn into the engine comes from outside the engine compartment, where the air is relatively cool. Removing the snorkel allows hot underhood air to enter the engine, and since hot air is less dense than cool air, this is (theoretically) bad for engine performance. There is no doubt that hotter air is bad; according to Bill McGoldrick in his Jan 01, 1999 posting on the subject:
"A drop in charge air temperature of 20 degrees F yields a 1 motor octane drop in octane requirement. Example: a naturally aspirated engine that needed 93 octane at 90 degrees F could run on 91 octane at 50 degrees F. Turbos and intercoolers complicate things a bit but the formula still holds. By what ever means you lower inlet charge temperature, it's cold out today, big intercooler, more efficient turbo, etc., you'll effectively gain one motor octane number for every 20 degrees F you lower charge temperature."
Proponents of modified air cans point out that it is unlikely underhood temperatures will be significantly different from the outside air temperatures while the car is in motion. They argue that any performance drop will occur while the car is at rest, and will quickly disappear as soon as the car gets moving. There is some evidence that this may be true.
Still, it is possible that the performance gain obtained by removing the intake restriction is offset my a nearly equal loss of performance caused by the introduction of hotter air into the engine. Unfortunately, no one has been able to say for sure if this is the case. In the meantime, modding the air can continues to be a very popular modification on DSMs, as it 'has been done before' and nobody has ever reported decreased performance.
Tom Stangl addresses the hot-air problem in his VFAQ on how to do a ram-air intake. The ram air setup includes panels to block hot underhood air from entering the air intake. This type of air blocking panel/ducting is also a common practice among owners of non-turbocharged cars, who have long recognized the disadvantages of allowing hot air into their engines.
Tom also lists some brief information regarding air intake temperatures, but more information on the effect of the stock air horn can be found in the December 21, 1998 Digest in a post by Gary Schmitz (not yet in the archives). Gary found his air intake temperatures 20 degrees Farenheit hotter without the air horn, as compared to the same setup with the air horn at 60 mph. Howard Draper ran similar tests on his GVR4, and found a 60 degree difference between having the horn and not while the car was in motion.
More opinions on why modified aircans may not be so great come from Greg Campbell, Victor Del Col, Donal Lavoie and Mac Crossett in the Jan 01, 1999 Digest (edited):
"A couple of us did some testing this summer when the temperatures hovered around 100deg [Farenheit] for several weeks.... With the 14B turbo and an open filter (K&N FIPK), temperatures at the MAS were around 135-140degF, or 35-40degF over the ambient air. With 15lbs of boost and the stock intercooler, temperatures at the throttle body exceeded 220degF at WOT! (and maxing out our temperature sensor)
Replacing the [FIPK] with the stock airbox and a drop-in K&N filter, temperatures at the MAS were reduced to ~105degF, or only 5degF over ambient... Temperatures at the TB were reduced to around 185degF at WOT, a significant improvement. With the addition of a front-mount intercooler from a '88 Starion, TB temps dropped to around 145-155degF."
Owing to the continuing debate and somewhat conflicting evidence/results, it is fair to say that the dis/advantages of modified aircans may vary from car to car. In other words, YMMV (your mileage may vary). However, the bulk of real-world testing shows that inlet air temperatures increase when using modified aircans. The debate over the pressure drop induced by the aircan will likely continue for some time.
QA #50
Last Updated:
2016-06-01 09:39
What is a silencer?
Similar Questions:
How do I remove the silencer?
What performance gains can I expect by removing the silencer?
The 'silencer' is a small circle of zig-zag cardboard inside the back of the air can, behind the 1G mass airflow sensor (MAS). It is not part of the MAS, and appears to have no function other than to quiet things down a bit - in fact, 2Gs have no silencer. It is not the gold honeycomb, which is part of the MAS itself (on the front), so be sure you get the right part.
As for removal, having a shop manual handy makes everything a lot easier.
Performance gains for removing the silencer itself should be expected to be nil; it is not that restrictive. It may provide a slight performance gain when combined with other mods, however, and the removal is simple, making it the first ever 'free mod' for DSMs. It also provides an excellent starting point for newbies who need to learn more about their cars; there is incentive (performance), economy (free) and a difficulty level ideal for non-mechanics (very easy), yet provides a great deal of basic information about the car.
QA #51
Last Updated:
2016-06-01 09:43
What is a MAS?
Similar Questions:
What is a MAF?
MAS stands for (Mass Airflow Sensor). It is also sometimes called a MAF (Mass Air Flow) sensor.
It is the assembly that measures the properties of the air entering the engine, consisting of three separate sensors. For a complete explanation, please refer to Mike Jackson's excellent DSM MAF Theories Page (Internet Archive)
QA #52
Last Updated:
2016-06-01 09:47
What is a MAS honeycomb?
This refers to a thin, gold-colored grille material located at the front of the mass airflow sensor (MAS). Its reason for living is to 'straighten' out the incoming airflow into the MAS. This is a requirement of the Karmaan vortex airflow sensor used in the MAS. The upper portion of the honeycomb affects the measured air, while the lower portion affects bypass air - air that is not measured by the MAS.
Removing the lower portion of this honeycomb-like material can sometimes help delay fuel cut on 1G DSMs, by adding a few percent more unmetered air into the air/fuel mixture. Some owners, however, complain the mod makes their engine run rougher - the current theory is that the turbulet lower airflow somehow affects the non-turbulent upper airflow where the two flows meet.
Please note that under no circumstances can all of the honeycomb material be removed from the MAS. Doing this will screw up your idle huge, as the MAS airflow measurement gets all screwed up. Only the lower portion may be removed, and generally only on 1G cars.
2G owners often find out they can't remove any of the honeycomb material. Fortunately, since the 2G MAS flows a lot more air than the 1G MAS, the honeycombs should be considered far less of a concern.
You can read Jim McKenna's MAS modification for more information. For those interested in the entire MAS sensor assembly, please read Mike Jackson's DSM MAF Theories Page (Internet Archive)
QA #53
Last Updated:
2016-06-01 09:50
What is a 'Cyclone' intake?
The 'Cyclone' intake is the air intake system from a Mitsubishi Cyclone, a car not marketed in North America. This intake is a dual-runner system that keeps some runners closed unless the engine is boosting. The Cyclone is thought to provide slightly better power than the stock intake, but the difference is not significant to the vast majority of DSM owners.
Some Japanese Mitsubishi engines can come with Cyclone intakes installed. Those on the lookout for one should know that there are also Japanese "Cyclone" intakes that do not have the extra runners and associated butterfly valves. These were installed on non-turbo cars.
This intake is not the same as the third-party intake that was marketed as the Cyclone. That intake was a 'magic product' and had nothing to do with Mitsubishi. Neither is it the same as products under similar names marketed for non-DSMs.
For more information on the Cyclone, check out this little blurb from Road Race Engineering.
QA #54
Last Updated:
2016-06-01 09:51
What does 4G63 mean?
Similar Questions:
What does 420A mean?
These are engine model designators. 4G63 is the Mitsubishi model number for the Sirius engine lineup, which was built entirely by Mitsubishi. The 4G63 model number was used for 1G turbo, 1G non-turbo and 2G turbo engines; although the engines are somewhat different from each other, they retain the same basic design.
Please note that there are different 4G63 engines, although posters on the Talon Digest almost invariably mean the turbo 2.0L version. Generally speaking, components from one 4G63 can be fitted to another 4G63, because the basic components (head, block, etc) are the same.
420A is the model of the Chrysler-made 2G 2.0L non-turbo engine. Fundamentally different from the Mitsu 4G63 engines, the 420A represents a distinct shift in DSM evolution, as Chrysler took over engine duties on the non-turbo cars. Generally, components from 420A engines cannot be fitted to the 4G63 engines, or vice versa.
For more information on Mitsubishi motor codes and their breakdowns, see this guide from Road Race Engineering and this one from Turboclub.
QA #55
Last Updated:
2016-06-01 09:58
What is a turbocharger?
Read the Wikiepedia Turbocharger Article for everything you ever wanted to know about turbos.
For a comparative listing of DSM turbos, look at Tom Stangl's VFAQ on the subject.
QA #56
Last Updated:
2016-06-01 10:02
What is a 16G?
Similar Questions:
What is a 20G?
What is a 25G?
These are Mitsubishi racing turbos, larger than stock. 16G is the short name for the Mitsubishi TD05-16G, the 20G is a Mitsubishi TD06-20G, and the 25G is a Mitsubishi TD06/07 hybrid turbo.
The 16G is a popular upgrade from the stock DSM turbo. It has been said that this turbo is designed for quick spoolup, which improves streetability and performance in application such as autocross.
The 20G is a much larger unit and is generally reserved for serious drag racers. Once the biggest turbo available, the 20G is now considered a "medium" turbo upgrade at best.
The 25G is a combination turbo based on the 20G. Similar to the "big" 16G, it has "mismatched" compressor and turbine wheels: the turbine wheel is TD06 (stock 20G) while the compressor wheel is bigger. 25Gs very new and extremely hard to find.
Read the Top Ten FAQ for lots of technical information on these and other turbos.
QA #57
Last Updated:
2016-06-01 10:13
What is a 'small' 16G?
Similar Questions:
What is a 'big' 16G?
According to Road Race Engineering, a 'small' 16G has a standard compressor wheel. A 'big' 16G has a larger compressor wheel. This is the only difference, but it reportedly leads to a 10% increase in flow. The 'big' 16G is standard on the Lancer Evolution III. Please refer to the RRE link above for details.
QA #58
Last Updated:
2016-06-01 10:28
What is a Super 60?
A Super 60 or Super 60 is a modified Garrett T25 turbocharger, with an enlarged compressor inlet, housing and compressor fan. It is one of those annoying turbos that has one name but several different possible configurations, depending on the parts installed, with some of the more elaborate configurations being superior to the cheaper lookalikes.
QA #59
Last Updated:
2016-06-01 10:31
What is an intercooler?
An intercooler is a radiator-like device that sits between the air intake and intake manifold on turbocharged cars. Its function is to cool air passing through it. It is often found on forced-induction cars because turbochargers or superchargers heat air as they pressurize it, which leads to a denser but hotter charge. The intercooler is designed to reduce the temperature of the pressurized air to help prevent detonation.
For more information, read Autospeeds Complete Guide to Intercooling.
QA #60
Last Updated:
2016-06-01 11:20
What is a turbo timer?
Similar Questions:
Do I need to let the engine 'cool off' after driving?
Do I need to let the turbo 'cool off' after driving?
Will the turbo ever get hot enough to require a 'cool-down' period after driving?
A turbo timer is an electronic device which permits the car to run for a fixed length of time after the ignition has been shut off. It's sort of the reverse of a remote car starter, which runs the car before the ignition is switched on. Turbo timers usually have user-selectable run times and can usually be installed around car alarm systems.
The purpose of the timer is to allow the turbocharger additional cool-down time before the engine is shut down. The idea behind this came from the discovery that turbocharger systems can get hot enough to 'cook' the oil left in the turbo oil lines after the engine is shut off. The simple solution to this problem is to circulate oil for a longer period of time after the turbocharger has heated up. The turbo timer simply automates this process so the car operator is not forced to wait in his/her automobile until the desired cooling-down period has transpired.
Many DSM owners believe that turbo timers are a sound investment, or at least a prudent one, when weighed against the possibility of turbo damage due to oil lines partially or completely blocked with 'coke', or cooked oil residue. These timer proponents often point to the red-hot nature of the turbocharger after long runs at 55+ MPH as 'proof' that a turbo timer is a good idea. Other owners report they have run just as long and just as hard without a timer or any special attention provided to cool-down times, and still get turbo longevity and durability equal to those cars using a timer.
Driving patterns could also have a significant effect on the need for a timer. Folks who travel at high speeds almost directly to their destination will have higher turbocharger temperatures at shutdown than those who are required to wait at three or four stoplights or who drive through residential neighborhoods at low speeds before shutting down. Ambient temperatures and vehicle modifications are also likely to play a role.
There are several arguments against the necessity for turbo timers. There have been significant improvements in turbocharger design and oil formulation since the time turbo timers were concieved . This includes the advent of pure synthetic oils, which are more resistant to the turbo heat and free of impurities (such as waxes and varnishes) which contribute to coking problems. Turbochargers are also more precise and better lubricated than in previous designs. These facts are often cited as evidence for the case against turbo timers. The most compelling fact is that the majority of DSMers have never used a turbo timer, and yet there have been very few reports of DSMS 'coking' up the turbo oil lines with overcooked oil.
If you feel the need for a timer, many vendors sell them.
The Last Word: You do not need a turbo timer. But it can occasionally be handy.
QA #61
Last Updated:
2016-06-01 11:32
What is knock?
Similar Questions:
What is detonation?
Knocking (also called knock, detonation, spark knock, pinging or pinking) in spark-ignition internal combustion engines occurs when combustion of the air/fuel mixture in the cylinder does not start off correctly in response to ignition by the spark plug, but one or more pockets of air/fuel mixture explode outside the envelope of the normal combustion front.
The fuel-air charge is meant to be ignited by the spark plug only, and at a precise point in the piston's stroke. Knock occurs when the peak of the combustion process no longer occurs at the optimum moment for the four-stroke cycle. The shock wave creates the characteristic metallic "pinging" sound, and cylinder pressure increases dramatically. Effects of engine knocking range from inconsequential to completely destructive.
Knocking should not be confused with pre-ignition. They are two separate events. However, pre-ignition is usually followed by knocking.
Also read How does the [DSM] knock sensor work?
QA #62
Last Updated:
2016-06-01 11:42
What is a knock sensor?
A knock sensor is a device for detecting knock or detonation.
Knock sensors come in various styles. The simplest is just a microphone element that picks up engine vibrations and noise and sends the signals to the onboard ECU. This is the type of sensor used on the DSM cars. Other sensors might do some signal processing or filtering inside the sensor before generating the output signal.
QA #63
Last Updated:
2016-06-01 11:55
What is a 'knock LED'?
Similar Questions:
I am running [x] PSI on my car, and my knock LED flashes! Is my setup ok?
My knock LED flashes all the time! Is there a fix?
My knock LED flashes all the time! Did I screw up my engine?
A 'knock LED' is a light wired up to the boost control solenoid (BCS) on the engine. The short answers to the other three questions are: Probably, no, and probably not.
Despite it's name, the 'knock LED' DOES NOT MEASURE KNOCK. [Doubters take heed: it DOES NOT.] All the LED is doing is informing you when the boost control solenoid has been tripped by the ECU. This has only the vaguest relation to knock, as there are many other non-knock circumstances that will cause the BCS to trip. This quite possibly gives the 'knock LED' the distinction of being the worst-named modification in the history of DSMs.
For details on this, read prostreets Build a Knock LED
About the only time that you can be certain the 'knock LED' is reporting knock is when it is solidly on. This indicates a last-ditch attempt by the ECU to limit boost, which can only occur when the engine is knocking for prolonged periods of time.
The LED will also flash when the ECU is attempting to limit the turbo boost (1G and 2G cars); when the ECU is "smoothing" out the normal turbo operation (2Gs); and when the car is first started and the ECU transitions the solenoid from fully closed to fully open (all turbo cars). These occurances are perfectly normal and not cause for concern.
As for the question of whether or not your engine is ok, you will only know that by looking at the operational setup and the circumstances under which you believe you may have damaged the engine. If you have been following the typical guidelines for upgrading your engine, you are probably fine. If you have upgraded your engine past the recommended guidelines or had some catastrophic event occur, your engine may be damaged. In real terms, 99% of people who are concerned about their knock LED flashing have absolutely nothing to worry about.
The Last Word: Anyone who actually takes the time to put in a "knock LED" by now is wasting their time. Not that it was ever really useful to begin with. If you truly want to measure knock, get ECMLINK.
Back in the day, there was a gentleman by the alias vanade that created was was probably the closest thing to ecmlink knock monitor for the 1G. ECUVIEW is here for historical purposes only.
QA #65
Last Updated:
2016-06-01 12:09
What is porting?
Porting is the technique of improving airflow by removing additional material away from a component. Typical components are intake and exhaust manifolds, turbos, wastegates and oxygen sensor housings, all of which can be opened up to achieve better airflow. Porting the O2 sensor housing and/or wastegate is an often recommended cure for boost creep. This uncontrollable rise in intake pressure is often caused by the turbo pushing more air than can be possibly be dumped out of the wastegate and downpipe, despite the wastegate being completely open.
Porting is considered something of an art, with most established vendors claiming that a poor porting job will actually reduce airflow. Some porting services also come with polishing, which some consider a waste owing to the contaminants present in exhaust air.
Many vendors offer porting services for both new and used components.
QA #66
Last Updated:
2016-05-30 09:09
What is clipping?
Clipping is the technique of cutting away some of the material on the fins of the impeller wheel of the turbocharger. In other words, to 'clip' a turbo is to make the fins in the exhaust path smaller. The cut is usually done at an angle of between 10 and 20 degrees - the bigger the angle, the more material is removed from the fins.
This may seem like a dumb thing to do, since smaller fins mean that the exhaust gases will impart less force to the turbine wheel and consequently increase turbo lag. This is true, but the benefit of clipping is found in the high RPM range of the motor. At higher RPMs, the turbo may have already surpassed the required user-set boost levels and is not contributing to engine power.
Since the impeller wheel in the exhaust stream partially blocks the exhaust gas flow (by design), it can act as a significant restriction at high RPMs, when the exhaust flow rate is highest. Clipping the turbo reduces this restriction and allows more air to flow past the turbo wheel at high RPMs, thereby improving airflow through the engine and increasing top-end response.
More details on clipping can be found in a thread on DSMTuners - Exhaust Turbine Clipping
QA #67
Last Updated:
2016-05-30 09:09
What is a catch can?
Similar Questions:
What is a breather filter?
A catch can is a small container, sometimes with a filter, that collects oil blown out of the PCV valve or valve cover intake hose. The idea is to keep the oil out of the intake, which helps keep the intercooler running at maximum efficiency. It has also been reported that the catch can mod can reduce the crankcase pressure, helping to eliminate the problem of having the oil dip stick pop out of the engine. It is necessary to periodically empty the catch can to prevent it from overflowing. Some cans provide a drain for this purpose.
UPDATED: Much of the issue is due to positive crankcase pressure pushing oil into the intake. If you PCV valve is ok and everything else looks good, read up on Jack's Transmissions PCV article. Very interesting.
Other people have installed a K&N 'breather' filter in place of the stock hose. The filter allows gases to escape but keeps liquid oil inside the block, thus providing the same benefit as the catch can without requiring maintenance. Many believe they are too restrictive, but people have used them with good results. Unfortunately, the breather filter can sometimes allow oil to escape and get onto the engine. We recommend you avoid this method.
QA #68
Last Updated:
2016-05-30 09:05
What is a shift gate?
Similar Questions:
Has anybody ever installed a shift gate on a [DSM]?
A shift gate can refer to one of two things. An internal shift gate is a mechanism on the shifter that controls the 'position' of each gear, and sometimes provides a 'lock' feature to prevent the owner from accidental mis-shifting. However, when most people refer to a shift gate, they are talking about an external shift gate.
An external shift gate is a guide - essentially, a thin metal plate with slots cut into it - installed on the shifter of a car. It provides a positional reference for each gear. It is usually installed in an exposed position, so the driver can see it. Some cars, such as certain Ferrari and Mercedes automobiles, come with external shift gates stock.
It is also possible, on some automobiles, to install an external shift gate as an aftermarket accessory. Owners can do this for looks alone, or as a measure to help keep them from accidentally mis-shifting the car into an incorrect gear while racing.
It is not possible to install a shift gate on a DSM without altering the shifter. The reason is that the shifter shaft overlaps the same space in different gears. For example, the shaft position in third gear overlaps the shaft position in first and/or fifth gear. For this reason, it is not possible to install a shift gate that has separate slots cut into it for different gears. The shaft is also hollow, so thinning it is problematic.
With that said, Kyle Grendall has successfully made a shift gate for the DSMs by changing the shifter shaft.
There are also several methods of making the DSM shifter feel more positive. [TODO]
QA #69
Last Updated:
2016-05-30 08:59
What is water injection?
Similar Questions:
Has anybody ever installed a water injection kit on a [DSM]?
Water injection is a venerable technique for achieving all kinds of good things in the engine by lowering the combustion temperatures. This has a cooling effect on the intake air charge, which increases power and reduces the possibility of knock. This has the same effect as adding extra fuel to the mixture without sacrificing fuel economy. Additionally, less fuel (a leaner mixture) in itself reduces the possibility of detonation. A nice side effect is that the water tends to keep the engine cleaner, whereas extra fuel can actually leave more carbon deposits behind.
The theory is simple: water is atomized into the intake air stream, and is included in the air/fuel mixture burned in the cylinders. Since the cooling effect is not typically needed in everyday driving, the injection system is normally activated by a pressure switch that activates at a preset boost level. The injection point is either just before the throttle butterfly or before the turbocharger, depending on the exact setup. The water is sometimes mixed with alcohol or other fluids.
Downsides to water injection include having to keep water in the tank, and the possibility that a malfunctioning valve might put too much water into the engine, causing serious damage. However, the technique has been around since the 1940s and the risks are arguably no more serious than relying on an over-rich fuel mixture to provide the required cooling effect.
Unfortunately, nobody makes a DSM-specific water injection system; several vendors offer generic versions. Speculation on the subject has been wide and varied over the years, but few people have actually installed such a kit on their cars. Many people regard it as old technology, while others class it with nitrous injection as an 'unfair' system. This lack of practical knowledge and a proper bolt-on kit for DSMs has kept the technique from wide application.
Water injection has recently drawn more attention in the Talon Digest, partly because a group buy for the Spearco WI kit has drawn all the WI users out of the woodwork. There is also a little-known DSM Water Injection Home Page for interested parties, as well as the DSM Water Injection Group from Yahoo! Groups. You can also peruse issues of the Talon Digest from January to mid-February 1999 for DSM-specific information.
Related to, but separate from, the water injection systems is the intercooler sprayer, which sprays water or other coolant directly on the intercooler to help it do it's job. This system provides only minor benefits but is simple, cheap and failsafe, and may be rigged with a pressure switch to activate it during high boost.
Here are some questions answered by Devil's Own Injection Onwer / Operator
Methanol in general is harder on alloys than it is on plastics. Most plastics in a car are a nylon 11 /12 or Polyethylene and are A-Excellent with Methyl Alcohol And generaly most all makers use poly or nylon for the transfer hose for this kits. .
Rubbers in the car and in the system:
Only source of rubber in the car these systems should come in contact with is your hard pipe couplers and they are made from Silicone and its considered A-Excellent with Methyl Alcohol. Now some manufactures sell alcohol injection pumps with viton seals that are C-Fair .  So make sure the pumps have EPDM seals. If they don't say then its probley viton, which you don't want.
Alloys in the car and in the system:
Aluminum for example is considered meth compatible by some and not by others. When it boils down to it its the grade of aluminum that causes this. Most aluminum go kart tanks that are not anodized will not fair well with constant contact with methanol. Aluminum intakes for example, since they are not under constant contact and they are a lot more substantial would be considered compatible. All of your Stainless Steels are grade A
Brass, while considered compatible with both water and meth we have found for it to create a coating on the inside of these systems, This is the main reason we use Nickle plating on all the fittings.
QA #70
Last Updated:
2016-05-25 10:42
What is nitrous / nitrous oxide / NOS?
Similar Questions:
What is a "jet"?
What is a "fogger"?
What is a "wet" system?
What is a "dry" system?
Nitrous is often referred to as NOS. This is not technically correct. NOS is the acronym for Nitrous Oxide Systems, a company that has done it's best to become synonymous with the use of nitrous oxide.
The distinction has become so blurred that it was lost even in the popular racing movie "The Fast and the Furious", where characters routinely referred to nitrous oxide systems as "NOS". Interestingly, some claim Nitrous Oxide Systems was a sponsor of the movie. Regardless, however convenient it may be, "NOS" is not a term, abbreviation or contraction for nitrous oxide.
Nitrous oxide is a gaseous oxidizer (N2O) which is injected into the engine intake. As with any chemical name, "nitrous oxide" is not capitalized since it is not a proper noun.
During the heat of the combustion cycle, it breaks down, releasing relatively large amounts of oxygen into the air/fuel mixture. Since nitrous is 30% oxygen, compared to normal air at 21% oxygen, more fuel burns in the cylinder, which results in more power.
Also, as the highly-pressurized N2O liquid is introduced into the intake air, it expands. This expansion requires heat, which is taken from the surrounding air. The net result is an overall drop in the temperature of the intake air charge, resulting in higher air density (more power) and cooler combustion temperatures (less knock).
A byproduct of the nitrous injection is that the timing on the car must generally be retarded to compensate for the increased burn rate of the mixture. In normal-air applications, the spark is set off before the cylinder reaches top-dead-center (TDC - the maximum height in the cylinder) because it takes time for the air/fuel mixture to ignite. Ideally, the piston reaches TDC just before the mix ignites completely, resulting in maximum power. The nitrous-enhanced mix burns faster, so the ignition must occur later or else the piston will still be moving towards TDC when the mix ignites. This can be extremely hard on an engine. The knock-sensing abilities of the DSM engine computer will help prevent this occurance.
Used by dentists as an anesthetic gas, automotive systems avoid medical industry regulation by mixing in foul-smelling sulfur gas, preventing automotive gas from being inhaled. It also makes nitrous-equipped vehicles smell bad while using the system.
The amount of nitrous is usually controlled by the size of the injectors ("jets"), which are rated according to the expected horsepower gain. Some form of electronic or manual control is also employed; on DSMs a favorite controller is a boost-sensitive switch, which automatically kicks in the nitrous delivery at the appropriate time. Nitrous can also be used directly on an intercooler to cool down the intake air - such a system is called a 'fogger', and provides more cooling but potentially less oxygen.
A "wet" nitrous system injects fuel along with the N2O gas. A "dry" system does not. "Wet" systems are harder to tune since the introduction of additional fuel is an added complication.
Nitrous systems may not generally be used except at full acceleration, over a certain RPM, and (of course) require periodic refills. Still, there is no doubt that it is an effective way of getting a lot of horsepower. 50 hp systems are common, but it is possible to get over 200 hp, provided your car can handle it. They also provide unaltered driveability and fuel economy under normal conditions, since the N2O is only supplied on demand.
Those familiar with the movie "The Fast and the Furious" and "Gone In 60 Seconds"will remember various characters pressing buttons on the steering wheel to activate their nitrous systems. This is not normally the case. Instead, nitrous systems are generally set on throttle position or boost pressure switches and activated automatically as soon as the throttle is near 100% open.
Nitrous oxide systems are sold by Nitrous Oxide Systems and many other vendors. They cost roughly $500-$1000, depending on the complexity and application.
Nitrous oxide systems are not widely used on DSMs, as there is a perception among the DSM community that nitrous systems are a form of 'cheating'; that is, no special effort or knowledge is required in order to make a car fast if you use nitrous oxide. This is not particularily true - nitrous systems are no more 'drop-in' than a side mount intercooler - but it is easy to point out that most DSM upgrades are full-time, whereas nitrous systems may only be used under particular circumstances. Also, there are no DSM-specific nitrous kits - universal kits work - and the equipment cost is relatively high.
Despite any old prejudices, nitrous systems seem to be coming back into vogue among high-end DSM racers as a legitimate method of producing raw power. Some DSMs have dyno results showing no less than 611 horsepower, 70 of which were gained through the use of a nitrous kit. Cars of this type generally have few options left to achieve big power gains.
Nitrous systems have unconventional uses as well. To the dismay of the competition, some DSMers even fitted a rental Nissan Maxima with nitrous at the 1997 Oklahoma Shootout (the NOS-Xima), showing that even a hopeless family sedan can turn decent times on the bottle. (Note this is not the same Maxima described below.). Metnal note. Never buy used rentals.
You may want to read the statement and see the pictures provided by Doyle & Victoria Schoenberger, who had a 15 lb. nitrous bottle explode in the rear of their 1991 Nissan Maxima while it was parked in their garage. They experienced significant damage to the home, as well as the total destruction of their car. The explosion was apparantly due to a triple failure - the nitrous bottle heater was wired so that it could be powered even if the ignition was off, the heater was accidentally left on, and the safety vent on the bottle failed to operate. While this can safely be classed as a freak event (or even some type of scam, as some people suggest), it is nevertheless a powerful argument - one must never become complacent when working with compressed gases. When handled properly, they are safe, but any carelessness could result in severe damage or death.
The argument that nitrous is 'cheating' often arises.. This assertion implies that there exist rules (written or unwritten) which govern how DSMs should be set up. Since there are no such rules (unless, of course, individuals get together and agree on a set for their own purposes) it is difficult to justify this position, and Digesters have long since become tired of the discussion - please resist the temptation to reopen the topic.
QA #71
Last Updated:
2016-05-30 08:57
What is "Waterwetter"?
"Waterwetter" is a coolant additive made by Red Line Oil, a performance fluids manufacturer. It is added to normal coolant to improve the heat transfer ability, in order to lower engine temperatures.
On first glance, Waterwetter would seem to be another 'magic' product. After all, the engine cannot run at a lower temperature unless a low-temperature thermostat is installed. However, it is important to realize that there is a difference between the thermostat temperature and the engine temperature. The thermostat regulates coolant temperature. The engine block, which is creating heat during the combustion cycle, is at a higher temperature.
If the coolant has poor heat transfer characteristics, the coolant is unable to absorb heat from the block and carry it away. This leads to a significant difference in temperature between the block and the coolant, with the block becoming hotter. Improving the heat transfer characteristics of the coolant allows it to absorb more heat, making the block run cooler.
The reverse is true at the radiator. A fluid with poor heat transfer may not be able to transfer the accumulated heat to the radiating surfaces. This can lead to heat buildup in the cooling system.
Whether Waterwetter is 'worth it' is up to the individual. Few people report performance gains with it; rather, it is viewed as simply a prudent thing to use.
Majority of Summer only DSM owners run Distilled Water + WatterWetter only with no ill effect. Some say that a little more lubrication is required for the water pump so 80% Distilled Water / 20% Coolant + Water Wetter.
If your DSM sees near freezing temps, no less than 50/50. Unless you want to blow your freeze plugs.
QA #72
Last Updated:
2016-08-10 07:43
What is a 'short block'?
A 'short block' is an engine that includes only the following components:
- the engine block (the 'bottom half' of the engine, where the pistons are);
- the pistons, piston rings, and connecting rods;
- the crankshaft; and
- all the bearings and fasteners for the above.
A short block could be defined as a complete 'lower half' of an engine. However, short blocks usually do not have an oil pump, oil pan, or water pump.
QA #73
Last Updated:
2016-05-30 08:49
What is a 'long block'?
A 'long block' includes all of the components for a short block, plus:
- the head(s) (the 'top half' of the engine, where the valves are);
- oil pan;
- camshafts;
- valves, lifters, and springs; and
- intake or intake manifold.
A long block is not a complete engine. Missing parts include carburators or injectors, exhaust manifold, turbocharger(a) or supercharger(s) (if any), intercooler(s) (if any), and so forth.
QA #74
Last Updated:
2016-05-30 08:49
What is a 'balanced' engine?
A 'balanced' engine is an engine constructed of components that are as evenly weighted as possible. This allows the engine to operate with as little vibration as possible.
For example, if you rotate a shaft that is heavier on one side than the other side, the shaft will "pull" towards the heavy side. This is how the vibration mechanisms in pagers and cell phones work - by spinning an unevenly weighted shaft on a motor.
This sort of an effect is generally undesireable in a automobile engine, and most manufacturers try to make the rotating components as symmetrical as possible. Larger components, such as crankshafts and flywheels, must generally be very close to ideal to prevent unwanted engine shake in consumer automobiles. Unfortunately, economics often dictate that less-than-ideal parts be used, and some engine vibration is generally tolerated.
In general, to balance an engine, all of the rotating parts need to be balanced - sometimes individually, and often as a set. This involves removing material from the 'heavy' side of the rotating components, either by drilling holes, or machining off some material. Special machines are often used to spin the components at the operating speeds, to identify which sides are the 'heaviest' on the complex mechanical shapes used for today's engines. In other cases, components are matched, by weight, to each other. Tolerances on such matching generally stay within 1/2 of a gram.
The net result of a balanced engine is generally a smoother-operating engine, sometimes with a touch more power output than before. It is often performed on racing engines, which require not only peak power output, but are frequently stripped of the other mechanisms that would normally reduce engine shake and noise. It is a labor-intensive and sometimes expensive procedure.
QA #75
Last Updated:
2016-05-30 08:48
What is a 'blueprinted' engine?
A 'blueprinted' engine is an engine that has been remanufactured to conform exactly to the manufacturer's official specifications - the blueprints, as it were.
You might assume that an engine costing thousands of dollars would already conform to spec. Well, it invariably does, but only within a certain tolerance. Automotive manufactuers already make engine parts (and other components) to tolerances that would have been economically impossible just a few years ago, but economics still plays a factor. To make a 'perfect' engine would require such exacting checks, and such frequent remanufacturing of parts, as to be impossible on a mass scale.
On an individual scale, though, it is certainly possible - given enough time and labor - to build a 'perfect' (really, a near-perfect) engine. Such an engine would realize its peak power output, best fuel economy, and best possible emissions quality due to the 'ideal' interaction between all of the components. Of course, few people need such a machine, and blueprinting is normally reserved for high-performance racing engines.
QA #76
Last Updated:
2016-06-01 12:23
What is a stroker motor?
Similar Questions:
What is a 'bored' engine?
What is meant by a 'bored and stroked' engine?
A stroker motor is any engine that has been modified to increase its displacement by extending the length of the piston stroke. This involves changing the crankshaft, and possibly the connecting rods and pistons, to increase the maximum combusion chamber size inside the engine. Compression ratios may also be changed, or the design may involve using additional parts to negate this. The net result is usually an engine with significantly more power than the regular engine but lower revving.
A 'bored' engine is an engine that has larger-than-factory pistons installed in it. This involves machining the piston chambers in the block to a larger size, and the installing oversize pistons to match. This again increases the displacement of the engine, and allows the user greater flexibility in choosing their overall compression ratio. The intention, again, is to eke more power from the engine.
If both of these methods are used on an engine, the engine is said to be 'bored and stroked'. Since performing one process usually takes a significant amount of labor, many people find that they may as well do both. Also, people who really want the power are likely to really want to do both. Both methods involve modifying the lower half of the engine.
The stroker motor is an extreme (and extremely expensive) method of increasing power; it is not a popular mod on DSMs or any other car because of the high initial expense, overall complexity and relatively small margin for error.
One little-known but useful fact for overbore proponents is that Mitsubishi sells factory overbore pistons. 1G owners can purchase 0.25mm, 0.50mm and 1.0mm overbore - 0.50mm and 1.0mm overbore are available in 2G style. Since the pistons are interchangeable between 1G and 2G engines (with accompanying changes in compression ratio), these provide additional options to the engine rebuilder. The best part is price - at the time this page was last updated the cost for the 2G pistons was less than $40 ($US) each.
QA #77
Last Updated:
2016-06-01 12:33
What is knife edging?
"Knife edging" is the practice of "sharpening" the motor crankshaft so it is no longer round. The major benefit to this technique is reduced rotational mass. Also, the edges are said by some to reduce the resistance of the crankshaft as it is dipped into the oil in the bottom of the engine.
Knife edging is an esoteric technique and is not usually done unless a complete engine rebuilt is already intended.
The jury is still out on the benefits.
QA #78
Last Updated:
2016-06-01 12:37
What is cryogenic treatment?
Cryogenic treatment is the process of using extreme cold temperatures to mechanically strengthen a material. One of the newest processes available to automotive enthusiasts, it generally appears to fall into the category of a magic product.
Unfortunately for those seeking a clear answer, discussions on the Digest have revealed that there may be some benefit to properly done cryogenic treatment in specific limited applications. Specifically, the materials must be high alloy steel. Low carbon steel, iron, aluminum, nylon, natural or synthetic rubber, polymers and plastics apparantly cannot benefit, since the cryogenic process is designed to convert austenite into martensite, and these substances only exist inside steels.
Wayne Kasel-Zuzek, who is by profession a metallurgical engineer, also believes that the cryogenic process may only be applied during manufacture as part of the quenching (cooling) process for steels, and that post-quench cryogenic treatment does nothing. His theory is that if a room-temperature quench does not produce the desired amount of martensite, then a cryogenic quench may achieve the desired (or, at least, a superior) result. He also points out that quenched steels, regardless of manufacture, must be tempered prior to use, since martensite is a desireable intermediate stage but is too brittle to be used as a finished product. Once the steel is tempered, he believes there is little that the cryogenic process can accomplish.
Here is a good starting point for reading up on Cryogenics
QA #79
Last Updated:
2016-06-01 12:40
What is a 'traction circle'?
Also know as the circle of forces, the 'traction circle' is not a real thing. It is a concept - a model for describing tire grip on a car.
The basic principle is simple: tires can only grip so much, in any direction, before they lose grip and start to slide. The sliding is caused by force on the tire. The forces are caused by acceleration, braking, cornering, or some combination of these.
Using a bit of simple physics, the tire grip can be represented by a circle surrounding the contact patch of the tire. The bigger the circle, the more traction the tire has - hence, the term 'traction circle'. If tires gripped equally well in all directions, the 'traction circle' really would be a circle. Since most tires don't, the traction circle is usually oval shaped.
Although it is difficult to actually model a traction circle for any given tire, the concept is helpful to performance drivers because it perfectly describes the relationship between braking and cornering grip on a tire. If the driver stays within the traction circle of the tire, the tire sticks. Stay on the edge, and you are getting the maximum possible grip for that tire. If the driver exceeds the limits of the traction circle, the tire slides, leading to a loss of both tire grip and control.
Several factors influence the traction circle for a tire: tire type, driving surface, load (weight) on the tire, and the amount of tire in contact with the road, among others. Since the traction circle is a general concept, it can be applied either to individual tires (one at a time) or to the car in general (all four tires at once).
Here is a great wikipedia article on Circle of Forces
QA #80
Last Updated:
2016-06-01 12:42
What is camber?
Similar Questions:
What is camber angle?
Camber angle is the angle made by the wheels of a vehicle; specifically, it is the angle between the vertical axis of the wheels used for steering and the vertical axis of the vehicle when viewed from the front or rear. It is used in the design of steering and suspension. If the top of the wheel is farther out than the bottom (that is, away from the axle), it is called positive camber; if the bottom of the wheel is farther out than the top, it is called negative camber.
Camber angle alters the handling qualities of a particular suspension design; in particular, negative camber improves grip when cornering. This is because it places the tire at a better angle to the road, transmitting the forces through the vertical plane of the tire rather than through a shear force across it. Another reason for negative camber is that a rubber tire tends to roll on itself while cornering. The inside edge of the contact patch would begin to lift off of the ground if the tire had zero camber, reducing the area of the contact patch. This effect is compensated for by applying negative camber, maximizing the contact patch area. Note that this is only true for the outside tire during the turn; the inside tire would benefit most from positive camber.
Read more here: https://en.wikipedia.org/wiki/Camber_angle
QA #81
Last Updated:
2016-06-01 12:44
What is caster?
The wheel is never located directly under the shock/strut mounting point on the car. The amount by which the wheel leads/trails the mounting point is caster. Positive is wheel ahead, negative is wheel behind.
In more detail, from a post by Kris Rozon:
"Think of caster as the amount the actual wheel is either ahead, or behind the top strut mount. If the wheel is ahead of the top mount, as in one of those Harley's with the big Chopper-Bar front fork things, then that is positive caster.
If you had negative caster, that is the same as a shopping cart's rear wheels. They trail the mounting point.
The more positive caster you have, the tighter the steering and the more the steering wheel will want to center itself. I am not aware of any side effects of too much caster, but there must be some. Obviously too much negative caster would be bad (kinda like the wobbly wheel on the shopping cart).
So, if one wheel is a great amount more negative or positive than the other, then you will notice a pull in the steering wheel. This is what some on the digest have experienced regardless of numerous alignments and tire balances. The steering wheel will also seem to turn one way better than the other. The front of the DSM is not alignment-friendly."
Some have reported that too much positive caster promotes road wander. Ernie Coursolle (Dakota) pointed out, based on his experience with pre-86 Corvettes, that not enough positive caster may also cause wander. The '84 'Vette reportedly tended to wander around a lot with only 3 degrees of positive caster. Once the specs were changed in 1986 to 6 degrees, the 'Vette lost the wander, and realigning the '84 to '86 specifications eliminated the wander on the older car. Still, most agree that extreme positive caster is a bad thing, which simply means that too much of a good thing is just as bad as not enough - just like everything else.
QA #82
Last Updated:
2016-06-01 12:44
What is oversteer?
Oversteer is when the rear of the car tends to move towards the outside of a curve. This is a familiar situation for those familiar with RWD vehicles, especially in slippery or wet conditions. Oval racing fans refer to this condition as 'loose' and know from experience it causes a lot of crashes as the rear ends of the stock cars lose traction. RWD vehicles tend to oversteer, while FWD/AWD cars tend more towards understeer. What is understeer?
Those interested in handling will find Dennis Grant's Far North Racing site a must read.
QA #83
Last Updated:
2016-06-01 12:49
What is understeer?
Perhaps harder to visualize than oversteer, understeer is where the front of the car tends to push towards the outside of a curve. This is the opposite of oversteer, and is difficult to understand intuitively. Oval racing fans call this 'tight' handling, and while it does not tend to cause crashes, it tends to slow the drivers down a fair bit, as they constantly fight the wheel to keep the car on the curve.
Northern residents are perhaps the most familiar with understeer from driving in icy conditions; that awful sensation you get from turning the wheel and finding the car keeps going in a straight line! This is understeer at it's worst - the complete loss of front-wheel traction. Understeer is commonly referred to as a 'push' (with the car 'pushing' into the turns) perhaps because it seems like something is shoving the front end of the car away from the desired turning line.
FWD cars tend toward understeer partly because of the location of the drive wheels, and partly by design - understeer is considered an easier condition for the average driver to handle. AWD cars are usually based on FWD platform, so they inherit the basic handling characteristics, including understeer. Both FWD and AWD DSMs tend to understeer a lot, a constant annoyance to those drivers wishing to corner quickly.
You can also check out What is oversteer?
Those interested in handling will find Dennis Grant's Far North Racing site a must read.
QA #84
Last Updated:
2016-06-02 12:11
What is wheel hop?
Similar Questions:
My front/rear end goes "whump whump whump" when I launch. What's going on?
This is generally wheel hop, also known as a convenient automatic windsheild wiper activation feature. Both AWD and FWD DSMs apparantly suffer from this, in proportion to other mods; FWDs tend towards front wheel hop, AWDs prefer rear hop.
Not really caused by wheels bouncing, wheel hop occurs when the tires are getting/loosing grip in rapid sucession. Wheel hop tends to stress transmissions, differentials and other driveline components quite badly. It has also been posted that the majority of center differential failures are directly related to wheel hop. Slicks, stiff suspensions, hard launches and burnouts promote wheel hop, and the resulting driveline failures.
Mark's solution (provided by Road Race Engineering) involves filling the stock engine mounts with polyurethane rubber to make them stronger.
Other FWD solutions include: equal tire pressures (left to right), lower tire pressures, softer suspension, a front sway bar (not strut tower brace) and less drastic launch techniques. AWD solutions include: equal tire pressures, softer suspension, and less drastic launch techniques.
Scott Willard describes his experience with a loose driveshaft striking the bottom of his car. This is not the same as wheel hop but has the same symptoms - he describes a test to differentiate between the two conditions. AWD cars which exhibit a thumping from the rear are likely to have this problem, which is caused by worn carrier bearings. The solution to this problem is listed on the VFAQ Locator; the $5.00 Carrier Bearing Fix page has the details.
QA #85
Last Updated:
2016-06-01 02:02
What is
"Chunking" is when the bond between the tire tread and the main body (carcass) fails, and large pieces of the tread fall off of the tire. Most motorists will remember seeing large pieces of tire tread left on the side of the road by passing 18-wheeler trucks. This is a similar problem aggrevated by the routine use of retreaded tires in the trucking industry.
Most enthusiasts who experience chunking are road racers of some type. This is because the tire heats up much more during racing. A race tire also experiences much larger forces due to cornering and its own rotational speed.
From Keith Sontheimer in the May 19, 2002 Digest:
"I've been told by several tire experts, chunking happens when a tire's tread heats up unevenly (top to bottom). If the outside of the tread block closest to the road heats up substantially quicker before the rest of the block closer to the carcass does, then chunking can occur.
Usually this happens when you go out on the track, and begin pushing your tires too soon. They haven't had a chance to heat up all the way through, and the chunking begins. It usually takes 3-5 easy laps at 75-80% of the pace you normally run to heat them up, depending on the tire."
QA #86
Last Updated:
2016-06-01 11:13
What is a strut tower brace?
Similar Questions:
Has anybody ever installed a strut tower brace on a [DSM]?
How do I adjust a strut tower brace on a [DSM]?
A strut tower brace is a metal bar that connects two shocks (either both front or both rear) together at the top. In this context, the shock/strut assemblies are called "strut towers". A front brace is located in the engine compartment under the hood, while the rear one is located in the hatch or trunk area.
The function of a strut tower brace is to reduce the amount of movement of the shocks under hard cornering. The brace stiffens up the car frame and helps prevent the wheel from being temporarily "bent" out of place as cornering forces try to push the wheel to one side. It also keeps the two opposing wheels from moving out of place relative to each other - keeping the two struts connected together helps this. The net effect is an improvement in cornering and in suspension "feel". Most DSMers report improvements after installing a brace.
Most braces are adjustable. Since the bar can be lengthened or shortened (put under tension or compression) most new owners are concerned about adjusting the brace "correctly". The method of installation doesn't seem to be too important. Most people shorten the bar to tension it up - the bars are likely stronger under tension than compression. However, for rear braces, one may want to extent the bar to try and keep the rear tires as flat as possible during hard launching. It doesn't really seem to matter a whole lot as long as the brace firmly connects both strut towers together.
The Last Word: According to non-DSMers, the typical DSM strut tower brace is useless. Firstly, there are hinges on either side, which allows the brace to pivot independently of the chassis - which totally defeats the purpose of the brace. Secondly, the brace midpoint is never attached to the engine bay firewall. "Real" braces are attached to the engine bay wall and are a single monolithic part. Real result or placebo effect? We'll never know.
FAQCHK
QA #87
Last Updated:
2016-06-01 11:54
What are coil-overs/coilovers?
A coilover is an automobile suspension device. "Coilover" is short for "coil spring over shock". It consists of a shock absorber with a coil spring encircling it. The shock absorber and spring are assembled as a unit prior to installation, and are replaced as a unit when the shock absorber has leaked. This provides damping without torsional loads. Some coilovers allow adjustment of ride height and preload, using a simple threaded spring perch similar to a nut. More advanced adjustable coilover systems use a threaded shock body, along with an adjustable lower mount for ride height adjustment, while an adjustment knob is used to adjust damping. Stiffness is changed by switching the spring for one with a different spring rate.
Src: https://en.wikipedia.org/wiki/Coilover
QA #88
Last Updated:
2016-06-01 11:55
What is an 'eccentric' bolt?
In mechanics, an 'eccentric' isn't a nutcase billionare - is something that has an off-center hole in it. For example, take a small wheel, with a mounting shaft run through it. In a regular wheel, the shaft runs through the center. An eccentric wheel is just like a regular wheel, except the shaft doesn't run through the center; it runs through an off-center hole.
An eccentric bolt is usually a bolt with a collar on it. The bolt shaft is tapered in the middle to run through the collar, so the bolt is thinner in the middle and thicker at the ends. The collar has an off-center hole in it and is free to rotate.
As can be seen in this sketch, an eccentric bolt allows adjustment through rotation. As the bolt assembly is rotated, the collar moves further off-center. This property is what makes eccentric bolts useful for adjusting and aligning different connected parts. They are frequently used in DSMs and other automobiles for suspension adjustments.
See also: https://en.wikipedia.org/wiki/Eccentric_%28mechanism%29
QA #89
Last Updated:
2016-06-01 11:55
What is a 'banjo' bolt?
A "banjo" bolt is a hollow bolt used in conjunction with "banjo fittings" to connect fluid lines together. Such bolts are used in the DSM fuel and oil systems. The fuel system bolt in particular is considered a restrictive element. Pictures of banjo bolts can be found on the wikipedia banjo fitting page.
QA #90
Last Updated:
2016-06-01 11:56
What is blow-by?
Blow-by is the leaking of combustion gases past the piston rings and into the engine block. All engines have some blow-by, since piston rings can never seal perfectly. Most cars have a vent (the positive crankcase ventilation valve, or PCV valve) which lets these gases out of the engine block while keeping (most) of the oil in.
Read Jack's Transmissions PCV article.
On DSMs, the PCV valve is connected via a hose to the air intake. Since oil leaks out of the PCV valve, oil gets into the intake and usually gums up the inside of the intercooler. Many DSMers remove the connecting hose to correct this problem. To prevent oil spraying into the engine compartment, they also install either a filter or a catch can [[What is a catch can?]] in place of the PCV valve.
QA #91
Last Updated:
2016-05-30 09:05
What is 'crank walk'?
Similar Questions:
What is a 'walking' crankshaft?
Is there a recall or TSB regarding the crank walk problem?
How can I tell if my car has a walking crankshaft?
A 'walking' crankshaft is a crankshaft that moves too much inside the engine. This is also known as excessive thrust bearing play. The movement is usually due to the crankshaft not fitting inside its bearings correctly. While not bad for the crankshaft, the movement can place excessive or uneven loads on the bearings, causing premature failures.
Many 2G owners have suffered from walking crankshafts. It appears that Mitsubishi built many 2G engines using defective crankshafts, which were machined out of specification and are thus capable of moving around too much inside the block. All 2G model years appear to be affected to some degree.
To fix this problem, Mitsubishi has designed several versions of matching crankshaft bearings. This allows the defective motor to retain the crankshaft, yet matches the bearings correctly so as to eliminate the excessive crankshaft movement. Matching the bearings in this manner is tricky and requires exact information about when the crankshaft was manufactured, which may be determined by color markings on the crankshaft itself. The 2G factory manual includes information on how to match crankshafts to bearings.
1G owners do not generally need to worry, as there are no chronic problems with crankwalk in per-1995 cars. However, it is possible for any engine to experience crankwalk if there is a problem with the crankshaft bearings. It has been reported that 'small rod' / 7-bolt flywheel motors (manufactured from later 1992 through 1994 on 1Gs) are more prone to crankwalk than 'big rod' / 6-bolt flywheel engines (manufactured from 1989 to early 1992). However, there can be no guarantees, since big block V8s and all other engines can also suffer from crankwalk.
It can be difficult to tell if a particular car is experiencing crankwalk. Symptoms are usually indirect and difficult to diagnose until major damage occurs.
Since the clutch places pressure on the crankshaft, many owners have reported clutch or shifting problems associated with the walking crank. Having the clutch 'stick' down on left-hand turns is often a telltale sign of crankwalk. Other symptoms include inconsistent engagement height, poor or rough engagement, difficulty shifting, ticking noises and varying pedal height or pressure. Another possibility is having the engine RPM decrease significantly when the clutch pedal is down.
Another problem with crankwalk is that the crankshaft may move so much as to literally tear up and destroy the 2G crankshaft angle sensor. This problem usually manifests itself as a ticking noise coming from the timing belt area, as the sensor is literally and slowly ground away by the crankshaft. Any such noise should be investigated right away to prevent serious problems.
Unfortunately, cranshaft angle sensor failure usually leads to a replacement sensor, rather than a replacement crankshaft, as mechanics fail to diagnose the underlying problem. 2G owners who have experienced premature failure of the crankshaft angle sensor should investigate the possibility of a walking crankshaft immediately.
Here is a video that Jafromobile made and his take on Crankwalk
For more information, read Road Race Engineering's archive of posts that contains all of the Talon Digest posts about the walking crankshaft problem.
Although 2G DSM owners have been anxiously awaiting a recall or TSB on the crankwalk problem, there is none as yet. It is doubly important that affected 2G owners get their bearings (or blocks, if necessary) replaced before their warranty expires. This might be difficult for owners of aftermarket clutches, as dealerships often claim the aftermarket pressure plates are the cause of the problem.
QA #92
Last Updated:
2016-06-01 11:59
What is a Galant / Galant VR-4 / GVR4?
The 4-door sedan member of the DSM line. The VR-4 model shares the same unusual AWD drivetrain as the other DSMs, as well as the turbocharged 4-cylinder Mitsubishi engine. There was also an unusual GSX model, which had the AWD drivetrain driven by a non-turbocharged engine; something you could not get in Eclipse, Talon or Laser cars. The VR-4 also came standard with an all-wheel steering that is unique among the DSM family. More details are available here.
The Galant is no longer in production.
Read more: https://en.wikipedia.org/wiki/Mitsubishi_Galant
QA #93
Last Updated:
2016-06-02 12:01
What is an Eclipse CT?
The Eclipse CT was a cabriolet (convertible) concept model of 1G DSM that may have been shown in Europe in the 1990s. It was never mass-marketed, and DSMers had to wait until the 1995 model year before a convertible model was introduced.
Information on the CT is extremely limited. It is not known for certain if the car was ever built at all, aside from a bare few concept cars. However, according to Johannes Schweidler, the car may have been marketed in 1994 in Germany. All of the available literature appears to be in German, which supports this conclusion. However, it was also made in the 1990-1991 body style (with pop-up headlights) which would have been unusual for a DSM marketed in 1994. He also never saw one, which indicates they might not have been sold after all.
This car may have been the precursor to the 1996 Spyder convertible. Kris Kjelstrup also mentions a 1G convertible concept car on display at the DSM plant. Mark Luttrell has also confirmed that a hand-assembled commemorative Eclipse CT was on display in a Mitsubishi factory in celebration of the one millionth car produced there; unfortunately, photographs were prohibited.
If we assume this display concept is an Eclipse CT, we can conclude from posts that the CT was a FWD car. It also seems likely that it used the turbocharged 4G63 engine, as well, since concept cars tend to pack a lot of power.
Unfortunately, some of the on-line information on the CT has already become unavailable. For an idea of what the car is/was like, take a look at these technical drawings.
QA #94
Last Updated:
2016-05-30 11:11
What is a Lancer / Lancer EVO / Lancer Evolution?
https://en.wikipedia.org/wiki/Mitsubishi_Lancer_Evolution
Update: As of the 2002 model year, the Lancer is now sold in the U.S.A., but it is not the "Evolution" version. Rather, it is a 120 hp family sedan.
For the 2003 model year, Mitsubishi made the Lancer Evolution VIII available in the USA. It is not available in Canada owing to stricter crash safety regulations, but the next iteration should be available in Canada.
The Lancer came to America some time ago, in the watered-down Toyota Camera-esque form. Recently, Canadians now have the option of buying the Evo. There is a rumour 2015 will be mitsubishi levo's last year.
The Last Word: It's 2016 and there are no new GSR / MRs in sight. Goodbye Evo.
QA #95
Last Updated:
2016-06-02 12:04
What is a Dodge 2000 GTX?
This car is the same as a Galant GSX - a non-turbo AWD sedan. There is little other information available; you can read this description provided by About.com and Allpar. It should be noted that the engine used in the "mighty" versions of the DSM family is presumably the 200 HP 2.0L turbo, not the 135 HP 2.0L non-turbo used in the 2000GTX family.
QA #96
Last Updated:
2016-06-02 12:05
What is a CFDF?
CFDF stands for Centerforce Dual-Friction, a popular clutch upgrade for DSMs. See the Centerforce web site for details.
QA #97
Last Updated:
2016-06-02 08:51
What is a ACT 2100?
Similar Questions:
What's the correct ACT part number for the ACT 2100?
What is an ACT 2600?
What's the correct ACT part number for the ACT 2600?
The ACT 2100 and 2600 are clutches manufactured by Advanced Clutch Technology. They are popular clutch upgrades for DSMs.
Unfortunately, the 2100 and 2600 designations don't match the part numbers shown on their website. The correct part number for the ACT 2100 kit (disc and plate) is MB1-HDSS; the ACT 2600 kit is the MB1-XTSS. Check out the kits for the part numbers of the respective friction discs and pressure plates.
QA #98
Last Updated:
2016-06-02 09:13
What is a 6-bolt engine?
Similar Questions:
What is a 7-bolt engine?
A 6-bolt engine is one that has a 6-bolt flywheel - that is, there are 6 bolts holding the flywheel to the crankshaft. A 7-bolt motor has 7 bolts there.
Along with the flywheel change, there are many other internal changes between the two engines. The crankshafts are different sizes, as are the rods and crankshaft seals. 6-bolt motors have 'big' rods, while 7-bolt engines have 'small' rods. The journal and bearing widths different, although the bearing diameters are the same.
There may also be other changes between the two engines, and the parts are not interchangeable.
QA #99
Last Updated:
2016-06-02 09:47
What is a 3-bolt rear axle/rear end?
Similar Questions:
What is a 4-bolt rear axle/rear end?
3-bolt rear axle assemblies have 3 bolts attaching the axle to the wheel hub. 4-bolt axles have 4 bolts, as well as beefier axle cups, and are therefore far stronger. See Tom Stangl's 3-bolt to 4-bolt conversion VFAQ for lots of great information. You can also read the answer to How can I tell if my car has a 4-bolt rear end? in this FAQ.
QA #100
Last Updated:
2016-06-01 01:46
What is 'Satan'?
Similar Questions:
Why are dealerships nicknamed 'Satan'?
Mitsubishi and Chrysler dealerships have earned the nickname 'Satan' over the past two decades by the DSM membership. This is because of the numerous horror stories circulated by reliable individuals concerning the quality of service provided by these dealerships. Also, the high cost of factory replacement parts contributed to the name. Apparantly, even the coveted 5-star service rating is no defense against various forms of service stupidity.
In all fairness, not all dealerships deserve the nickname 'Satan'. Some, like Talahassee Mitsibishi in Tallahassee, FL, have offered substantial discounts on factory parts to the Club DSM membership. Many other owners have reported good to excellent service from their local dealers. As with all things, your mileage may vary (YMMV).
Nevertheless, this particular term of endearment is reserved solely for those specific dealerships which provide bad service.
It is always best to shop around for parts and do your own mechanical work on your car. Unless you are rich.
QA #101
Last Updated:
2016-06-02 09:51
What is the 'blue book'?
Similar Questions:
What is a 'blue book' price?
'Blue book' refers to Kelley's Blue Book, a pricing guide that lists the actual dealer costs, manufacturer's suggested retail price (MSRP), shipping costs, and other pricing information on new cars. The 'blue book price' usually refers to the actual price the dealer pays the factory for a vehicle.
It should be noted that car dealerships don't often use the Blue Book for pricing information. They usually use the National Automobile Dealer Association (NADA) guide. It has been suggested that the Kelley Blue Book listings are not accurate.
Although few people realize it, the blue book is now online at www.kbb.com; the information gleaned from this resouce can be a powerful ally in negotiating a fair price with a dealer. Copies of the 'blue book' and other valuable auto pricing resources can also be found at most public libraries in the reference section.
QA #102
Last Updated:
2016-06-02 05:05
What is the 'red book'?
Similar Questions:
What is a 'red book' price?
'Red book' refers to the Automotive Red Book, a pricing guide that lists the selling prices of used automobiles. Less well-known than the 'blue book' the 'official' red book is generally only available in libraries. (There is one online version, but it's for Australia.) Look in the library reference section to find it, and remember to have a few quarters for the photocopier handy.
Paradoxically enough, the Kelley's Blue Book website offers pricing information on used cars, as do lots of other buying guides online, making the 'red book' less valuable than it once was.
QA #103
Last Updated:
2016-06-02 05:07
What is speed shifting?
Similar Questions:
What is power shifting?
What is no lift to shift?
Speed shifting (No Lift To Shift) is when you shift without letting up on the throttle. Usually you bounce off of the 7500 RPM rev limiter.
ECMLINK now provides a no lift to shift feature slightly reducing the strain while speed shifting. The rev limiter is lowered to your preset when you push the clutch in instead of bouncing at 7500rpm or higher.
Power shifting is when you shift without letting up on the throttle, and without using the clutch. It can be done, but is very hard on the transmission. Most people who do this become expert transmission rebuilders (or simply broke, or both) in a short period of time. Most Dogbox manufacturers don't even recommend no clutch and recommend a blip of clutch. (cut load for a brief second)
QA #104
Last Updated:
2016-06-03 07:13
What is 'heel-and-toe' shifting / downshifting / braking?
'Heel-and-toe' shifting is a driving technique that allows the driver to clutch, brake and keep the engine RPMs at a certain level, all at the same time. It is a useful racing technique that allows a driver to downshift without losing speed (or control of the car), expecially when entering corners.
The problems facing a driver when approaching a hard corner at high speed are numerous. Firstly, they want to approach the corner at the highest speed possible, and brake at the last moment, to achieve the fastest entry. Secondly, they need to carry as much speed as possible through the corner, often riding on the very edge of losing control over the car. Thirdly, they need to shift gears downwards in order to select the correct gear for the duration of the corner, as well as allowing maximum power on corner exit. Fourthly, they must ensure that when they shift gears, the engine speed is high enough to allow the new gear to engage without adversely slowing down or speeding up the drive wheels. Failure to accomplish this last point may mean a loss of control - remember, the car may be on the ragged edge, and if the engine forces the wheels to change speed the car may begin a skid or spin from which the driver cannot recover.
While this would normally take three feet - one for each pedal - to clutch, brake, and accelerate all at the same time, ordinary two-legged people can accomplish this by twisting their right foot into a position that allows it to touch both the brake and gas pedals at the same time. While several different positions are possible, most people adjust the foot so that the toe is on the brake, and the heel is on the gas - hence, 'heel-and-toe'. Some drivers prefer to have their right foot 'straddle' the brake and gas, using the sides of the foot to control pedal movement. The exact position depends on the driver and the pedal configuration in the automobiles - some cars are better set up for heel-and-toe than others.
In this position, the driver can brake (right toes) into the corner, clutch (left foot) and shift gears, and hit the gas (right heel) to bring the engine speed up to the desired level. He can then declutch and enjoy a smooth transition into the selected lower gear, reducing or eliminating the risk of a rough engagement that might upset the automobile. From that point, the feet may return to their normal driving positions, and the driver can brake, cruise, or accelerate as the situation demands.
Heel-and-toe shifting, while simple in theory, can be very hard in practice. Drivers must practice a great deal to achieve the necessary coordination. Also, some cars have pedal arrangements that make heel-and-toe shifting difficult. Missed shifts are common for the novice, as is grinding gears. Loss of brake or steering control is also possible, especially when practicing high-speed turns, and can result in very dangerous situations. It is highly recommended that anyone interested in this technique take a specialized driving course, and practice in a venue away from ordinary traffic.
Once mastered, heel-and-toe shifting can make even ordinary driving more enjoyable. Some DSMers have commented that heel-and-toe shifting is not a racing technique - rather, they feel it is the proper way to drive a manual transmission car. Regardless, it can be a useful technique for street driving, although normally only racers need concern themselves with it.
For more information on heel-and-toe on DSMs, try this Heel Toe Video (or search youtube for heel toe).
QA #105
Last Updated:
2016-06-02 05:23
What does 'rice' refer to?
Similar Questions:
What is a 'riceboy'?
The terms 'rice' or 'riceboy' are slang terms used to describe visibly modified import model automobiles and their owners. It is used to point out the cosmetic, rather than functional, nature of the vehicle modifications.
'Rice' was apparantly first used in the 1970s when high-powered Japanese sport bikes became available. In that context it was usually well-intentioned and not considered derogatory.
The application of the term 'rice' to import cars was derived from the fact that aggressive cosmetic enhancements were first applied to import automobiles. These cars originate from countries where rice is a staple food. Additionally, these import automobiles were popular among asian owners, who preferred the asian cars over those of American manufacture. So, by extension, 'riceboy' originally referred to an asian owner of such a modified automobile, and was considered by most to be racist. (This probably explains why the term 'ricegirl' never appeared - people are not likely to be politically correct about a politically-incorrect term.)
In addition, these terms hinge on the presence of cosmetic rather than performance improvements. Cars which exhibited primarily or purely cosmetic enhancement, with little or no performance enhancement, may combine aggressive looks with mediocre performance. Referring to these cars as 'ricey' was often meant to be insulting or derogatory by silmutanously pointing out the 'inferior' nature of the vehicle as well as the owners preference for style over substance.
Fortunately, the term 'ricey' has outgrown it's original meanings. The term is now in widespread use on the Talon Digest as referring to any owner of any cosmetically modified car, regardless of their ethnic background, and is no longer intended as a racist slur. It is also no longer used to express disdain for cosmetic improvements, as the general membership has come to recognize that different owners want different things.
Some owners even take pride in their pursuit of aggressive style. Many DSMers are happy to call their cars 'ricey', or 'rice-burners', with some going so far as to install gauge sets that list 'rice' instead of 'fuel'. They express pride in their DSMs ability to match performance and looks against American-made V8 powerhouse automobiles with literally half the engine.
While few performance automobiles are completely without cosmetic enhancements, not all are considered 'ricey'. In general, the more obvious, exaggerated or overstated the cosmetics, the more 'ricey' the car is. Recent trends in import automobile circles have yielded some cosmetic features that are humerous even to their owners, being obvious, obnoxious and useless all at the same time. (One good example recently seen is an Nissan Sentra equipped with a ten-inch exhaust tip which resembles nothing so much as a rocket exhaust projecting out of the rear of the car.)
Please note that because of irreconcilable differences of personal opinion, discussion about the value of performance vs. appearance is not part of the Talon Digest and is generally discouraged on other forums as well. Also, because of it's emotionally-charged heritage, use of the term 'riceboy' should be approached with caution, lest the target accidentally misinterpret the intended meaning.
QA #106
Last Updated:
2016-06-03 08:29
What is a datalogger?
Similar Questions:
Where can I get a datalogger?
How does the datalogger work?
Can I build my own datalogger?
A datalogger is a device that monitors and records information for you. Dataloggers are often used on racing vehicles, to provide the tuners with better information from which to base tuning decisions.
Although there are several dataloggers available for DSMs, most people who refer to a 'datalogger' mean the TMO datalogger fromTechnomotive, although some might be referring to the Pocketlogger or DSMlink. These extremely useful devices recieve and interpret a continuous stream of information from the DSM ECU, allowing a 'sneak peek' into the 'thinking' of the car.
These products operate using proprietary software and hardware to collect, interpret, analyze and display the ECU information. To do a similar job, a device would have to know the format of the information output by the DSM ECU.
Specific information concerning DSM ECUs and their output format is not in the public domain and might only be found by deciphering the DSM ECU code. Advanced tuners have agreed that the 1G DSM uses the ALDL (Assembly Line Data Link) interface similar to many General Motors cars. For more information on ALDL, see this answer in this FAQ.
2G vehicles use the OBD-II system, which is not compatible with ALDL. The OBD-II system was adopted as an industry standard on later model cars. However, the OBD system is slower and has less information available as compared to the proprietary solutions.
It is possible to create a datalogger to monitor the same information that commercial datalogging systems provide. However, to create a comprehensive standalone system capable of matching the TMO logger, Pocketlogger or DSMlink in capability is a formidable task for most people. The job has recently been simplified as freeware datalogging software and ready-made cables have become available.
Those interested in the details of DSM datalogging may find the Pocketlogger FAQ and Technomotive's Datalogger 101 guide helpful.
The Last Word: TMO is long gone, but you can still buy Pocketloggers. At least until all the serial-port Palm units die - there doesn't seem to be a ALDL-to-USB device available (yet?).
QA #107
Last Updated:
2016-06-03 08:31
What is TMO?
Similar Questions:
What is a TMO ECU?
What is a TMO datalogger?
TMO is the conventional contraction and website address for Technomotive, the first company to ever produce effective, customized chips for DSMs and to manufacture a DSM datalogger. A TMO ECU is an ECU that has been modified with one of the TMO upgrade chips. The TMO datalogger is a laptop-based data acquisition and recording device for DSMs. For more details, visit their website.
The Last Word: TMO stopped selling chips a long time ago. Anyone who claims to be selling their stuff under license is not telling the truth. Please visit ECMTuning and buy ECMLINK
QA #108
Last Updated:
2016-08-08 01:21
What are TMO gauges?
TMO gauges are a feature of the Technomotive ECU upgrade for DSMs. The upgrade reprograms the useless stock boost gauge on turbo models to display any of five different measurements, such as timing advance and injector duty cycle.
The Last Word: TMO stopped selling chips a long time ago. Anyone who claims to be selling their stuff under license is not telling the truth. Please visit ECMTuning and buy ECMLINK
QA #109
Last Updated:
2020-01-24 12:49
What is a Pocketlogger?
A Pocketlogger is a datalogger that runs on the Palm computing platform. Aside from operating on a Palm and not a laptop, it is substantially similar to the TMO datalogger described above. More information can be found at the Digital Tuning web site.
QA #110
Last Updated:
2016-08-08 01:25
What is a DSMlink?
Similar Questions:
What is ECMLink?
DSMLINK is now known AS ECMLINK.
Palm DSMLink can no longer connect to the ECU since V3.
ECMLINK is a tuning and datalogging product for the DSM Platform. Not just another OBD-II datalogger, DSMlink includes a new ECU chip that allows the factory ECU to be programmed and effectively communicate. ECMLINK is now a PC (Windows/Linux) only software written using Java.
Additionally, it allows the ECMLINK application to re-program the ECU "on-the-fly" to a certain extent, giving the operator additional flexibility by allowing changes to the onboard ECU fuel and timing maps.
The DSMlink is limited by the fact that it requires an EPROM ECU. 1G version has been developed. 2G has been supported for many years.
If you have any questions regarding ECMLINK, visit ECMLINK Contact Us
QA #111
Last Updated:
2016-11-23 11:23
What is ALDL?
ALDL is an acronym for Assembly Line Data Link. It is a one-wire interface used to connect the engine control unit (ECU) to diagnostic computer systems for diagnosis and troubleshooting.
1G DSMs use a version of the ALDL interface. All 1G dataloggers are designed to connect to the interface and interpret the information. 2G vehicles do not use ALDL, they use OBD-II (see below).
DSM enthusiasts did not recognize the ALDL interface for what it was until fairly recently. Because of this the GM hobbyists have much more information available on how ALDL works. There may be differences between the GM ALDL format and the DSM ALDL format since ALDL is not a formalized standard. For more information on ALDL, see these links:
QA #112
Last Updated:
2016-08-08 01:28
What are fuel trims?
"Fuel trim" in the ECU is the ECU's method of tuning individual cars.
In theory, the ECU reads the amount of air entering the engine via the mass airflow sensor (MAS) in the air intake. It will then add the proper amount of fuel through the injectors, ensuring a good burn, low emissions, etc.
However, while that works in theory, it rarely does in practice. MAS sensors vary, even when calibrated, even if only due to age. Injectors become clogged, fuel and turbo pressures can vary, parts wear or are replaced.
The way to compensate for the individual car-to-car variations is through fuel trim. By checking the oxygen sensor, the ECU can "check" if the amount of fuel it added was too high or too low. It will then add or subtract fuel in small increments depending on what it "sees". It "remembers" these adjustments and averages them over a period of time, resulting in a "trim" factor. The fuel trim is constantly applied and adjusted.
There are three fuel trims on DSMs: low, medium and high. These refer to the mass of air entering the engine, and only roughly correspond to RPM ranges. Low applies mostly to idle (750-1000 RPM), high in the 3000-4000 region, and middle in between.
Users of Super-AFC and similar units usually try to adjust their AFCs so the fuel trims are near 100%. This is mostly to provide a baseline of settings for future tuning - it means the AFC settings are "fooling" the ECU into "thinking" the car is still stock (or near stock). It also allows the ECU a lot of range to adjust the fuel trims as necessary.
Fuel trims have no effect at open loop (high RPM or hard accelleration). In this situation the ECU is ignoring the oxygen sensor and there is nothing to trim. Datalogger owners will see their fuel trim "stick" at 100% in open-loop situations.
Those interested in the details of DSM datalogging may find the Pocketlogger FAQ and Technomotive's Datalogger 101guide.
For ECMLink Users, view Tuning with ECMLink article
QA #113
Last Updated:
2016-08-08 01:32
What is the
The "blue wire" modification involves taking the blue wire from the AFC - normally unused on DSM installations - and connecting it to the oxygen sensor. The blue wire is a sensor check connector from the AFC that allows it to display the oxygen sensor reading. Kind of a free A/F gauge. The AFC does not change anything based on this "blue wire" input, it can only display it.
While quite popular initially, evidence is growing that the AFC accessory sensor inputs are not suitable for this kind of connection. Many people have reported that connecting the blue wire to the oxygen sensor artificially lowers the oxygen sensor signal by a significant amount. This is entirely possible since the AFC sensor inputs might not have been designed to be connected to low-power sensors such as the DSM oxygen sensor.
Still, it is a popular modification for those who want an unobtrusive way of keeping an eye on the oxygen sensor without actually using it as a serious tuning tool. Many DSMers scorn the idea of tuning by O2 reading in any case, as it is most likely the least accurate - though most certainly the least expensive - method available.
AFC owners should check out the Super-AFC-DSM mailing list on Yahoo! Groups. You need a Yahoo! ID since membership is now restricted. To join, click here.
The Last Word: This mod is cute, but useless. Use for entertainment value only.
QA #114
Last Updated:
2016-08-08 01:35
What is the
The "MAP sensor" mod connects a manifold absolute pressure (MAP) sensor to the AFC throttle input. The goal is to make the AFC load-sensitive rather than RPM-sensitive. As the boost level increases, the AFC can deliver more fuel accordingly. For more information, see this VFAQ by Corbin Behnken.
Here is a summary of the mod:
" Lots of questions about this mod. So here is a summary.
Why? Turn the Hi/Lo throttle reference for the NE points on the SAFC into boost references and not throttle position dependent. This makes the SAFC engine load sensitive.
How? Buy 3 bar sensor GM Part # 16040749 at http://www.gmpartsdirect.com/
wire Pin A = Ground - on firewall
wire Pin B = Sensor output, cut the gray wire that previously attached the ECU's throttle position terminal, and wire the sensor output to this wire of the SAFC
wire Pin C = +5v, recommend throttle position sensor wiring harness - turn ignition on and use a multimeter to find it.
The map sensor has special 3 pin weatherpack connector, these are available from the junkyard or the wiring accessory section of any good automotive store. Get the one with pigtail wires, usually these connectors have internals alignment grooves - shave with knife to fit. Splice into your boost gauge (manifold pressure and vacuum are necessary) with a 1/4" tee and run hose to the sensor nipple.
Drive car and observe the voltage on the SAFC that the sensor makes at max boost. Let's say YOUR car makes 19psi boost and the corresponding sensor output voltage is 4.1v , take 4.1 divide by 5.0 (max sensor output) and the result is 0.82 or 82% This is your Hi Throttle NE point on your SAFC. Set the Lo Throttle similarly. I used a sensor voltage of 1.15v, which corresponds to slightly above -5 in Hg. and is usually not seen at 70mph cruise, thus 1.15/5.0 = 0.23 or 23%. The Lo Throttle NE point is now 23%. I am still working on tuning this in. I pick up some part throttle knock under light acceleration, but mash it to the floor and it works very very well. The upper rpm is better than before I did this mod. I will make a VFAQ page for this someday.
QA #115
Last Updated:
2016-08-09 08:49
What are Altezza tail lights?
"Altezza" lights are rear brake lights that have a clear lens overtop of round red lamps. This unique look was apparently first marketed by Toyota in Europe on it's Altezza model sedan, and is sometimes referred to as "European Altezza" or simply "Euro-style" lamps. The Altezza was marketed in North America as the Lexus IS300, but the "Altezza" name stuck once the brake light design was adapted to other cars - probably because it sounded better than "IS300-style".
Please see Has anybody ever installed "Altezza" brake lights on their [DSM]? for information regarding the legality of Altezza lighting systems.
QA #116
Last Updated:
2016-08-09 09:10
What are AN fittings?
"AN" fittings are a standardized system for tubing and fittings originally created for the U.S. military (Army-Navy). Designations such as AN-8 are Army-Navy sizes. In theory, fittings and parts with the same AN size will always fit together.
For a given AN-x size, take x/16" to get the simple imperial size. For example, an AN-8 fitting is 8/16" (= 1/2") big. An AN-4 fitting is 4/16" (= 1/4") big.
Sizes refer to the outside size only. The inside size (bore) of AN fittings is not standardized, so some parts will have a smaller inside diameter than others.
AN fittings are sometimes used in the automotive world as upgrades to existing factory parts. In the case of DSMs, the metric-to-AN adapters can sometimes be hard to come by. Some people substitute combinations of metric-to-NPT (national pipe thread) and NPT-to-AN fittings - both types are airtight when torqued correctly.
QA #117
Last Updated:
2016-11-21 10:10
What are 4.8 / 8.8 / 10.8 / [and similar] bolts?
These are strength designations for metric bolts. DSMs, being primarily Mitsubishi cars, use metric fasteners.
Metric bolt strength is designated by 2 numbers separated by a decimal. The first number is the minimum tensile ultimate strength: the resistance to fracturing, given in megaPascals (MPa). The second number is the minimum tensile yield strength: the resistance to deformation, and is rated as a percentage of the first number. Thus, a 10.8 bolt has a 10 MPa ultimate strength, and a yield strength of 0.8 (80%) of that number (= 8 MPa). Generally, the higher the better.
For more detail on the differences between ultimate and yield strength try this chapter of the material sciences guide at tpub.com.
For a table of typical fastener grades, try here.
QA #118
Last Updated:
2016-08-09 09:38
What is a roll cage?
Similar Questions:
Has anybody ever installed a roll cage on to a [DSM]?
Where can I get a roll cage?
A roll cage is a rigid metal frame installed inside a vehicle to protect the occupant(s) in the event of a rollover accident. It is a commonplace requirement for many racetracks to require a roll cage for cars that participate in racing events. Fortunately for amateur racers, roll cages are usually not required unless your car is quite fast. Roll cages usually have to meet specific requirements laid down by one or more sanctioning bodies and pass inspections to that effect.
Dale Hammons had the following to say regarding roll cages (edited for appearance only):
"Keith Sontheimer asks about roll cages. As an SCCA tech inspector I have seen a lot of roll cages. The best ones are made by businesses that build tube frame race car chassis or prepare cars for racing. The tube frame chassis people are every where. If you can't find them in any other way go to a local race event find a car with good workmanship and ask the owner who did it.
To get a cage that meets your expectations on final appearance and function you need to have a full understanding of what is needed by the sanctioning body that you are having the cage built to. This will dictate tubing size and wall thickness. Make sure the roll cage fabricator has a copy of your sanctioning bodies requirements. He may not be familiar with your form of racing. How many attachment points are required or allowed. You need to realize what trim items must be removed and modified to accommodate the roll cage (especially dash and rear seat).
Be prepared to modify or add to the cage after its first inspection because you will probably miss something. Get the cage inspected before its painted and all the trim items are back in place in case changes are made.
Your question (ease of installation, cost, quality, ease of exit/entry, etc.)? Bolt in cages are relatively easy to install, relatively inexpensive, tend to be ugly, will need parts added to pass inspection. Welded in cages are a time consuming installation, probably cost around $2000, will look as good as the workmanship used. Ease of entry: all cages reduce ease of entry, as more LH intrusion protection is added the ease of entry decreases."
QA #119
Last Updated:
2016-08-09 09:40
What exactly is a DSM?
Technically, a DSM is a car built by Diamond Star Motors, a joint effort by Mitsubishi (three diamonds) and the Chrysler Corporation (penta-star) to build some of the most incredible automobiles in the world. The vehicles were produced with the names Eagle Talon, Mitsubishi Eclipse, and Plymouth Laser. DSM cars are assembled in Normal, Illinois. The '94-and-up Mitsubishi Galant is also assembled at the DSM plant in IL; previous Galant's were assembled in Japan. The Eclipse and Galant (since '89) share the same platform..
[Note: From time to time, debates on the definition of a 'DSM' emerge on the Digest. These debates usually center around a record-breaking car which, because it does or does not have a certain component or feature, 'should' or 'should not' be considered a 'DSM' in the 'true' sense of the word.
Such judgements are entirely subjective and cannot be resolved, except by arbitrary rules; resist the temptation to reopen any such debate on the Talon Digest, as the moderator (and membership) are tired of hearing about it. All race results that can reasonably be deemedrelated to DSMs are reported - whoever is king in your own mind is best kept to yourself.]
In further news, the now-merged DaimlerChrysler corporation purchased a 34% stake in the now-ailing Mitsubishi Motors corporation in April, 2000. This is not to be taken as a re-emergence of DSM, however - the DSM marque is now consigned to the pages of history.
QA #120
Last Updated:
2016-08-09 09:42
What happened to DSM?
Similar Questions:
What happened to Eagle?
Diamond-Star Motors was officially dissolved in 1993 after the design and production tooling for the 1994 and 1995 cars was complete. Mitsubishi Motors continues to operate the plant formerly responsible for DSM cars under sole ownership.
The "Eagle" brand name was originally created as a method of integrating AMC dealerships and products into Chrysler. It continued for some time as a marque, much as General Motors now continues to market under several brand names. It was eventually discontinued as Chrysler sought to improve their business operations. For more information, go to eaglecars.com.
QA #121
Last Updated:
2016-08-09 09:43
What is a 1G?
Similar Questions:
What is a 2G?
What is a 3G?
What is a Y2K Eclipse?
These terms are acronyms for the 'generation' of car. 1Gs (first generation) were built in the model years 1990-1994, 2Gs in 1995-1999, and 3Gs in the year 2000 onward. The Y2K Eclipse is the year 2000 Eclipse.
QA #122
Last Updated:
2016-08-09 09:44
What is a Spyder?
A Spyder is a convertible Eclipse only sold by Mitsubishi. It was introduced for the model year 1996 with non-turbo 2.4L and turbo 2.0L engines available. These cars are FWD only - there is no AWD version. Production was continued through the 1999 model year.
Note that the name 'Spyder' was also used on the Mitsubishi 3000GT convertible.
QA #123
Last Updated:
2016-08-09 09:44
Are 2Gs (second generation, 1995+ cars) really DSMs?
[Note: this information applies only to the definition of a 'DSM' as used for the purposes of the Talon Digest, and does not reflect the personal opinion of any individual.]
2G cars are considered DSMs because they are direct descendants of the original DSM cars. Although they were technically not built by Diamond Star Motors, their connection to the original line is unmistakable, as they share the name, trim levels and original intention of the 1G cars.
Also, some early 95 cars have DSM labeling on them, leading many to believe that all 2Gs were built by Diamond Star Motors. This is not the case, as Diamond Star Motors officially ceased to exist in mid-1993, when Chrysler sold off all of its Mitsubishi holdings, technically making the 1994 cars the last of the DSMs. This type of hair-splitting is not important for Club purposes, however, and the Club has decided that 2Gers have as much right to be included as earlier owners.
The Galant VR-4 is something of an oddity in the club, but the VR-4 shares many important components with the 1G cars, including the unusual AWD drivetrain. It can be argued that the Galant VR-4 is the "parent" of all DSMs: the original concept for the DSM in North America was a four-door. Also the VR-4 platform was originally concieved to be Mitsubishi's entry into the rally racing circuit before DSM existed.
A similar situation exists with the 2G Spyder convertible, but it's connection with the other 2G cars is unmistakable. Thus the Spyder and VR4 are included in the scope of the Talon Digest.
Other pseudo-related cars, such as the non-USA Lancer and Mirage, are not included in the Digest.
The Last Word: C'mon guys, we're all brothers by now
QA #124
Last Updated:
2016-08-09 09:45
Are 3Gs (third generation, 1995+ cars) really DSMs?
[Note: this information applies only to the definition of a 'DSM' as used for the purposes of the Talon Digest, and does not reflect the personal opinion of any individual.]
The relationship between the 1G, 2G and 3G cars can be summarized as follows:
- 3Gs were not built by Diamond Star Motors, which was dissolved in 1993,
- they do not have the same engine lineup as the 1990-1999 cars,
- they do not have the same transmission lineup as the 1990-1999 cars,
- they share few parts with the 1990-1999 cars,
- they share few upgrade parts or upgrade paths with the 1990-1999 cars.
Please note that the diference in external appearance between 1G/2G cars and 3G cars was not a factor in making this determination. The moderator simply feels that to introduce discussion of a largely different car into the Digest will result in a fragmented version of a list which has already expanded well past the most optimistic expectations. There is no denying that most of the past and present discussion on the Talon Digest will have little to do with 3G cars It also seems unreasonable to expect future discussion on 1G/2G cars to be of interest to 3G owners because their cars have different engines, upgrades, and problems than previous models.
Owners of 3G cars need not despair. Check out Club3G, focused on modifying and maintaining the new model cars. Additionally, discussion on similar parts, upgrades or modifications will still be allowed on the Talon Digest, as they are with other cars such as the Colt, Mirage and Lancer, and a great deal of useful general performance information is contained in the many FAQ files. Also, speciality DSM vendors have already begun to support the 3G; this support will increase more and more in the years ahead.
QA #125
Last Updated:
2016-08-09 09:47
Are Sebrings and Avengers DSMs?
Aside from the fact that Sebring and Avenger cars are built in the same MMMA plant as the 2G cars, there is nothing to connect them to the DSM name. They do not share heritage, appearance, upgrade paths or many parts with DSMs. For this reason, these two models are not considered DSMs, and discussion regarding these cars is not part of the Talon Digest or most UBB systems concentrating on DSMs.
Having said that, the Avenger enthusiasts are quick to point out that the Avenger/Sebring platform and the second-generation non-turbo DSM platform do share some similarities. They have similar interiors, bodies, and suspension, and several of the non-turbo upgrades for the NT DSMs work on the A/S cars, since some A/S cars have the same 420A Chrysler motor. Also, some A/S cars have a 2.5L NT similar to the 3.0L NT found in third-generation Eclipses. (Information provided by Tomas Ely.) It could be argued that the A/S cars are cousins to the DSMs - not the same, but similar.
Those looking for more information on the Avenger and Sebring would do well to visit the A/S Owner's Group (ASOG). Seeing this is the internet archive link, not all links will work.
QA #126
Last Updated:
2016-08-09 09:49
What kind of engine is in my car?
Similar Questions:
How much horsepower does my [DSM] have in stock form?
What is the horsepower rating of a [DSM]?
That depends on which model you have. All of these cars have inline 4-cylinder engines, but the displacement and intake systems differ.
Base and mid models have non-turbo (NT) engines, while upper and AWD models have turbo (T) motors. All are 2.0L, except the base model (1.8L) and the non-turbo Spyder (2.4L). Details on the various configurations are below.
Table 1: 1990-1994 Talon/Eclipse/Laser/Galant
|
Specification |
Base model |
Mid model |
Upper model (FWD) |
Upper model (AWD) |
|
Eclipse model names |
GS |
GS |
GS/GST |
GSX |
|
Talon model names |
DL |
ES/ESi |
TSi |
TSi AWD |
|
Laser model names |
none/RS |
RS |
RS Turbo |
RS Turbo AWD |
|
Galant model names |
- |
- |
- |
VR-4 |
|
Engine |
1.8L |
2.0L |
2.0L turbo |
2.0L turbo |
|
Horsepower |
92 |
135 |
190 / 195 (M/T) |
190 / 195 (M/T) |
|
Valves |
8v |
16v |
16v |
16v |
|
Cam type |
SOHC |
DOHC |
DOHC |
DOHC |
Table 2: 1995-1999 Talon, Eclipse and Eclipse Spyder
|
Specification |
Base model |
Mid model |
Upper model (FWD) |
Upper model (AWD) |
|
Eclipse model names |
RS |
GS |
GS-T |
GSX |
|
Talon model names |
- |
ESi |
TSi |
TSi AWD |
|
Engine type |
2.0L |
2.0L |
2.0L turbo |
2.0L turbo |
|
Horsepower |
140 |
140 |
210 |
210 |
|
Valves |
16v |
16v |
16v |
16v |
|
Cam type |
DOHC |
DOHC |
DOHC |
DOHC |
Table 3: 1996-1999 Eclipse Spyder
|
Specification |
Mid model |
Upper model (FWD) |
|
Spyder model names |
GS |
GS-T |
|
Engine |
2.4L |
2.0L turbo |
|
Horsepower |
141 |
210 |
|
Valves |
16v |
16v |
|
Cam type |
SOHC |
DOHC |
Astute readers (or longtime owners) will notice the 190/195 horsepower "split" in the 1G models. This difference arises in differences in the published factory specifications for the different marques through the 1990 and 1991 model years and not through any actual known changes in the cars themselves. Eventually all the turbo models were rated at 195 horsepower.
QA #127
Last Updated:
2016-08-09 09:50
What does RS / GS / GST / GSX / TSi / ESi / ES / DL mean?
DL/RS (1G) 1.8L SOHC, base model
RS (2G) 2.0 DOHC, base model
GS/ESi 2.0 DOHC, 2.0 Non-turbo, 2nd from the bottom model
GS-T/TSi 2.0 Turbo FWD, more options than the GS
GS-X/TSi AWD (Note:On 1Gs, TSi and TSi All wheel drive were badged identically from the rear, and only had the side decals to identify them separately) 2.0 Turbo AWD
QA #128
Last Updated:
2016-08-09 09:52
What is the top speed of my car?
Top speeds will obviously vary with the modifications to the vehicle. However, the top speeds for stock vehicles are in the following neighborhood:
- 1G AWD: around 140 MPH / 225 km/h
- 1G FWD: 140 MPH / 225 km/h
- 2G AWD: somewhere around 130-140 MPH.
- 2G FWD: some cars are speed limited to 130 MPH - see What are the differences between a M/T turbo and an A/T turbo?
QA #129
Last Updated:
2016-08-09 09:53
Is there a rev limiter on my car?
As far as is known, the ECU will stop fuel delivery on all the DSM cars at 7500 RPM.
Some 2G FWD cars have a speed limiter which cuts off fuel at 130 MPH. This is because the stock H-rated tires are only rated up to 130 MPH. Replacing the tires and performing this procedure will eliminate it. Warning: you do this procedure at your own risk. There is some information that this fix only works for 1995-1998 cars.
QA #130
Last Updated:
2016-08-09 09:54
What are the differences between a [model year] and a [model year]?
There are many differences, both major and minor, between various model years. To date, no comprehensive list exists which details all of the changes; to list them all is beyond the scope of this FAQ. A few of the high points are:
1990
- Inagural model year of the DSM.
- Pop-up headlights.
- Some high-end models had wheel covers.
- Mix of EPROM and Non-EPROM ECU's
- Front brakes change during the model year.
- 1.8L models have the 4G37 engine, all others have the 4G63 engine.
1991
- ECU changes mean that 1991+ ECUs don't operate the 1990 tachometer correctly.
- Most ECUs had EPROMs.
- First model year with ABS available. ABS not available with limited-slip differential (LSD).
- All high-end models had alloy or mesh wheels.
- First year of the Galant VR-4 - 2000 sold in the American market.
1992
- Non-popup headlights introduced on all models.
- The first AWD Lasers were introduced.
- Few (or no) ECUs have EPROMs.
- ABS now available with LSD.
- The engine changes from the 6-bolt version to the 7-bolt version in April.
- Second and final year of the Galant VR-4 - 1000 sold in the American market.
- The last year of the Dodge 2000GTX.
1993
- "Big brake" 2-piston front calipers become standard on turbo models.
- 7-bolt engines are now standard.
- No ECUs have EPROMs.
- Diamond-Star Motors ceases to exist.
1994
- All cars built to California emissions standards - there are no "Federal" cars.
- The last year of the 1G car and the 1.8L NT models.
- The last year of the Plymouth Laser.
1995
- The inagural year of the 2G DSM.
- Significant changes to the engine, body, and electronics.
- New transmissions.
- All ECUs have EPROMs.
- Non-turbo models are based on the Chrysler 420A engine instead of the Mitsubishi 4G63 engine.
- OBD-II becomes standard on DSMs, along with two oxygen sensors.
- Mitsubishi begins using some substandard crankshafts, leading to crank walk on some 2G cars.
1996
- The first year of the convertible Spyder.
- The Mitsubishi 4G64 engine is offered, in the Spyder models only.
- ECUs stop having EPROMs.
1997
- Additional body changes from the 1995/1996 models.
- Minor changes to the ECU code.
1998
- Minor changes to the ECU code.
- After many years, Mitsubishi finally issues a recall on the AWD DSM transfer case.
1999
- The last year of the 2G car, and of the 4G63/AWD DSM platform.
- The last year of the Eagle Talon. Chrysler drops the Eagle marque.
2000+
- 2000 - The first year of the 3G Eclipse.
- 2002 - The first year of the Lancer (non-Evolution) in the United States and Canada.
- 2003 - The first year of the Lancer Evolution in the U.S.A.
- 2004? - The first year of the Lancer Evolution in Canada?
A photo gallery comprising 100+ images is also available.
Also, for those who are curious (or just nostalgic), Tim Tate has completed the process of immortalizing the original USA dealer brochures for every year, make and model of DSM. Check it out!
For more information on the different model years, it is best to either read the archives (for general information) or to research specific components, as described in 'Has anybody installed a [component] on a [DSM]?'.
There is a page here that has a discussion on the "best" model year of DSM. There is also a page which details the differences between the 1990 engine and the 1993 engine - See this Engine Upgrades page for more detail.
For those looking for ECU-specific information across the various years, please refer to the Technomotive's Sept. 8 issue of The Diagnostic Port.
QA #131
Last Updated:
2016-05-30 08:15
What are the differences between a turbo car and a non-turbo car?
For 1Gs, there are several differences between T and NT cars of the same year, aside from (duh) the turbo (or lack thereof).
Generally, turbo cars can be identified by:
- The lettering 'TSi' on the rear of the car. Non-turbos are "ES", "ESi", or "DL".
- The presence of a boost gauge in the instrument cluster, inset into the tachometer. (Pictures (2G) here and (1G) here (Adobe Acrobat required). This gauge does not exist on NT cars.
- The words "Premium unleaded fuel only" on the fuel gauge. See (2G) here (Acrobat required).
- For AWD cars only, the words "All Wheel Drive" on the side of the car.
On 1G cars, there are two non-turbo engines: the SOHC 1.8L and the DOHC 2.0L. The 2.0L is based on the same 4G63 engine as the turbo models. It has higher compression pistons (9:1 vs 7.8:1) and no turbocharger or intercooler. The 1.8L is based on the 4G37 engine and also has 9:1 compression.
On 2G cars, there also also two non-turbo engines: the 2.0L and the 2.4L. The 2.0L is not based on the Mitsubishi 4G63 engine; rather it is based on the Chrysler 420A engine, which is why 2G NT owners share some parts, upgrades and procedures with other Chrysler products such as the Are Sebrings and Avengers DSMs?. The SOHC 2.4L is the Mitsubishi 4G64 engine, which is "sort-of" similar to the 4G63 engine used in the turbo models. The 4G64 was only offered in the Spyder convertible models.
QA #132
Last Updated:
2016-08-09 10:00
What are the differences between a automatic tranny car and a manual tranny car?
For 1Gs, there are several differences between manual and auto cars of the same year, aside from (duh) the transmission.
Auto 1G cars have
- smaller turbochargers
- smaller injectors (390cc)
- a 'power/economy' switch located next to the shift lever
- ECUs designed for the smaller injectors
- cams designed to produce more low-end torque [1G only]
Manual 1G cars have:
- bigger turbochargers
- larger injectors (450cc)
- a nifty little coin holder next to the shift lever, a fave place to put electronic widgets of one sort or another.
- ECUs designed for the larger injectors
- ECUs designed to produce less low-end torque [1G only]
2G owners rejoice, as their auto and manual cars have identical engines - assuming, of course, you are comparing apples to apples. Aside from the presence/absence of the 'power/economy' switch, there are no other obvious differences. There still may be additional differences for both 1G and 2G cars.
QA #133
Last Updated:
2016-08-09 10:02
What are the differences between an Eclipse and a AnchorTalon?
Aside from badging, logos and some stickers, there are usually no differences between the 1G Eclipse and the Talon of the same model year. Some 1G Talons and Eclipses had different rear ends; the Eclipse is more like the Laser than the Talon.
It has also been reported that 2G Talons have a different ODBII port than same-year Eclipses, and are not wired to accept a CD changer unless the changer was included as a factory option with the car. Eclipses apparantly have the harness installed even if the CD changer is missing.
Also, Eagle is a dead marque; there will be no more Talons. The Eclipse nameplate is continued on in the 3G Eclipse.
QA #134
Last Updated:
2016-08-09 10:05
What are the differences between an Eclipse and a Laser?
The only differences between an Eclipse and a Laser have to do with the exterior body styling of the car, and some logos/badging. Some Eclipses may have different rear ends than Lasers. Also, there apparantly was never a spoiler on the Laser until 1992. From Feb. 1992 on, turbo model Lasers included a spoiler, but some non-turbo models apparantly did not. The side panels and front end are also different, with badging located in different spots than either the Eclipse or the Talon. Mesh-style wheels were standard, rather than alloy-style wheels.
The interior, engine, transmission, driveline and all other major components of the Laser are the same as the Eclipse. Note that Lasers were built until 1994 only, so there are no 2G Lasers. Also, AWD Lasers were not available until the 1992 model year.
QA #135
Last Updated:
2016-05-30 09:07
What are the differences between U.S. spec cars and Canadian spec cars?
There are not many differences. Canadian cars never had the automatic seatbelts ("mouse belts") present in earlier USA DSMs. Also, U.S. cars lack the daylight running light (DRL) system of the Canadian cars. Canadian cars also have metric instrumentation, including km/hr (speedometer), km (odometer) and kg/m3 ('boost' gauge). Canadian cars also have a 90A alternator, as opposed to the U.S. spec 75A.
QA #136
Last Updated:
2016-08-09 10:06
What are the differences between Federal cars and California (CA) cars?
CA cars have more stringent emissions requirements than Federal cars, so they have a couple of extra pieces of equipment. An exhaust gas recirculation (EGR) solenoid valve is installed on CA cars next to the fuel pressure solenoid valve, while Federal cars have a empty space there. 1G CA ECUs are programmed slightly differently than Federal ECUs, making it problematic to switch ECUs from car to car without getting error codes.
To add to the confusion, all 1994 USA DSMs had California emissions, meaning there are technically no Federal 1994 cars. This prevents 1994 owners from installing an EGR blockoff plate, as the CA-style ECU is smart enough to notice and flag an error code. This requires the substitution of a 92-93 Federal ECU for the original CA ECU.
[Other changes to be added.]
Other than that, there are no differences between Federal and CA cars.
QA #137
Last Updated:
2016-08-09 10:07
What are the differences between a M/T turbo and an A/T turbo?
Similar Questions:
What are the differences between a [turbo] and a [different turbo]?
Virtually all aspects of turbo design can change from model to model.
[[UPDATE_NEEDED]]
QA #138
Last Updated:
2016-08-09 10:09
Other people know the
The serial number of your car is the last 6 digits of its Vehicle Identification Number (VIN). Unfortunately, the serial numbers for DSMs are largely mixed in with those of other vehicles built in the same plant - in our case, the Sebring and Avenger. To make things worse, the Laser, Talon and Eclipse serial numbers were similarily mixed up, meaning there is no reliable way of knowing how many of the same model vehicle were made prior to your own.
The exception may be very early 1990 cars - the Talon was apparantly a late addition to the model lineup, so it is somewhat more likely that Talons were made with sequential serial numbers up to a point.
Galant VR-4 owners have the advantage here, as there were a limited number of Galants made in early model years. Owners that list their cars "number" are typically GVR4 owners, as GVR4s have a dash plate listing the "number" of the car in that production year. This number does not correlate to the VIN, which throws more cold water onto the theory that Talon, Eclipse or Laser owners have the ability to figure out their car number.
The VIN also holds lots of other information. Some of it is in this answer, or check in the shop manual for details. In addition, there is a sticker on the driver's door that lists when the car was manufactured: MDH stands for month, date, and hour.
QA #139
Last Updated:
2016-08-09 10:17
How can I tell if my car has a 7-bolt engine?
The two engines have different oil pans, among other changes.
Before the oil pan method was identified, the only way to 'tell' if you had a 7-bolt engine was the production date of the car. According to the staff of Conicelli Mitsubishi, cars produced between March, 1989 and the third week of April, 1992 have 6-bolt motors; May, 1992 to the first week of May, 1994 have 7-bolt motors.
Another way might be to check the front brakes. 7-bolt engines are associated with big brakes; cars that have big brakes often have 7-bolt engines. Unfortunately, nobody seems to know if this method is reliable or not.
QA #140
Last Updated:
2016-08-09 10:18
How can I tell if my car has a 4-bolt rear end?
According to the staff of Conicelli Mitsubishi, all 1G cars produced before the second week of June, 1991, have 3-bolt rears. This essentially covers all 1990 and 1991 DSMs. All 1992-1994 cars have 4-bolt rears.
Many DSM owners are under the mistaken impression that the changeover between the original 3-bolt rear end and the stronger 4-bolt version occurred halfway through the 1992 model year. This is not so.
Those curious to know the production date for their car can check the driver's side doorjamb sticker. The acronym MDH stands for month, day and hour of production.
QA #141
Last Updated:
2016-08-09 11:09
Can anybody tell me what recalls are currently on my [DSM]?
Phone any dealer of your marque car with your VIN number in hand. They will tell you what recalls are currently outstanding for your car. Also check the NTHSA for information on both recalls and TSBs.
Canadians can check the Transport Canada Vehicle Recalls On-Line Database, or call Chrysler Canada at 1-800-465-2001.
QA #142
Last Updated:
2016-08-09 11:10
I want a [DSM]! What year/make/model should I buy?
This is generally an impossible question for anybody other than yourself to answer. Only you can determine which features you prefer in a vehicle.
1G cars of the same model type (non-turbo, turbo, AWD turbo) are all similar in performance potential regardless of marque. 1993 and 1994 cars have the newest transmissions and big brakes installed, and will generally be in better condition than older cars. 1990-1992 cars will be cheaper and have the same performance potential as the newer versions. Some models may not be available in your market.
The same general rules apply for 2G cars - condition is directy proportional to price, but the upgrade potential is very similar across similar models of different brand. All Galant VR-4s are essentially the same as well.
Which model you will end up with will be determined by your plans for the vehicle, your personal capabilities and your budget. If you desire a make or model not available in your local market, you will have more difficulties maintaining the car since parts will be less available.
QA #143
Last Updated:
2016-08-09 11:13
I want a [year/make/model/type] [DSM]. How much should I pay?
Similar Questions:
What is a good buying/selling price for a [year/make/model/type] [DSM]?
This is far too subjective a question to answer. As with any automobile purchase, the buyer/seller must weigh such factors as options, condition, mileage, warranty, upgrades/repairs, market value and financial need in setting a 'fair' price.
Fortunately, there are several guides to automobile buying available online. The Kelley Blue Book is now available on the net, and lets you check the ever-elusive 'blue book price'.Edmund's offers free information and advice, including the ever-elusive dealer price (what they really pay) and negotiating tips. Check Yahoo! for at least 40 other sources of car purchasing information. Research your local market by checking out what used vehicles are selling for. Canadians, don't forget craigslist and kijiji
QA #144
Last Updated:
2016-08-09 11:16
I want a [DSM]. Can anybody tell me what problems to look out for?
Similar Questions:
I just purchased a [DSM]. Can anybody tell me what problems to look out for?
It is extremely important for new owners to read the "Vital recall and safety information" section of this FAQ, so as to avoid serious difficulties.
The various problems have also been extensively discussed in the past. Read forums. It is simply the best way to become familiar with the DSM cars.
QA #145
Last Updated:
2016-08-09 12:44
It seems like there are a lot of problems with DSMs. Is this true?
Similar Questions:
Why are there so many problems with DSMs?
Newcomers to the DSM world, through reading the Talon Digest, may fall under the impression that DSMs are unreliable cars and are plagued with all sorts of problems. This is not true. DSMs do not have any more problems than the next car, and are quite reliable in many key areas.
The reasons why far more problems than 'normal' are reported are as follows:
- Generally, those breaking their cars are either A) Abusing their cars (driving hard) or B) Have modified past design parameters of the parts. Going for 200 to 400hp will tend to break things.
- Forums spanning almost 3 decades of DSM owners, which is an unusually large user base from which to compile problem reports.
- There are many automotive and DSM experts on the Digest who can detect, analyze and report problems reliably and accurately.
- Discussions about problems and their possible fixes are integral to the concept of forums, so all subscribers can benefit from experience. Not often to people sign up to tell everyone trouble free the cars are.
- Because of this, the Digest user base is unusually well informed about the nature of possible (not necessarily probable) problems with their car, and often take preventative steps to avoid known pitfalls.
- There are many types of racers who use DSMs. Those in the fastest classes (or those attempting to get into the fastest classes) break parts as a matter of course for their chosen sport, as they often far exceed the design parameters of the OEM parts.
- Some of these cars are getting towards 20 years old, and will occasionally require replacement parts as a matter of course.
- And finally, people are far more likely to post about a problem than about a routine day going to and from work; this is simply human nature.
Many vehicles have problems which are easily more widespread and/or more severe than DSMs, but members of the public usually do not hear about them unless they are an owner of an affected vehicle. DSM owners have the advantage of drawing from the accumulated knowledge of a large experienced group that covers all of North America, through resources like forums and this FAQ page.
Aside from some 'lemon' cars, DSMers are usually quite happy with their vehicles. There are a few disappointed owners who have had bad luck, which is true of ANY car make.
QA #146
Last Updated:
2016-08-09 12:48
What is the fuel capacity on a [DSM]?
Similar Questions:
What is the size of the gas tank on a [DSM]?
All 1G cars have a 16 gallon (60 liter) tank.
All 2G cars have a 17 gallon (64 liter) tank.
QA #147
Last Updated:
2016-08-09 12:50
What is the oil capacity on a [DSM]?
Similar Questions:
What is the recommended oil range/type/weight for a [DSM]?
he following table is a generalization of factory oil specifications for DSMs. Requirements vary with driving conditions and exact year of vehicle. NT is non-turbo, T is turbo.
| Specification | 1G 1.8L |
1G 2.0L NT |
1G 2.0L T |
2G 2.0L NT |
2G 2.0L T |
Spyder 2.4L NT |
GVR4 |
| Oil weight | 10W-30 | 10W-30 | 10W-30 | 10W-30 | 10W-30 | 10W-30 | 10W-30 |
| Engine capacity | 3.5 L | 4.0 L | 4.1 L | 3.8 L | 4.1 L | 4.0 L | 4.0 L |
| Oil filter capacity | 0.4 L | 0.4 L | 0.4 L | 0.5L | 0.3 L | 0.3 L | 0.3 L |
| Oil cooler capacity | ---- | ---- | 0.1 L | ---- | 0.1 L | ---- | 0.3 L |
| Total capacity | 3.9 L | 4.4 L | 4.5 L | 4.3 L | 4.4 L | 4.3 L | 4.6 L |
[[TODO_CREATE_OIL_FILTER_ADDITIVE_SECTION]]
QA #148
Last Updated:
2016-08-10 07:37
What is the coolant capacity on a [DSM]?
Similar Questions:
What is the recommended coolant type/rating for a [DSM]?
The factory recommends a mixture of water and antifreeze, with the coolant comprising 30%-60% of the total mix. Higher concentrations of coolant are more suitable for low-temperature operation, since the "coolant" is actually antifreeze and anti-corrosion agents. Straight water usually cools the best, but doesn't provide protection against rust or freezing.
If in doubt, run a 50-50 mix of antifreeze and coolant. This is suitable for most driving conditions in the United States and Canada.
The following table lists the factory coolant capacities for DSMs. NT is non-turbo, T is turbo.
| Specification | 1G 1.8L |
1G 2.0L NT |
1G 2.0L T |
2G 2.0L NT |
2G 2.0L T |
Spyder 2.4L NT |
GVR4 |
| Coolant capacity | 6.2 L | 7.2 L | 7.2 L | 7.0 L | 7.0 L | 7.0 L | 7.2 L |
IMPORTANT: Water cools better than antifreeze, but anti freeze will raise the boiling point of water and provide lubrication to the water pump. Many SUMMER ONLY DSMs use 100% water and WaterWetter. There is debate wether this is enough lubricant for the water pump. If your DSM will see cold storage (freezing temps), ensure you have antifreeze in the system or you risk blowing out freeze plugs or cracking your block as the water turns to ice and expands.
QA #149
Last Updated:
2016-08-10 07:49
What is the stock boost pressure on a [DSM]?
1G cars have a stock boost pressure of 8-12 psi.
2G cars have 10-15 psi.
The service manual allows lower pressures, but those are rarely seen in actual vehicles.
QA #150
Last Updated:
2016-08-10 07:50
What is the stock injector size on a [DSM]?
| Specification | 1G 1.8L |
1G 2.0L NT |
1G 2.0L T |
2G 2.0L NT |
2G 2.0L T |
Spyder 2.4L NT |
GVR4 |
| Injector size | 250? | ? | 450 (manual) / 380 (auto) | 235 | 450 cc | ? | ? |
The Last Word: People once thought the 2G 2L NT had 190 cc injectors, but according to Nathan Cross (moderator of 2GNT.com) they're actually 235 cc. Also, 2G autos were incorrectly listed as 390cc, while in actuality all turbo 2Gs have 450cc injectors regardless of drivetrain. [Thanks, Nathan!]
QA #151
Last Updated:
2016-08-10 07:51
What is the stock compression on a [DSM]?
| Specification | 1G 1.8L |
1G 2.0L NT |
1G 2.0L T |
2G 2.0L NT |
2G 2.0L T |
Spyder 2.4L NT |
GVR4 |
| Compression ratio | 9.0 | 9.0 | 7.8 | 9.6 | 8.5 | 9.5 | 7.8 |
| Standard compression | 185 psi | 192 psi | 164 psi | 170-225 psi | 178 psi | 192 psi | ? |
| Service limit | 131 psi | 145 psi | 121 psi | 100 psi | 133 psi | 146 psi | ? |
QA #152
Last Updated:
2015-09-29 12:06
What is the stock fuel pressure on a [DSM]?
Fuel pressures given below are at curb idle. 1G numbers are as follows: the first number is stock; the second number is with the fuel pressure regulator vacuum hose disconnected and plugged. 2G numbers are with everything connected.
| Specification | 1G 1.8L |
1G 2.0L NT |
1G 2.0L T |
2G 2.0L NT |
2G 2.0L T |
Spyder 2.4L NT |
GVR4 |
| Fuel pressure | 38 / 47-53 psi | 37 / 47-53 psi | 27 / 36-38 psi | 47-50 psi / n/a | 33 / 42-45 psi | 38 / 47-50 psi | 27 / 36-38 psi |
QA #153
Last Updated:
2016-08-10 07:51
What are the paint codes and color names for a [DSM]?
Paint codes can be found on the vehicle information code plate in the engine compartment. It is located on the firewall (underneath the windshield). The body color code is the bottom number on the plate.
Comparing the car to another car with a known paint code might not be a good idea - there have been reports that the paint codes differ across the years. However, for 1990, the paint codes were as follows:
| Body color | Exterior code |
| Light Gray | H18 |
| Red | R11 |
| Dark red | R16 |
| Turquoise blue | T13 |
| Dark blue | T81 |
| White | W12 |
| Black | X13 |
QA #154
Last Updated:
2016-08-10 07:55
What is the coefficient of drag for a [DSM]?
The coefficient of drag for most DSMs is reportedly around 0.29-0.30. This applies to both 1G and 2G.
QA #155
Last Updated:
2016-08-10 07:55
What kind of transmission is in my [DSM]?
Table 1: 1990-1994 Talon/Eclipse/Laser/Galant
|
Specification |
Base model |
Mid model |
Upper model (FWD) |
Upper model (AWD) |
|
Eclipse model names |
GS |
GS |
GS/GST |
GSX |
|
DL |
ES/ESi |
TSi |
TSi AWD |
|
|
none/RS |
RS |
RS Turbo |
RS Turbo AWD |
|
|
Galant model names |
- |
- |
- |
VR-4 |
|
Engine |
1.8L |
2.0L |
2.0L turbo |
2.0L turbo |
|
Driveline |
FWD |
FWD |
FWD |
AWD |
|
Standard transmission |
F5M22 |
F5M22 |
F5M33 |
W5M33 |
|
Automatic transmission |
F4A22 |
F4A22 |
F4A33 |
W4A33 |
Table 2: 1995-1999 Talon, Eclipse and Eclipse Spyder
|
Specification |
Base model |
Mid model |
Upper model (FWD) |
Upper model (AWD) |
|
Eclipse model names |
RS |
GS |
GS-T |
GSX |
|
Talon model names |
- |
ESi |
TSi |
TSi AWD |
|
Engine type |
2.0L |
2.0L |
2.0L turbo |
2.0L turbo |
|
Driveline |
FWD |
FWD |
FWD |
AWD |
|
Standard transmission |
F5MC1 |
F5MC1 |
F5M33 |
W5M33 |
|
Automatic transmission |
F4AC1 |
F4AC1 |
F4A33 |
W4A33 |
Table 3: 1996-1999 Eclipse Spyder
|
Specification |
Mid model |
Upper model (FWD) |
|
Spyder model names |
GS |
GS-T |
|
Engine |
2.4L |
2.0L turbo |
|
Horsepower |
141 |
210 |
|
Standard transmission |
F5M31 |
F5M33 |
|
Automatic transmission |
F4A23 |
F4A33 |
Different transmissions are not interchangeable. Note that 2G transmissions are interchangeable with 1G transmissions of the same model number, but 2G transmissions have different internals and are generally considered to operate much better. Usually only minor modifications are required to fit a 2G transmission to a 1G engine
QA #156
Last Updated:
2016-08-10 07:56
What are the transmission gear ratios for a [DSM]?
Tranny gear ratios for DSMs
Full Read Here: http://vfaq.com/mods/Trannies.html
Excerpt: According to the Shop Manual CD, here are the gear ratios for 1G NTs, 1G/2G FWDs, 1G/2G AWDs, 2G 2.4 Spyders, Galant GSXes (GGSX, AWD nonturbo) and Galant VR4s. The Shop Manuals for the different years sometimes conflicted with the Tech Manual (the CD only has the early Tech Manual, so only covers 1Gs), so I put what I thought were the proper numbers in some places - thanks to Mike at RRE for corrections. I have put the Galant GSX in the Turbo section to make it easy to compare with the GVR4 and EVO GVR4.
| NonTurbo | |||
|---|---|---|---|
| Gears | 1G NT | 2G NT 2.0 | 2G NT 2.4 |
| 1st | 3.363 | 3.54 | 3.166 |
| 2nd | 1.947 | 2.13 | 1.833 |
| 3rd | 1.285 | 1.36 | 1.240 |
| 4th | 0.939 | 1.03 | 0.896 |
| 5th | 0.756 | 0.81 | 0.731 |
| R | 3.083 | 3.42 | 3.166 |
| Primary | 1.096 | ? | ? |
| Secondary | 3.941 | ? | ? |
| FINAL | 4.322 | 3.94 | 3.625 |
| Turbo | |||||||||
|---|---|---|---|---|---|---|---|---|---|
| Gears | 1G FWD | 2G FWD | 1G AWD MT |
1G AWD AT |
2G AWD MT |
2G AWD AT |
GVR4 | GGSX | EVO GVR4 |
| 1st | 3.083 | 3.090 | 3.083 | 2.846 | 3.083 | 2.551 | 2.846 | 2.846 | 2.571 |
| 2nd | 1.833 | 1.833 | 1.684 | 1.581 | 1.684 | 1.488 | 1.684 | 1.684 | 1.600 |
| 3rd | 1.217 | 1.217 | 1.115 | 1.000 | 1.115 | 1.000 | 1.115 | 1.115 | 1.160 |
| 4th | 0.888 | 0.888 | 0.833 | 0.685 | 0.833 | 0.685 | 0.833 | 0.833 | 0.862 |
| 5th | 0.741 | 0.741 | 0.666 | NA | 0.666 | NA | 0.666 | 0.690 | 0.617 |
| R | 3.166 | 3.166 | 3.166 | 2.176 | 3.166 | 2.176 | 3.166 | 3.166 | 3.166 |
| Primary (gear toothcount) |
1.208 (29/24) |
1.206 (29/24) |
1.275 (37/29) |
1.125 (?/?) |
1.275 (37/29) |
1.228 (?/?) |
1.275 (37/29) |
1.680 (?/?) |
1.275 (?/?) |
| Secondary (gear toothcount) |
3.437 (?/?) |
3.437 (?/?) |
3.866 (58/15) |
3.611 (?/?) |
3.800 (57/15) |
3.55 (?/?) |
3.866 (58/15) |
3.100 (?/?) |
4.260 (?/?) |
| Transfer (gear toothcount) |
NA | NA | 1.090 (24/22) |
1.090 (24/22) |
1.074 (29/27 ?) |
1.074 (29/27 ?) |
1.090 (24/22) |
1.090 (24/22) |
1.090 (24/22) |
| Final | 4.153 | 4.153 | 4.929 | 4.062 | 4.929 | 4.359 | 4.929 | 5.208 | 5.435 |
| Rear Diff ratio (gear toothcount) |
NA | NA | 3.545 (39/11) |
3.307 (43/13) |
3.545 (39/11) |
3.307 (43/13) |
3.545 (39/11) |
2.846 (?/?) |
3.545 ? (?/?) |
| Gears | 1G FWD | 2G FWD | 1G AWD MT |
1G AWD AT |
2G AWD MT |
2G AWD AT |
GVR4 | GGSX | EVO GVR4 |
QA #157
Last Updated:
2016-08-10 07:58
What is the curb weight for a [DSM]?
The following table lists the approximate weights. Weights vary from year to year and according to which options are present on the car. Where two numbers are given, the first is for manual transmission cars, and the second is for automatic transmission cars.
Table 1: Approximate curb weight of DSM models (pounds)
| Vehicle | Base model | Mid model | Upper model (FWD) | Upper model (AWD) |
| 1G Talon / Eclipse | 2550 | 2712 | 2791 | 3108 |
| 1G Laser | 2530 | 2690 | 2745 | 3073 |
| 2G Talon/Eclipse | - | 2842 / 2906 | 2921 / 2998 | 3157 / 3234 |
| Galant VR-4 | - | - | - | 3295 |
| Eclipse Spyder | - | 2888 / 2943 | 3053 / 3142 | - |
QA #158
Last Updated:
2016-08-10 08:00
How much do the stock wheels weigh on my [DSM]?
The following table lists approximate weights for the various wheels.
| Specification | 1G 16" steel |
1G 16" alloy |
1G 16" mesh |
2G 16" alloy |
2G 17" alloy |
Spyder | GVR4 |
| Weight | 28 lbs | 19 lbs | 19 lbs | 22 lbs | 25 lbs | Spyder | GVR4 |
QA #159
Last Updated:
2016-08-14 02:54
What is the recommended lug nut torque for a [DSM]?
1G DSMs have a recommended torque of 90-110 ft/lbs.
QA #160
Last Updated:
2016-08-14 02:56
What is the recommended oil change interval on a [DSM]?
Similar Questions:
What is the correct oil weight for my [DSM]?
How much oil does my [DSM] hold?
Most people will operate their DSM under one or more conditions deemed "severe" by the manufacturer. For severe (typical) operating conditions, oil changes are recommended each 3 months / 4800 km / 3000 miles.
Non-severe conditions:
For 1G turbo models, oil changes are recommended each 6 months / 8000 km / 5000 miles. For 1G NT models, oil changes are recommended each 12 months / 12,000 km / 7500 miles. For 2G turbo models, oil changes are recommended each 6 months / 8000 km / 5000 miles. For 2G NT models, oil changes are recommended each 6 months / 12,000 km / 7500 miles.
The proper oil weight depends on the temperatures the car is driven in. For 1Gs, both NT and T models can use 10W-30 between -23 and +50 degrees C (-10 to +120 degF). 5W-30 can be used for lower temperatures. 1G cars hold 3.9L (1.8L engine) or 4.4L (2.0L NT and T engines); the oil filter holds about 0.4L, and the oil cooler (if present) 0.3L.
Some owners recommend you change the oil twice as often as required, or use synthetic oil and change at recommended intervals. There is no proof that this treatment extends service life.
The Last Word: Face it, the car is getting old. Unless you're a fanatic, the recommended intervals is probably fine.
QA #161
Last Updated:
2016-08-14 02:58
What kind of engine oil is the best for a [DSM]?
Similar Questions:
What brand of engine oil is the best?
By far the most important aspect of engine oil is to have the proper grade.
Update: Check this article (PDF) written by Forced Performance | Recommedations for Motor Oil
As is true for many automotive enthusiast groups, DSMers generally recommend fully synthetic oil for general use. Synthetic oils can withstand higher temperatures than mineral oils, and contain less wax, which theoretically leads to less residue building up in the engine.
However, some members stick with semi-synthetic or regular oils, and may or may not change them more often than recommended. A good case can be made for using either type of oil, so it usually comes down to the owner's personal preference.
Engine oil brand is even more debatable than oil type. There are dozens of brands on the market, each slightly different from the last. Fortunately, almost all of them will work just fine in all autmotive applications, including DSMs, allowing owners to pick whatever brand they have confidence in.
If you have deep pockets, these are talked about: Brad Penn, Royal Purple (w/ Zinc. Not RP canadian Tire version) and Rotella
QA #162
Last Updated:
2018-11-03 06:01
What kind of oil filter is the best for a [DSM]?
Similar Questions:
What brand of oil filter is the best?
My car has a [big/small] oil filter, but the shop says it needs a [small/big] filter! Which is correct?
Some DSMs came equipped with a 'small' oil filter, and some with a 'big' oil filter - apparently a difference between Chrysler and Mitsubishi, as well as between different model years. Both filters appear to work the same, so owners generally don't sweat too much over which one to use.
A few owners with modified exhaust systems have found that the 'big' filter doesn't fit their car anymore. Changing to the small version seems to work fine for them as well.
As for brands, filters are like engine oils - it is nearly impossible to identify a 'best' oil filter. Many different oil filters seem to work equally well, and there is almost nothing to distinguish different brands from each other.
In a quest for knowledge, Russ Knize took a bunch of oil filters and cut them apart, to see how they compared internally. The results of his work have been written up on the Oil Filter Study page, which details the comparison of the different filter types. He also has a separate page detailing his personal recommendations on which oil filters should perform the best.
Final Word: Highly recommend to stick with Mitsubishi Filters
QA #163
Last Updated:
2016-08-14 03:13
Do I have to use a factory oil filter in my [DSM]?
No, you don't. It is true that the original Mitsu/Chryco oil filters have a small check valve in them. The common belief is that this check valve helps maintain oil pressure, and keeps oil in the engine while the car isn't running. (Dealers often repeat this tidbit of DSM 'lore' in an effort to steer owners away from the popular oil-change companies.) Some suspect, however, that the valve is nothing more than a bypass valve that allows oil to circulate even if the oil filter becomes too clogged to operate properly.
In any event, the aftermarket oil filter manufacturers include the check valve in their own offerings for the DSM triplets. This makes perfect sense, as it is unlikely that either Mitsubishi or Chrysler manufacture their own oil filters. Those who prefer OEM parts may, of course, stick with what they are most comfortable with, but it is by no means mandatory.
Final Word: You should still stick with factory but do not need to.
QA #164
Last Updated:
2016-08-14 03:14
Can I use oil additives in my car?
Similar Questions:
What about products like those listed below? Are they worth it?
| Slick 50 | Splitfires | Dura Lube | Prolong |
| the 'Tornado' | the 'TurboZet' | the 'Cyclone' | the 'Force' |
| the 'SpiralMax' | the 'Vitalizer' | Performance 'chips' | Raphite |
| the 'Hyper-Charger' | Motor Up | the zMax system |
and other 'trick' products
This class of products generally includes those products which promise significant improvements in engine power, longevity, durability, economy, and emissions in one convenient package. They either utilize proprietary formulae added to gasoline or oil, or provide some type of 'improvement' in the engine intake systems.
The pervading opinion on the Talon Digest, as well as on most other automotive mailing lists, is that these products provide few or none of the improvements they claim. Few people have been able to verify these claims through real-world dyno or track testing. Many of them cost as much or more than parts which have been shown to work, over and over, by the Club DSM membership and specialtyvendors, so you may wish to spend your money elsewhere.
As oil additives are generally the most pervasive "magic" product, they deserve special attention. Commercial engine oils are already formulated with several additives in them. The formulae are usually referred to as "synergistic" - that is, the combination of additives work together to produce greater effects than any single additive alone.
Engine oils are already manufacturered with great attention to detail. It is not likely that any separately formulated additive will greatly improve the oil characteristics. At best, the additive will have no effect; at worst, the additive might upset the chemical balance of the oil and actually degrate its performance.
Those who remain convinced these products do, in fact, provide significant benefit are generally unaware that the U.S. Federal Trade Comission has brought suit against dozens of companies selling these types of products, with a uniform result - the companies settle without contesting the charges. This means they do not have to admit any wrongdoing, but are prohibited from making further unsubstantiated claims about their product(s).
This type of federal action is a sure sign of a 'magic' product that even the manufacturer cannot prove to be genuine. Up until recently, this information was hard to come by, but the FTC website now provides a lot of useful information direct to the public - some of it is listed below. Among others, the FTC has taken action against the following brand names: Prolong , Valvoline, Slick 50 and STP.
While the manufacturer's information extolling the unparalleled virtue of these products is easily come by, there is also a lot of information available on the web that casts doubt on the claims of many of these products. A quick search for trade names will often come up with as much bad information as good.
A few rebuttal links are
- a skeptical look at Slick 50
- the Slick 50 question from Miata Net
- a Federal Trade Commision summary of FTC vs. Quaker State / Slick 50, or the complete record.
- FTC vs. Blue Coral / Slick 50.
- a Federal Trade Commision cease and desist order against Blue Coral / Slick 50 (also PDF version.
- An FTC document describing actions against Ashland / Valvoline for their TM8 Teflon additive.
- Another FTC news release, this time against STP / First Brands for the XEP2 additive.
- Yet another FTC news release detailing how the makers of Dura Lube and Motor Up products were forced to discontinue their advertising. Dura Lube had to pay $2 million dollars in this case.
- The FTC search engine (try searching for "Slick 50" and/or "engine treatment" for more details on the above cases).
-
Read the FTC's own words on gasoline additives and gasoline saver products.
-
Try Fred Rau's article on Slick 50, originally from Road Rider.
- a search of the Club DSM archives for information on fraudulent ECU upgrades ('chips'), described below.
- if you can, check out the October 1998 Consumer Reports test on Prolong (subscription required).
- The Engine Oil Bible by Chris Longhurst.
- Finally, the Club DSM Fluids FAQ has some information on how to obtain some of the 'proof' claimed by certain additive manufacturers.
However, as with all things, you will have to make up your mind for yourself. It's your car, and your money.
Those looking to restore their outlook on life after reading this information should visit the Kaleco Auto home page - I'm sure you'll find their products quite interesting. (Read carefully.)
QA #165
Last Updated:
2016-08-14 03:16
What is the recommended coolant change interval for a [DSM]?
Every 2 years or 48,000 km / 30,000 miles.
QA #166
Last Updated:
2016-08-14 03:16
What is the recommended timing belt change interval for a [DSM]?
Similar Questions:
What is the recommended balance shaft belt change interval for a [DSM]?
All DSMs should have their timing AND balance shaft belts changed every 60,000 miles (90,000 km). Many engine-destroying belt failures are really the fault of the balance shaft belt, rather than the main timing belt.
Most people find it convenient to change all the belts at once. There are five belts on 1G DSMs (and probably on 2Gs, as well) as well as tensioners and pulleys. For a complete list, see I need to replace my timing belt. What other parts should I replace? Also, read Why is it so important to change the timing belt on a [DSM]?
QA #167
Last Updated:
2016-08-14 03:20
Why is it so important to change the timing belt on a [DSM]?
Similar Questions:
What happens if the timing belt breaks on a [DSM]?
Why is it so important to change the balance shaft belt on a [DSM]?
What happens if the balance shaft belt breaks on a [DSM]?
Brief answer: most belt failures on DSM engines result in major internal engine damage, and very high repair bills.
With the exception of the 1.8L NT engine, DSM engines are of the 'interference' style. This means that the pistons and valves occupy the same space, but not at the same time. This type of engine design might seem stupid, but is done for many reasons. (1.8L owners please note that you are not necessarily immune to these problems - keep reading.)
Of course, the engine needs some mechanism for ensuring the pistons and valves don't try to occupy the same space at the same time. The component that does this job is (you guessed it) the timing belt. It's main function is to keep the position of the camshafts (which run the valves) and the crankshaft (which runs the pistons) constant. So long as this is true, it is not possible for the pistons to hit the valves.
There are several reasons why the timing belt mechanism might fail. Obviously, if the timing belt itself breaks because of stress, age or contamination, the valves and pistons will get out of sync. Less obvious is the possibility for damage by the often-unnoticed balance shaft belt.
The balance shaft belt (known as timing belt B in dealership circles) has a much less important job than the main timing belt. It's function is to operate one of the balance shafts in the engine, a component that does nothing but smooth out the engine vibration. Balance shafts are not essential in an engine, and many engines don't have any at all. If the balance shaft belt should break, the worst symptom the driver should notice is an increased 'buzziness' to the engine.
Unfortunately, it's usually not that simple. This little balance shaft belt runs immediately alongside the main timing belt. If it breaks, it almost invariably strikes the timing belt with great force. This results in one of two things: either the main timing belt breaks as a result of the impact, or it 'skips' - that is, jumps teeth on the gears - and the timing between the crankshaft and camshafts becomes radically incorrect. Either way, the end result is usually the same.
Should the timing belt break, the camshafts will be held in a static position while the crankshaft is still turning. In other words, the pistons will be moving, while the valves will be staying still. If the valves are stuck in a position where they are 'in the way', the pistons will strike them during their normal travel.
A similar problem exists if the timing belt has skipped out of position. Although it is still driving the camshafts, it is causing the valves to open at the wrong time. Often, it is the same time during which the pistons are trying to use the same space inside the cylinder, and the pistons will still hit the valves.
During these encounters, the valves almost invariably lose, and get bent out of shape. They are then unable to do the job of sealing the cylinder intake or exhaust ports, and the engine cannot run. This is a virtual certainty on the 2.0L turbo and non-turbo engines, but even 1.8L owners have been known to have similar problems.
Since many of the DSM engines have 4 valves per cylinder, there is a high probability that at least one valve per cylinder will be bent, no matter what position the camshafts are in. Most owners find they lose at least half the valves (all the intake or all the exhaust valves), and many find all sixteen valves are damaged. A compression test usually tells the sad tale: zero pressure in the cylinder because a valve is stuck open.
Unfortunately, the only way to repair these valves is to remove the head from the engine. The 'head' is essentially the top half of the engine, which holds virtually everything in an engine aside from the cylinders, pistons and crankshaft. To get it off, about half of the engine components must be removed and/or disconnected. While it is off, the head must also be reconditioned and inspected for damage. All of this translates into major labor and high repair bills.
Sometimes the pistons are dented or gouged as well, requiring them to be replaced. This usually involves the 'block', or bottom half, of the engine to be removed from the car, which requires even more labor as well as the cost of new pistons.
The moral of this story is: always change your belts, on schedule, with the best replacement parts you can afford. This is truly a situation where an ounce of prevention is worth a pound of cure, as engine repairs cost three to six times as much as timing belt changes.
Those who dislike the idea of keeping the balance shaft belt in the engine may wish to consider removing the shafts - Has anybody ever removed the balance shafts in a [DSM]? .
QA #168
Last Updated:
2016-08-15 09:42
What kind of recalls have there been on DSMs?
The major recalls on DSMs have been for:
- 1990-91 timing belts;
- 1992 timing belts, under a separate recall;
- 1990-91 seat belt latches;
- 1990-91 oxygen sensors; and
- 1990-1998 transfer cases.
There have been other recalls. Doing a recall search at the National Highway Traffic Safety Administration (NHTSA) website will reveal them all. For maximum information, search for all three models of DSM: Talon, Eclipse and Laser. Canadians can check the Transport Canada Vehicle Recalls On-Line Database, or call Chrysler Canada at 1-800-465-2001.
QA #169
Last Updated:
2016-08-15 09:46
Can anybody tell me what recalls are currently on my [DSM]?
Phone any dealer of your marque car with your VIN number in hand. They will tell you what recalls are currently outstanding for your car. Also check the NTHSA for information on both recalls and TSBs.
Canadians can check the Transport Canada Vehicle Recalls On-Line Database, or call Chrysler Canada at 1-800-465-2001.
QA #170
Last Updated:
2016-08-15 09:47
QA #171
Last Updated:
2016-08-15 09:48
What is the timing belt recall?
Similar Questions:
What is wrong with the timing belt?
Will I get a new timing belt under the recall?
There are two separate timing belt recalls. One involves 1990 and 1991 cars, while the second (which was issued much later) involves early 1992 cars.
In both cases, Mitsubishi was guilty of using inferior quality timing belts. The belts tended to break ahead of schedule; for information on what happens when the belt breaks, see Why is it so important to change the timing belt on a [DSM]?
Owners of recalled vehicles are entitled to a new replacement timing belt under the recall. It is very important to note, however, that there are many other components involved in the timing belt system that should also be replaced when doing the timing belt. These components are not covered by the recall, so dealerships may not automatically replace them. For guidance, this list of components that should be replaced along with the timing belt.
QA #172
Last Updated:
2016-08-15 09:49
What is the transfer case recall?
Similar Questions:
What is wrong with the transfer case?
What kind of problem is it?
Will I get a new transfer case under the recall?
There is nothing wrong with the transfer case - there *is* something wrong with the brass plug in the centre of the transfer case yoke. This plug can leak. If enough lubricant is lost out of the transfer case, it will wear out and lock up. Leakage may cause premature wear on the transfer case even if it does not seize up. The Transfer Case Leak page is a must read on the subject, as are Paul Lyons' definitive posts on the transfer case recall.
There is a safety recall on this problem for all model year AWD DSMs from both Mitsu and Chryco, up to and including mid-1998 models. The wording of the recall is such that:
- the dealership will inspect the transfer case yoke to determine if there is a leak or not.
- upon evidence of a leak, the dealer will replace the yoke and yoke seal at no charge.
- if, in the dealer's opinion, the transfer case has undue wear on it, it will also be replaced at no charge.
Because of the wording of the recall, transfer cases are not automatically replaced. All the crying and bitching in the world won't change that. However, the transfer case and yoke are warrantied for the life of the car. This is because the recall is a safety recall. Future leaks will be covered under the terms of the recall notice. These terms are not within the discretion of either the dealer or the manufacturer - thus spake the NHTSA, and so mote it be. Do not be afraid to stand up for your rights on this crucial point.
Many DSMers have been happy with the recall work. However, there have been several reports of owners who have not received satisfactory service from the dealerships performing the recall. The causes include:
- no parts available. At one time or other, all the involved parts were reported as backordered.
- dealerships not recognizing the transfer case leak for what it is; it is sometimes misdiagnosed as engine oil or U-joint oil.
- a DIY repair of the transfer case yoke, which fools the dealer into believing the yoke is not leaking.
- dealerships not believing that the transfer case has experienced undue wear as a result of the leak.
Owners who do not get decent service should do the following:
- phone the Mitsu/Chryco and NHTSA telephone numbers, listed on your recall notice, to report the difficulty.
- Have them intervene on your behalf with the dealer. Dealers and Mitsu/Chryco do not have the power to deny you in this matter. Remember that the NHTSA does not have to guarantee you a replacement t-case!
- contact Todd Hayashi regarding your bad experience - he is putting together a list of people who have had problems with the recall. Include your name, your car (year/make/model) and the name and address of the dealership with whom you had problems.
The phone number for Mitsubishi is 1-800-222-0037, for Chrysler it is 1-800-521-2777 (or perhaps 1-800-992-1997). Canadians phone Chrysler Canada at 1-800-465-2001. The NHTSA is at 1-888-327-4236. (Note: Troy Davis reports that one of these numbers may have changed to 1-800-853-1403.)
Mitsubishi owners who have already had the transfer case repaired, either by a dealer or a third party, apparantly have the option to get reimbursed from Mitsu. Details on this are sketchy.
Club DSM members can thank Dallace Marable and Paul Lyons; they are the reason why this recall is in place. You can read all of Paul's recall posts to the Digest here; do so before asking questions. I'm sure that a thank-you note would be well appreciated.
The Last Word: Good things are not meant to last. Unfortunately, the recall is unlikely to be honored by any dealership at this point in time.
Despite the information above, the idea that the transfer case safety recall would be honored indefinitely was somewhat naive. These days it seems difficult to get any dealership to honor any TSB or recall, no matter how legitimate, and a semi-official repair like this one is way, way down the list. Even the NHTSA has been saying that the recall is only good once, and if the problem reappears it is up to the owner to fix it.
Some people were lucky, and managed to get their cases repaired or replaed multiple times - presumably on the dealerships in-house service warranty, which sometimes holds for one year. Other people had a struggle getting it replaced or even repaired once.
An independent mechanic, given the proper information, should be able to repair and/or replace your transfer case. Fortunately, there have been very few reported incidents of transfer case lock-up. Unfortunately, those few I've heard about have sometimes involved injury or death.
More to the story.....
I wrote all of the stuff in the original post more than 2 decades ago. Here is what I've learned over the years. NHTSA recalls are not for the life of the car. They are for 10 years. Sorry folks but this one is long gone. I had the unique experience of dealing with this subject again when I found a very pristine low mile 2gb Talon that needed recall work but they would not honor it. As of that time period(2011) the recall parts kit were still available and inexpensive. Sadly if you trash a transfer case as a result of this issue you are out of luck. A little back story about what I found from the original conversations. There were supposedly two machines manufacturinig the yoke for the driveshaft. It is a broach process and then a plug in the end to seal the fluid. Well apparently one of them had issue so many cars had a problem but there was no way to know which ones. As a result Mitsubishi did not want to just replace all of them so instead the original recall was to get an inspection. If there were signs of leakage you got a new yoke kit and if the transfercase made noise you got one of thsoe too. The problem is the defective parts were in the newer cars also. Some of them didn't have enough miles to exhibit a problem (my 97 included) so many cars got the "recall" but didn't actually get anything done. Informed owners sometimes got the service performed but from a legal standpoint I don't think they had to if they have record of service at some earlier date. The links above are probably dead but it likely doesn't matter as the information is old anyway. If anybody wants to banter about this or ask me further questions my email is pauleyman@hotmail.com. I'm also on Dsmtuners as pauleyman.
Paul Lyons
QA #173
Last Updated:
2019-02-07 07:12
Is my GVR4 covered under the transfer case recall?
The recall is apparantly now in force. Some owners have already recieved notices. The NHTSA campaign number for this recall is 98V168000. Some GVR4 owners have already had the recall done, even prior to the 'official' release.
Canadians can check the Transport Canada Vehicle Recalls On-Line Database, or call Chrysler Canada at 1-800-465-2001
QA #174
Last Updated:
2016-11-25 04:56
Why does my car seem to lean to the left?
A slight lean towards the drivers side is normal. Conjecture on this subject has been wide and varied for many years, but nobody has quite been able to finger the exact reason. One theory is it was done so it would be easier to drive in a straight line on a one lane road, which rises in the middle to assist in drainage. The best theory thus far is that the lean is caused by the engine and driver being on the left-hand side. Nobody has complained thus far that it affects any part of the ride quality of the car, although a few people have commented that the right rear of the car tends to rattle a bit more. This may be because the lower left front tends to unload the right rear suspension slightly.
After 10+ years and if the lean is excessive, things to look at:
- suspension bushings are probably worn out, causing excessive lean.
- different brand/size tires
- spring snapped in half
- check the spring seat at the top of the strut tower. rubber spacer might have rotted
QA #175
Last Updated:
2016-11-25 10:32
What sort of preventative maintenance should I do?
See also: [[What is my [DSM] maintenance schedule?]]
Update: There is a great thread located here at DSMTuners.com | DSM Maintenance Guide
Any dealer can tell you this. You can also obtain a copy of the owners manual for your year, make and model car from Mitsubishi or Chrysler. It's pretty much a typical regimen of changes for oil, filters, plugs and belts. You can also get a shop manual for your car which details the wheres, whens and hows for the various procedures.
There is now some maintenance information in this FAQ.
New owners: PLEASE read the Recalls section of this FAQ to inform yourself about important potential problems. Also note that timing AND balance shaft belts REALLY should be changed by 60 kmiles (90 kkm), so used-car owners will want to check that right away.
QA #176
Last Updated:
2018-11-03 05:57
What idle speed is normal?
In general, normal idle for a DSM is 750 RPM. However, due to specifications for various components, an idle of 700-825 RPM displayed on your tachometer can be considered normal (in the absence of other symptoms). This specification applies to a fully warmed vehicle with all electrical accessories switched off (except Canadian vehicles, which have DRLs).
The car will have a higher idle under certain circumstances:
- The vehicle not fully warmed up (+0-500RPM, slowly falling)
- The A/C is on (+200-250RPM)
- The vehicle is not at a complete stop (+150-200RPM)
Note:
1G owners can expect 1.8L engines to idle at 800 RPM, while 2.0L (non-turbo and turbo) idle at 750 RPM. With the air conditioning on, automatics will drop to 650 RPM, while manuals will rise to 850 RPM.
2Gers will get 800 RPM out of their non-turbos, and 750 RPM from the 2.0 turbo and 2.4L engines. Again, this will rise to 850 RPM with the air conditioning on.
If your car does not idle exactly at these levels, or changes its idle slightly, occasionally or while driving, don't freak out. Few cars idle at precisely the designed level, owing to variations in climate and engine components. All of the above levels are rated at plus or minus 100 RPM, and the car will sometimes adjust the idle acording to driving conditions. If you don't have a problem with the car, leave the idle alone.
Some DSMers have problems with an unstable idle, or with their car being unable to maintain idle when coming to a stop. The first problem is a symptom of a badly set base idle, while the second in an indication of a broken speed sensor. Those with idle surge problems go here; those with cars that die at stoplights go here.
QA #177
Last Updated:
2016-11-23 06:58
What gas mileage is normal?
Similar Questions:
My gas mileage stinks! Is there a fix?
My gas mileage was fine, but it's going down a lot! Is there a fix?
Most owners get around 20 MPG (11.75 L/100km). On-highway use typically results in 25 MPG (9.5 L/100 km). These numbers vary a fair amount according to season, location, altitude, type of driving, state of modifications, age of various parts, and quality of gasoline used; non-turbo owners often have the edge here. Owners have reported 'normal' mileage on both new and used cars that vary from typical by as much as 10 MPG.
Mileage in the 12-13 MPG (18-20 L/100 km) sometimes reflects a problem with the car. An old or failing oxygen sensor is a prime suspect, as this component senses the air/fuel mixture and, when bad (or even weak), can cause the ECU to supply more fuel than is necessary. According to Todd Day of Technomotive, even a slightly weak O2 sensor can knock 1-2 MPG off of the normal mileage. Since weak or dead oxygen sensors often do not trip the "Check Engine" light (see here for why), owners may not realize their O2 sensor is on the blink.
However, this is not always the case. Mileage can often be lower in the winter simply because of the widespread sale of oxygenated gasoline, which tends to lower fuel mileage. Cold weather also leads to increased idling and more congested traffic.
Another common problem occurs when upgraded downpipes are installed. Techs often forget to re-connect the ground strap from the original downpipe, leading to a poor ground for the oxygen sensor that can have the car running rich.
If you're really desparate, try replacing your thermostat - a poorly operating unit can keep the car thinking it's cold so it never leaves it's 'warm-up' mode, during which the ECU runs the car richer than normal.
QA #178
Last Updated:
2016-11-25 05:10
Why does my oil pressure keep changing?
Similar Questions:
What is the normal oil pressure for a [DSM]?
Oil pressure is directly related to
- the ambient temperature
- the engine temperature
- the amount of oil in the engine
- the engine speed
When changing the oil you often end up with a slightly different amount of oil in the engine then you had previously. Less oil means less oil pressure - add a little more oil and the pressure will rise.
Also, the oil pump is driven by an accessory belt. Operating the engine at higher speed runs the oil pump faster, raising oil pressure. Consequently, oil pressure is lowest when the car is idling (and hot), and will rise during cruising.
Normal oil pressure on these cars is between the Low and Mid mark when idling, and between the Mid and High marks when cruising. These marks, unfortunately, do not correspond to any known psi rating.
Limited testing by DSM owners with mechanical oil pressure gauges indicate that DSMs tend to have around 70-90 psi of oil pressure while cruising, and only 10-20 psi while idling. Cold starts can generate oil pressures of over 100 psi, a fact verified by the DSM manuals when discussing proper oil filter selection.
Consistently low oil pressure while driving could be an oil leak, or a bad oil pressure sending unit. Be careful.
The Last Word: Some DSMs just show low oil pressure, period. My car has shown low oil pressure for years, but nothing comes of it.
And, despite what some people have told me, oil pressure DOES depend - a little bit, at least - on the amount of oil. I've seen the oil pressure on my car go up by adding a bit more oil. There is a danger of overfilling the oil and causing oil "frothing", but I consider that a low-probability problem, whereas my car (and most DSMs, by now) does definitely leak and/or burn oil. Personally, I'd rather have a bit too much than not enough.
The oil light on the dash may come on under hard braking when your oil is low. Top up immediately.
Finally, the little connector that connects the oil pressure sender to the dash gauge can wear out and/or fall off. The gauge will show zero oil pressure and scare the bejeezus out of you, but the dash oil light doesn't light up. The sender is located between the oil filter and the wheel, under the car.
QA #179
Last Updated:
2016-11-28 05:46
Why is there a button to pop up the headlights on my [DSM]?
Similar Questions:
Why is there a blank spot in my dashboard for an extra switch?
There's a switch missing in my [DSM]! What is it supposed to be?
What kind of switch can I install in the "missing" switch spot of my [DSM]?
How can I keep my pop-up headlights from raising when turned on?
1990-1991 DSMs had pop-up headlights. The popup button raised the lights even if they were off. Since 1992-1994 DSMs did not have pop-up headlights, this switch is not installed. There is a "blank" where the switch would have gone. The installation of such "blanks" is commonplace in automotive design. If desired, a pop-up switch, fog light switch or other stock DSM switch can easily be installed into the "blank" spot to control auxiliary lighting or other special equipment.
It is true that the pop-up switch is slightly redundant on 1990-1991 cars since the headlights pop-up automatically when switched on. It is possible to prevent them from doing so. Owners sometimes want to do this to allow them to look "cooler" when using the headlights as daylight running lights. Others prefer to run the headlights down and use the high beams to make up for the lost light. [Note: The writer of this FAQ does not recommend operating the headlights down at night.]
QA #180
Last Updated:
2016-11-30 03:40
What does the yellow light on the A/C button mean?
Similar Questions:
How do I know my A/C is on?
"When the yellow light is on, the air conditioner delivers cold air when the interior of the car is hot and then gradually tempers the air as the interior of the car cools down. This is done by gradually changing the temperature set points at which the compressor cycles to higher temperatures."
"To see exactly how this all works check out the graph at the bottom of page 24-4 of the "Technical Information Manual"."
QA #181
Last Updated:
2016-12-05 03:40
What does the green light on the A/C button mean?
Similar Questions:
Is my A/C compressor cycling.
Most people believe that the green light means the air conditioner compressor stays on all the time. This is not true.
From a post by Lorrin Barth:
"When the green light is on the air conditioner cycles off when the oulet temperature of the evaporator drops to 37 degrees and cycles on when it rises to 39 degrees. In other words, cold air all of the time. Of course, as in really hot weather, the evaporator temperature may take a long time to drop to 37 degress, and this is going to depend on the condition of the system too, making you think it never cycles.
So, as you can now see, the compressor cycles in either mode. To see exactly how this all works check out the graph at the bottom of page 24-4 of the "Technical Information Manual". "
QA #182
Last Updated:
2016-12-05 03:41
Why does the A/C come on, by itself, when I turn the defroster on?
This is peculiar to 2G DSMs. Likely the factory installed this feature to ensure that the defrost air is dry. Trying to defrost a freezing windshield with humid air does more harm than good, and blowing snow can easily get into the fresh air intakes.
It was previously posted that the rationale for this 'feature' is that disuse of the A/C feature during winter can lead to premature seal cracking. Having the A/C on with the defrost ensures that the A/C system stays "active" and keeps the seals properly wetted. This might be considered suspect since chronic A/C seal failure is not known to be a problem on 1G DSMs - even Canadian ones.
If you hate it, you can remove the little tab on the vent dial that is responsible. Essentially, there is a small tab on the A/C selector knob that automatically trips the A/C if the defroster is selected. Breaking off the tab "fixes" it.
The Last Word: Your experience may vary, but the only reason I keep A/C in my car is to dry the air and keep the windows fogging up in rainstorms.
QA #183
Last Updated:
2016-12-05 03:42
Why does the brake light keep coming on?
Similar Questions:
My brake light comes on for [some time], then goes away, every day. How come?
How do I know if my brake fluid is low?
Your brake fluid is probably low. Check it. Another possibility is that your brake pads are wearing out.
Some owners have found that the brake light comes on when it is cold out. However, this is often a symptom of another problem, and not the problem itself. Check your brake system to make certain.
Another possibility is some malfunction in the antilock braking system of your car. If you find your fluid is ok, have the ABS system checked out. It has been reported that 1991 cars may occasionally experience a glitch in a wheel sensor, causing the ABS system to reset.
Still another possibility is that you are accidentally bumping the parking brake handle with your right knee. This can happen to taller people.
QA #184
Last Updated:
2016-12-05 03:43
My ABS light will sometimes come on, sometimes not. How come?
This may be a symptom of a failing battery - the ABS system can misbehave under low-voltage conditions.
QA #185
Last Updated:
2016-12-05 04:09
What does the power/economy switch on the automatic transmission do?
Similar Questions:
How do I get better gas mileage in an auto?
Changes the shift points the transmission uses - that's all. Mitsu recommends that the economy setting not be used except over 50 MPH, to avoid unnecessary wear and tear on the transmission.
QA #186
Last Updated:
2016-12-05 04:10
I keep hearing a 'click' after shutting the car off! Is there a fix?
Similar Questions:
What is the 'click' I hear after shutting the car off?
That is the ECU turning off. It is perfectly normal.
QA #187
Last Updated:
2016-12-05 04:11
Why can't I tow an AWD [DSM]?
Similar Questions:
My AWD [DSM] was towed [at some time]! Did anything break?
You can tow an AWD DSM. The trick is to have all four wheels off the ground while it is being towed. This can be done using a flatbed tow truck, or putting the front wheels on dollies.
The reason that AWD DSMs should not be towed with two wheels on the ground is the limited-slip differential (LSD) which is present on many AWDs. The function of the LSD is (surprise!) to allow a limited amount of speed difference between the front and rear wheels.
[Please note that the operation of the LSD has been simplified here for the purposes of discussion. This is not a dissertation on the LSD itself.]
Under normal driving conditions, the front and rear axles rotate at the same speed. (This is what differentiates AWD from older 4WD vehicles - on 4WD vehicles, it is assumed that the front and rear wheels usually rotate at different speeds while the 4WD is engaged.) During this time, the LSD does no work, and is 'open', providing no coupling between the front and rear wheels of the car.
The LSD is a viscous (fluid-based) device, and contains no mechanical interlocks. When one set of wheels begins to slip, plates in the LSD rotate at different speeds. The speed difference creates friction, and therefore heat, in the LSD fluid. When enough heat is generated, the LSD fluid abruptly changes state from 'open' to 'closed' providing a semi-solid junction between the two plates. With the fluid now 'locked' the plates are forced to rotate at near-equal speeds, which is turn forces the axles to turn together. When the slip condition disappears, the LSD quickly loses heat and returns to an 'unlocked' state.
So, the raison d'etre of the LSD is to prevent excessive wheel slip between the front and rear axles. The only problem with this occurs if two wheels are forced to slip, while the other two remain stationary. This occurs, of course, if two wheels are on the ground (rolling) and two are stationary (lifted) while the car is being towed.
In this scenario, the LSD will quickly build up heat and 'lock', attempting to rotate both axles equally. Unfortunately, it is unable to do so, since the stationary axle is locked securely into place by the tow operator. The other option is to halt the rolling axle, but the LSD does not have the strength necessary to resist the force provided by a tow truck designed to pull much larger vehicles. So the LSD plates continue to slip, even when the LSD is 'locked'.
When placed into such an impossible situation, the LSD does the only thing it can do - build up heat until it self-destructs. The tow truck driver, driving a dually burdened with the added weight of a 3000 lb car, is unlikely to notice either the extra resistance provided by the LSD or the lack of resistance once the LSD burns out. By the time the car is again dropped to the ground, the LSD is literally toast.
This situation can easily be avoided by only towing the car with all 4 wheels off of the ground. The exact method used is not critical. And no, it isn't going to hurt the LSD to load the car - technically, the front and rear axles are never going to rotate at exactly the same speed during driving, so the LSD plates are always rotating at slightly different speeds. Obviously, this doesn't hurt it, since it runs in 'open' mode normally - the problems occur when it is 'locked' and still cannot equalize the axle speeds.
Those interested in the exact operation of the LSD can read all about it in their technical manual (you do have one, right?).
Those interested in the details of the AWD system should read Eliot Lims Introduction to AWD Systems.
QA #188
What are the grilles / vents / slots in the side of the car for?
They are functional. They let air out of the car when the windows and sunroof are closed up.
QA #189
My car does not idle very well. Is there a fix?
Many. Read Michael Stegbauer's Idle page. Brad Baur has an excellent idle surge VFAQ up. Also read the answer to "How do I adjust the idle on a [DSM]" in this FAQ.
If this process doesn't work, you are in the minority. Try looking for something basic, such as
- loose throttle cable
- fouled spark plugs
- defective or gunked-up idle speed control (ISC) motor
- leaking injectors
- cracked vacuum hose
- damaged intake manifold gasket
- Timing. (If you have adjustable cam gears, make sure they didn't move)
High idle can also be caused by a throttle cable or cruise control cables that are too tight.
Some troubleshooting tips: if your idle adjusts when your A/C compressor is on, or when all of the electrical accessories are on, the ISC is at least partially working. If your idle appears to fluctuate with temperature, suspect an air leak in a vacuum hose or at the air intake first.
If you need to check the ISC, do it when it is hot. The ISC resistance can sometimes change when it has cooled down. Thus, the ISC looks ok when checked, but misbehaves when actually operating. The same holds true for cables since they can tighten up during operation.
The Last Word: With the age of these cars, cracked hoses, hardened gaskets and broken seals are going to be very common. The throttle body shaft seals can leak air, for one example. It's the nature of an older car.
|
Failure Rate |
Medium High |
Low |
High |
Low |
Low |
High |
High |
Medium |
Low |
|
Failure Severity |
Medium |
High |
Low |
High |
Low |
Low |
High |
Low |
Low |
|
Periodic Maintainence |
N/A |
N/A |
Yes |
N/A |
Yes |
Yes |
Yes |
Yes |
N/A |
|
Idle is low |
|
|
- |
|
- |
|
|
|
|
|
Stalls during stops |
|
|
|
|
- |
|
|
|
|
|
Idle is high |
|
|
|
|
|
|
|
|
|
|
Car won't start |
- |
- |
- |
|
- |
- |
|
|
|
|
Idle is irratic |
|
|
|
|
|
|
|
|
|
|
Stumble during idle |
|
|
- |
|
|
|
|
|
|
Legend
 |
Very Likely |
|
Likely |
|
Eh... |
|
Not Likely |
|
Very Unlikely |
QA #190
Last Updated:
2016-11-24 11:40
My car sometimes starts badly, then sputters and idles poorly! Is there a fix?
This is likely the infamous 'hot start' problem. This question pops up every year in the springtime, when many DSMs 'suddenly' exhibit this problem.
Perhaps better named as a 'warm start' problem, this difficulty often surfaces after a car has been driven, then parked for a relatively short period of time. Upon restart, the warm engine (not fully cooled down from the previous drive) appears reluctant to crank over. When it does catch, idle is often in the 300-500 RPM range, with engine shaking, sputtering, reluctance to rev up, and sometimes stalling. Holding the accelerator down until the engine smooths out often 'solves' the problem, but sometimes the engine will not rev up at all. Often the problem will correct itself with no intervention by the driver.
Please note that an inability to crank over or failure to actually start the engine are not related to the 'hot start' problem. The problem referred to by that name relates only to bad idling after starting.
This problem appears to pop up on every year of DSM if the conditions are right. Dealerships are often completely unable to diagnose or even replicate the problem.
First diagnosed in the 1990 year, Mutsibishi developed a 'kludge box' - an add-on ECU modification - designed to fix the problem, and released TSBs #18-08-91 and 18-55-91 describing it. Other model years have no such box available, nor are there any TSBs. Since TSBs are not warranties, 1990 owners may still be out of luck. There are no reports that the kludge box was effective anyway, but at least 1990 owners have a definite 'fix' to try out.
Later 1G owners have reported a bewildering array of 'fixes' to this problem. Owners have reported hot start problems that they have attributed to many different components. Fortunately, Jim McKenna put together a nice Hot Start FAQ that should help you diagnose the problem. However, since the problem can arise from a large number of component failures, you may end up systematically going through your engine to find the problem component.
2G cars also have this problem, which is puzzling since they are largely different from their 1G counterparts. There has been speculation that there is some kind of flaw or design error in the 2G engine or ECU software that allows this problem to occur. In other cases, the ECUs were able to flag a specific error that helped the owners track down the errant sensor that was causing the difficulty. In any case, the fixes described in the Hot Start FAQ may still help out 2G owners. Other fixes include changing thermostats, switching brands of gas, and general fuel and ignition systems troubleshooting.
It is possible, however, that some (or all) of these problems are nothing more than good old-fashioned vapor lock. Gasoline blends vary according to climate, and winter fuels have more volatility than summer fuels. (In other words, winter gas vaporizes better.) In warm temperatures winter gas might vaporize more than it should. Since fuel pumps cannot pump vapor, the engine does not get the fuel it requires to idle properly and it ends up stumbling. Eventually the problem cures itself once the vapor is cleared from the fuel system. Presumably it will go away in colder temperatures or once summer fuels become available.
The Last Word: No real consistent fix has ever been discovered for this problem. Personally, I think it's a combination of two problems: an ECU coding bug, where the ECU gets "confused" because the temperature and other sensor inputs do not correspond to the actual engine condition on a "warm start", and good old-fashioned vapor lock in fluctuating weather conditions. YMMV.
If the hot start fixes page is a 404, you can view the answer here: How do I fix the hot start problem?
QA #191
Last Updated:
2023-05-23 07:37
My engine makes a 'tick tick tick' sound. What is it? Is there a fix?
This is commonly attributed to the hydraulic lash adjusters (lifters) used in the DSM cars. Other cars have similar problems - Mazda owners, for example, refer to them as HLA problems. Other possible causes include excessive carbon buildup on the valves and piston heads.
The general consensus is that this problem is not damaging to the engine. Indeed, many owners have lived with the problem for years with no side effects. In extreme cases, it is possible that the ticking may be picked up by the ECU as knock, causing a retardation in timing that will cost some engine power. This case seems to be the exception, not the rule, since the DSM ECU only 'listens' for knock during specific time intervals.
In the past, owners have reported that their tick appeared or went away with certain oil brands, oil weights, oil filters, oil pressures or the like. These 'solutions' appear to be car-specific and do not represent a real fix, but some experimentation may help alleviate the problem. Some owners find that adding a small amount of extra oil helps to raise oil pressures and minimize the ticking, but again, it doesn't work for everyone.
Yet another solution involves realigning the lifters in the engine to promote better oil retention. Jeff Brinkerhoff recently did so with excellent results, reported in the December 2, 1998 Digest. Bryan Cobb has followed his example with similar success. Check the FAQ Locator to find the procedure.
Simply replacing the problem lifters is unquestionably the best option. The lifters have been redesigned to eliminate the tick. There is a VFAQ on this process, which is not terribly difficult, and involves about as much work as realigning the existing lifters. Use the FAQ Locator to find it. The newer lifters apparantly do not rotate, and do not suffer from alignment problems.
There have actually been a few versions of the lifters. The original were Mitsubishi part number MD149309 used in 1990 to 1997 cars. A redesigned version (part MD337687) was then introduced, and was replaced yet again by part MD377054. This latest part number is reportedly the best version but the availability may be limited if dealerships still have some of the older part still in inventory.
Mike Ferrara focused on the problem of carbon deposits on the valves. It is a relatively dangerous procedure, as it involves pouring automatic transmission fluid into the intake of the engine. As fluids are incompressible, a miscalculation can literally devastate your engine. A few DSMers have experienced major engine damage from performing this procedure incorrectly. Thus, this procedure is not recommended for the novice mechanic
Rather than doing this dangerous procedure, those who have non-lifter tick problems should consider using Mopar Combustion Chamber Cleaner on their car. Other Digest members have had considerable success using it to clean major carbon deposits in the DSM engines. Read the Mopar Combustion Chamber Cleaner discussion captured on VFAQ page
Other sources of non-lifter tick include exhaust system problems including a cracked exhaust manifold, broken exhaust maifold bolt or stud, cracked turbine housing or other exhaust leak. Some owners have reported that their tick went away after changing, repairing or upgrading their manifolds. Others have found that their spark wires (whether new, old, upgraded or whatever) were arcing to the block, causing a sparking sound they mistook for lifter tick. This is usually detected by looking under the hood at a running engine in the dark. Finally, a few owners are sure their ticking is really the injectors firing.
QA #192
Last Updated:
2016-06-06 11:52
My engine shakes a lot! Is there a fix?
Excessive engine vibration is a telltale sign that the balance shafts (also known as silent shafts) are out of alignment. These shafts are designed to counterbalance the engine to keep it from shaking during normal operation.
If the engine vibration just started, do NOT start or drive your car until you can verify that the balance shaft belt is okay. If the belt is old or worn, it can jump, causing the balance shafts to be out of phase. This, in itself, will not damage your engine, but is a symptom of much larger potential problems.
The real problem is that if the balance belt jumped, it may be getting ready to break, and could the next time you start your car. This in itself is not a bad thing (the car runs fine without the balance belt at all), but the balance belt has a nasty habit of hitting the timing belt after breaking. The timing belt will often jump or break after such treatment, which is, literally, an engine-destroying event. You can count on losing at least eight valves if the timing belt jumps, and probably all sixteen if it breaks. Repair costs can run into the thousands. It is for this reason that the balance shaft belt should be replaced at least as often as the main timing belt.
It is also possible that the engine will shake immediately after a timing belt change. This is indicative of a simple misalignment of the balance shafts in the engine. Running the car that way is not damaging, but is obviously undesireable. Return the car to the shop in question to have the timing re-done - driving it there is usually ok, although towing is great (especially if you can get the shop to do it). Read the timing belt VFAQ for more information. (Yes, it's listed in the FAQ Locator.)
QA #193
Last Updated:
2016-11-23 07:34
My belts make a lot of noise! Is there a fix?
Try putting a small amount of Ajax on the back of the offending belt(s) and running the car. This helps clean the belts off. If this does not work, you can purchase belt dressing from any auto parts store that might quiet them down a bit. You can also check the belts for correct tension - sometimes overtightening the belts (by just a bit!) will eliminate the problem.
Inspect your underdrive pulley. Make sure it is not cracked.
There have been reports that badly rebuilt alternator may also be the cause of the squealing belt. Try another alternator as a last resort.
QA #194
Last Updated:
2016-11-25 01:31
My car overheats! Is there a fix?
Similar Questions:
My car runs hot, but my cooling fan does not come on! Is there a fix?
Yes. Replace your thermostat. Although you can use a cooler thermostat, this may not be a good idea. See this answer for why.
If this fails to solve the problem, you may be having difficulties with your coolant temperature sensor. This sensor also affects idle, air/fuel mixture, and timing, and failures can generally be detected by the ECU as error code #21. A burned out fan switch or relay may also be the fault.
For racers that run their car at sustained high RPMs, it is possible that their cooling pump may not be operating that well due to cavitation. For these people, an underdrive pulley will spin the cooling pump slower than typical, allowing it to operate properly. This is not a concern for non-racers.
If you have ECMLink, start the car with the rad cap off.
- Let the car get to up temp with rad cap off and watch ECMLink and the coolant at the thermostat housing. it should not be flowing.. just gurgling a little. If flowing. you have a stuck thermostat.
- Once the temps reaches 183-187... the thermostat should open and you should see temps dropping to below 180.
- When you see temps drop, looks at the coolant.. it should be flowing.
- Once it drops below 180, coolant should stop flowing.
- *** If coolant is flowing all the time, you have a bad thermostat.
- At one point once the coolant has cycled from rad to block a few times at idle, the rad fans will come on as there is no airflow across the rad.
- *** If rad fans don't come on, you may have a bad temp sensor, fan relay or fan.
QA #195
Last Updated:
2016-11-25 01:16
I just installed an [intake/BOV] on my [DSM], and it makes this 'whoooosh' noise! . Is there a fix?
No. This is normal. It is simply the air moving through the intake/bov that you are hearing.
QA #196
Last Updated:
2016-11-28 06:02
I just installed an [BOV] on my [DSM], and it makes this 'chiirp' noise! . Is there a fix?
Chances are you used silicone to installed a 1G BOV to your 2G. The silicone can plug up a little secondary air hole in the BOV. The hole is located next to the main BOV hole on the mounting flange. Clean out that little hole and the chirp should go away.
The Last Word: If it's more a whistle than a chirp, it may be the infamous "boost canary", caused by the BOV opening and closing. Don't worry about it.
QA #197
My boost is not strong enough. Is there a fix?
Poor boost is often a symptom of other problems. It is important to know why the boost is low before attempting corrections.
The DSM ECUs have partial control over the amount of turbo boost through the use of the boost control solenoid (BCS) a.k.a. thewastegate bypass solenoid. Under normal driving conditions, the BCS is open and allows the wastegate to open at the normal intake pressure. Should the ECU detect a serious problem with the engine, it will often close the BCS, causing the wastegate to open sooner and lowering the turbo boost produced.
The ECU uses the BCS to reduce turbo boost in several situations. Should the ECU detect a large amount of airflow into the engine, the BCS will be pulsed off and on to reduce the air intake to acceptable levels. This can lower the turbo boost significantly, and usually only occurs at high RPMs. This is usually a temporary problem, which disappears when the intake airflow drops to more normal levels.
The ECU will also close the BCS if it detects significant engine knock. Knock, also known as preignition or detonation, is a damaging condition brought on by excessively advanced ignition timing, lean air-fuel mixtures and/or low octane or poor quality gasoline. The BCS is the second and last line of defense against knock - the ECU will first retard the ignition timing in an attempt to prevent knock. If this fails, the BCS will close to reduce the intake air flow (and boost pressure) to a minimum value, hopefully eliminating the knock at the expense of engine power.
A simple LED monitor circuit can be constructed to check the operation of the BCS. If the BCS is pulsing, or remains closed during typical engine operation, it means that you may have some other problem that is making the ECU very nervous. This is often accompanied by retarded engine timing, resulting in a further power loss, all of which makes the car much slower than it should be. Note that the operation of the BCS monitor is not necessarily intuitive - study the Troubleshooting section, this issue of the Diagnostic Port, and the Boost Solenoid Details page very carefully before deciding you have a problem.
If the BCS is not operating as expected, suspects include poor quality gas, excessive turbo pressures, injector malfunctions, oxygen sensor malfunctions, and anything else that can lead to a low-octane, air-rich mixture inside the cylinders. Differences in mass airflow sensors from car to car will also affect the operation of the BCS.
If the BCS is fine, the timing may still be retarded due to airflow or knock problems. If you are certain this is not the case, it may be time for some modifications; see "What should I do to make my car faster, or handle better?" , above.
If you are certain this information does not relate to your problem, check your intercooler hoses. Often a hose has popped off, or is leaking air badly. Another spot to check is the wastegate actuator; make sure the actuator rod is still connected to the wastegate door. Otherwise, the wastegate may be flopping open and letting out all the boost air. Sometimes the arm has broken off the wastegate due to a rusted-out holding pin.
QA #198
Last Updated:
2016-11-28 06:20
My boost is too strong! Is there a fix?
Similar Questions:
My boost won't stay where I set it - it keeps going up! Is there a fix?
This is called boost creep, and occurs when the turbo is pushing so much air that the wastegate, even when fully open, cannot dump all of the intake pressure. This results in a continual increase in intake pressure, and is common with upgraded turbos, especially with upgradeddownpipes - the exhaust would rather flow through the turbo/exhaust than the more restrictive wastegate, which spins the turbo ever faster. Cars with this problem can develop mind-blowing (and engine-blowing) intake pressures in a hurry.
The general solution to this problem is to port the oxygen sensor housing, turbine housing and/or wastegate to allow them to dump more air. Otherwise minor malfunctions of the wastegate may also exhibit themselves as boost creep, such as poor travel on the wategate actuator arm. Some people use an external wastegate for better pressure control.
Check out Tom Stangl's - O2 Housing Porting vfaq. (archived PDF)
People interested in more theory behind this problem will enjoy Dennis Grant's Turbo Fundamentals Series.
QA #199
Last Updated:
2016-11-28 07:27
I am running [x] PSI on my car, but I'm not going fast enough! Is there a fix?
Similar Questions:
I have my boost set to more than 15 psi, but I'm not getting fuel cut! What's wrong?
I'm running insane boost on my boost controller, but I'm not going fast enough! Is there a fix?
Owners who run high levels of boost to little or no effect on their cars may have their base engine timing set incorrectly. Although the ECU advances the timing as much as possible during operation, it has a limited range. If the timing is pulled back excessively, the ECU may not have enough adjustment to re-set it back into the correct range. Retarded timing leads directly to a loss of power.
The ability to run high boost levels and still go slow appears to be directly related to timing problems - DSMers who have run 18-20 psi with retarded timing suddenly find themselves hitting fuel cut at 14 psi, once their base timing is set properly. They also find their car is faster at 14 psi than it was at 18 psi, a direct result of timing advance. If you boost like crazy but still can't get decent times, check your timing straight away. See here for some info on how to do it.
QA #200
How do I prevent fuel cut?
Similar Questions:
I have [injectors/fuel pump/fuel rail] installed, but I still get fuel cut! Is there a fix?
This question comes up a lot, mostly because people misunderstand what fuel cut is for, and why it occurs at all. For the answer to this, read this chapter of the ECU Primer.
The simple answer is that because fuel cut is pre-programmed into the ECU, there is no method of disabling it. There are no modifications that can do so, aside from an ECU upgrade that eliminates fuel cut. Upgraded fuel pumps, injectors, and fuel pressure regulators do nothing to avoid or eliminate fuel cut. NOTHING.
That being said, there are some methods (some cheap, some not) of postponing fuel cut. All the methods work on one principle: fooling the ECU into thinking there is less air entering the engine than, in fact, there is. This can be done by adding unmetered air, or by changing the sensor inputs used by the ECU to determine air mass. Of course, these methods usually mean the engines run leaner than stock. Again, read Chapter 7 of the ECU primer for details.
Budget Methods include:
- removing the lower honeycomb from the MAS. See the FAQ Locator (look in the "Intake" section) and Jim McKenna's MAS modification page for more information.
- 'Gutting' (cutting out) the lower section of the MAS. This involves cutting out the entire lower section of the MAS - delaying fuel cut, but making the engine run leaner - and altering the intake air temperature sensor to compensate. Mike Jackson also does this - read his information here.
- plumbing in a secondary air intake after the MAS. Use extreme caution!
- the dime-store fuel cut defenser (DSFCD) for 1G or 2G. Use appropriate caution.
- fuel management computers, like a VPC or PMS. See the Glossary for details.
Proper Method
An ECU upgrade to ECMLINK or AEM is the only way to really eliminate fuel cut
Crankbender@DSMTuners:
WHAT SHOULD I NOT DO TO PREVENT FUEL CUT?
Do not decrease air counts without adding more fuel per air count. This will cause you to just run lean all the time and cause exactly what fuel cut tries to prevent. So....
DO NOT PUT IN A FUEL CUT DEFENDER.
DO NOT RUN A 2G MAF ON A 1G WITHOUT A WAY TO BALANCE IT OUT.
DO NOT JUST LEAN OUT YOUR AFC TO UNSAFE AFRs.
DO NOT TURN DOWN YOUR GM MAFT TO UNSAFE AFRs.
DO NOT TRY AND PUT IN LARGER INJECTORS WITHOUT FUEL MANAGEMENT.
DO NOT TRY TO UP THE FUEL PRESSURE WITHOUT FUEL MANAGEMENT.
QA #201
Last Updated:
2023-05-23 09:10
My oil dip stick keeps popping out! Is there a fix?
The dip stick is often usually forced out by excessive crankcase pressure. In many cases, however, this is not due to an increase in crankcase pressure - rather, it is due to a decrease in the holding power of the dip stick. Lots of these cars are over 5 years old, with many approaching the 10 year mark, and most rubber parts have lots their original resiliant nature. The rubber plug on the dip stick may have shrunk and hardened over time, causing the stick to come out more easily than before.
Read Jack's Transmissions PCV article.
If replacing the dip stick rubber doesn't help, the positive crankcase ventilation (PCV) valve is often at fault. This is an inexpensive little part that is supposed to vent excess pressure, but it can wear out or clog. A quick replacement may be in order.
Another possibility is replacing the breather hose with a small K&N valve cover filter, which will hopefully help to vent excess pressure. Bad turbo oil seals and worn piston rings are the next likely suspects.
Tip: Attach a small clamp near neck of oil tube. Then find a spring that will hold on to the diptick and attach other end of spring to clamp.
QA #202
Last Updated:
2016-05-30 09:05
My [2G] has leaky windshield washer nozzles. Is there a fix?
There is a TSB for this problem, number TSB080795, NHTSA Item Number: SB039984. Unfortunately, no summary or listing of this TSB is currently available on the web.
One DSMer suggested simply sticking a pin into the vent hole on the windshield washer reservoir cap. The stock hole is so small that it is hardly visible, and can easily get clogged. Cleaning or enlarging the hole keep pressure from building up in the system.
QA #203
Last Updated:
2016-11-25 01:53
My car stumbles/misses when accelerating. Is there a fix?
This is usually poor ignition, caused by:
- bad, incorrect, platinum or poorly gapped spark plugs
- bad or loose plug wires
- bad ignition coil
- bad transistor pack
Try swapping each one out until you fix the problem. Testing the components may or may not reveal the problem; many people have had components (especially wires) test ok, but perform badly on the car. Plug wires may also be loose in the coil pack, although they may look fine.
Other possible causes include
- a bad battery connection (or bad battery), leading to poor power to the fuel pump;
- misaligned timing belt;
- excessively high airflow through the 1G MAS, leading to 'missed' counts;
- incorrect routing of the vacuum hoses on the throttle body (there was a mistake in a shop manual somewhere);
- decaying of the ECU capacitors (a must read - go here for details);
- worn camshaft lobes (normally only a possible problem on certain aftermarket parts called Web Cams);
- or (in at least one case) a broken thermostat.
Those with an interest in spark plug theory will enjoy this post about Basic Theory of Spark Plug Operation.
QA #204
Last Updated:
2016-11-25 01:50
My car stumbles/misses when I let off the throttle! Is there a fix?
The general consensus is that this is caused by the BOV, which can stick or plug. This appears to be especially true of the 2G BOV, although some 1G owners have had this problem as well.
Alexander Kowalski's Jan 27, 1999 fix to his off-throttle stumble went like this (edited for presentation):
"I took the BOV off a today for a closer look. I found some RTV plugging up a 3 mm diameter hole at the base of the BOV. This hole appears to be part of a passage in the BOV casting that travels straight up to the top. I am assuming it is some sort of return relief passage.
Not only did clearing the RTV solve my off throttle stumble, my BOV no longer sounds like a loud bird shriek between shifts. Its more like the soft 'phfft' sound I have associated with my two previous BOVs. Darn, other than scaring the heck out of my wife I really liked that sound."
Cleaning the BOV, replacing it or upgrading to a 1G unit should solve the problem. Owners of adjustable BOVs report that setting the BOV too tightly will cause this same problem, so a quick adjustment may be in order.
Owners who are having the problem with the engine RPM dropping abnormally low after letting off the throttle may be having problems with the speed sensor or idle switch on their cars. If one of these is malfunctioning the ECU may not realize the throttle is at idle until the engine RPM drops below the normal idle speed.
QA #205
My car stumbles/misses during hard cornering. Is there a fix?
This problem is fuel starvation caused by fuel sloshing around in the tank during hard cornering. Depending on the direction of the turn, the fuel pump pickup can get uncovered, leaving the pump with nothing to pump but air.
Owing to differences in fuel tank design, 1G AWDs have this problem when executing hard left corners, while 2G FWD turbos have problems with hairpin right turns. In both cases the fuel pickups are on the side of the car which is on the inside of the turn; of course, the fuel wants to be on the outside (opposite) side of the car.
The only fix for this problem is to have enough fuel. Most recommend at least 1/4 tank of fuel, but some hardcore autoxers say they need at least 3/4 of a tank.
2G AWDs and 1G FWDs apparantly do not suffer from this problem as much, as their fuel pickups are located differently. Despite this, autocrossers may still run into the problem.
QA #206
My car stumbles/dies when stopping. Is there a fix?
This is a symptom of a broken speed switch, which is a part of the speedometer in the instrument cluster assembly. With the switch inactive, the ECU does not know the car is moving and doesn't keep the idle high enough to operate the power brakes.
QA #207
My [DSM] has a funny pulsation/vibration while cruising. Is there a fix?
Sally Vegso reported that her pulsation problem was caused by using Dextron ATF in her automatic transmission. Replacing the fluid with Mitsubishi Diamond ATF solved the problem immediately.
QA #208
I accidentally overreved my engine!! What kind of damage did I do?
Quite possibly none - the DSM engines seem remarkably tolerant of overreving. Dozens of DSMers have accidentally taken the engine waaay past redline for significant period of time without any damage. Read these posts for some good information on previous experiences with over-the-top engine speeds.
QA #209
My car blows white smoke! Is there a fix?
"[This is] ...caused by water evaporating in the exhaust stream. Occasional puffs [are] usually from condensation in the exhaust pipes (especially in humid areas) or a water balloon up your stove-pipe. Continual white smoke [is usually due to] a warped head/head gasket and coolant entering your combustion chambers. If you're really unlucky, might be from a cracked head."
Some people have reported that high boost levels may promote white smoke, for some reason. Turning the boost down some cures the problem. This might be related to worn out seals on the turbo, which can leak oil into the exhaust. A bad brake booster can potentially let brake fluid into the vacuum line, which also produces white smoke.

QA #210
My car blows black smoke! Is there a fix?
Similar Questions:
My car blows gray smoke! Is there a fix?
"This is caused by uncombusted [unburned] fuel. Could be plugs, timing, clogged air filter, air/fuel mixture, wires, coil, etc. Start with the cheapest answer and work your way up."
Please refer to David's Turbocharger Troubleshooting Chart
QA #211
My car blows blue smoke! Is there a fix?
Lorrin Barth pointed out that a fourth cause, especially on rebuilt heads, may be poor fit between the valves and the valve guides.
Also check out David's Turbocharger Troubleshooting diagnostic chart for a comprehensive guide to smoking and other engine problems.
QA #212
Last Updated:
2017-08-07 05:41
There is oil in my air intake! Is there a fix?
ccording to Pete Paraska, there are three ways oil can get into your intake:
- (1) Through the positive crankcase ventilation (PCV) valve.
- (2) Through the hose leading from the valve cover to the intake pipe.
- (3) From an leaky oil seal in your turbocharger.
#1 is true regardless of the age of the valve.
#2 is a symptom of blow-by, where oil is getting past the piston rings.
DSMers often install oil catch can [[What is a catch can?] in an effort to keep oil out of the intake.
QA #213
My exhaust manifold/turbocharger housing glows red at night! Is there a fix?
No, this is normal. Exhaust gas temperatures on DSMs range from about 775 degC to 825 degC on-highway, depending on whether you are within or over the speed limit. Most materials start to get 'red' hot at about 800 degrees C. The only solution to this 'problem' is to take it easy on the throttle.
QA #214
Last Updated:
2016-11-28 10:07
My exhaust manifold/turbocharger housing/O2 housing is cracked! Is there a fix?
Unfortunately, it is typical for 1G cars to end up with cracks in the exhaust manifold, O2 sensor housing and/or turbocharger housing. There is not much that can be done to prevent this, short of replacing original 1G manifolds or O2 housings with their more robust 2G counterparts. This is obviously not much of an option for the turbocharger, given the stock 2G turbo is smaller than the stock 1G turbo, and is obviously no help to 2G owners.
Short of replacement, sometimes the offending parts can be welded to close the cracks. This does not prevent them from cracking again, however. Unless you get a good deal on welding, it is probably best to simply replace the parts (preferably with upgraded parts). Those with cracked manifolds should know that many aftermarket exhaust headers also have significant problems with cracking.
QA #215
Last Updated:
2016-11-28 10:07
Why does my transmission shift poorly?
Important: If your clutch is dragging, stop driving the car immediately. Read Jack's transmissions Clutch Drag Kills Syncros.
Poor shifting is a hallmark of 1G cars. 2G owners have vastly improved transmissions, and do not generally suffer from bad shifting. If you have a 2G that has shifting problems, you must read about possible problems with crankwalk on the 2Gs.
For 1G cars, there are several fixes. There are also several TSBs on this problem, for various years. Check the NHTSA site for TSB information. Remember, TSBs are neither warranties nor recalls.
Solution #1 came up in 1992 when the first TSB called for adding a 'friction modifier' to the transmission fluid. The modifier increases the frictional coefficient of the fluid, so the synchronizer rings (synchros) match speeds faster. There have also been several synchro design updates throughout the various years, intended to improve the crunchy shifting. Of course, to take advantage of these requires a transmission rebuild.
Many DSMers recomment using Redline MT90 or Genuine Mitsubishi DIA Queen in place of the Redline MTL from years ago. Not many are left using BG Synchroshift or GM Synchromesh days due to claims of early syncro failure among the majority. All of these fluids have the same purpose - to increase friction, just as the Mitsu fluid modifier is intended to do. Most owners report at least some improvement with the new fluids, but most experience significantly better shifting. Opinions and experiences vary.
Recent experience suggests that Redline MTL gains in shifting performance by sacrificing synchro longevity. This is not exactly news, but more and more owners are reporting this problem with MTL now that there are alternative fluids available. Many owners considered the tradeoff to be well worth it. However, more people are now recommending a mix of Redline MTL with MT-90 gear oil, to combat both problems at once or just use straight MT-90.
Poor clutch disengagement has recently become a suspect for poor shifting in DSM cars. Refer to [[What are the symptoms of poor clutch disengagement?]] for more information. There is a great writeup on hotrod.com | How to Diagnose Your Own Clutch System Problems - Be Your Own Disc Doctor (or download archive PDF)
Problems have sometimes been found in the shift linkage as well, leading to the Tighter Shifter Page (90-94) (or download archive PDF) that describes how to rebuild the linkage in 1G DSMs for improved performance. Kyle Jones even found that an incorrect aftermarket lower radiator hose was interfering with his shift cables and causing crummy shifting; cutting the hose shorter did the trick.
The Last Word: Eric B. would like to add:
"On the topic of Redline gear oil eating away the syncronizers in your transmission, there is a reason for that. It is the wrong API service grade (GL-5). Chemically, GL-5 isn't friendly with brass and will deteriorate your syncros, which is why differentials and transfer cases seemingly only call for it. Almost all (if not all?) transaxles require a GL-4 service oil. This is most overlooked by everyone. I found out the hard way also from my other car's transmission. I verified this being the cause of failure from a handful of machinist and transmission specialists. By mixing it as stated on the page, it is merely being dilluted and the corrosive effect is still existing, but reduced."
Sean Costall: "Personally, my car has had MTL and Syncroshift in it since '96, and it still shifts fine on the original tranny. YMMV. [Thanks, Eric!]"
QA #216
Last Updated:
2018-11-06 04:37
Why does my clutch engage/disengage very close to the floor?
Similar Questions:
How do I bleed my clutch?
How do I adjust my clutch?
For those owning a new clutch, it is normal for the engagement point to drop low. The DSM clutch mechanisms are so constructed as to move the engagement point higher as the clutch wears.
Jack's how to adjust the clutch
Next try Jafromobile - Bleed your clutch.
Gary Selph, John Snodgrass and Kevin Fabec all found one of the connecting rods for the clutch mechanism was worn, causing the clutch to engage lower that it should. This may be a fairly common but easily overlooked problem, especially on older cars. A good test is to see if you can pull the clutch pedal up with your foot. If you can, the rod is likely worn.
Another commonly overlooked clutch problem is wear on the clutch fork or pivot ball. The clutch fork could also possibly be bent, especially if heavy-duty clutches have been used. The pivot ball and clutch fork have both been mentioned as 'wear items' and should be considered for replacement if a new clutch is going in anyway.
See Jack's Pivot Ball Shimming:
Of course, the problem may also be related to the clutch master cylinder. Replacing the cylinder and clutch lines can sometimes fix the problem. A few people have used stainless steel lines. It is far from required, but some people have found a steel line improved the clutch pedal feel quite a bit.
QA #217
Last Updated:
2018-11-06 04:32
Why is my clutch pedal is really stiff?
Similar Questions:
Why does my clutch pedal feel mushy?
Poor clutch pedal feel can often be attributed to binding of moving mechanical parts. Alternatively, problems in the clutch hydraulic system may be to blame, or a combination of both.
Despite popular opinion, it is possible to have a DSM that has a 'good' feeling clutch pedal. The key points appear to be to grease all the moving parts - throwout bearing, clutch fork and pivot ball - with a high-quality grease, and to replace the old stock clutch line with a stainless steel line (or, at least, a new rubber line). These items combine to prevent mechanical friction and hydraulic problems that can contribute to a poor clutch pedal feel.
Stronger clutches such as Centerforce Dual-Friction and ACT 2600 clutches have long had the reputation of providing a very stiff pedal. In these cases is it even more important that the clutch installation pay particular attention to the above items. In some cases, owners have reported their 'heavier' clutches feel better than 'lighter' clutches in a different car.
There have been many good reviews using Advanced Clutch Technology (ACT) Streetlite Flywheel and Southbend Clutch and Pressure Plates.
If you have the money, you can look at Twin Disc Clutch System from ACT ($1400+)
QA #218
Last Updated:
2018-11-06 04:32
What are the symptoms of poor clutch disengagement?
Similar Questions:
It seems my clutch may not be disengaging correctly! What should I look for to fix it?
Poor clutch disengagement can lead to the following problems:
- A very low engagement point on the clutch.
- Persistent grinding when shifting. Note this may also be caused by worn syncros.
- Shifter blocking, where the transmission simply will not shift into gear, especially at high RPMs.
- A tendancy for the car to creep forward when the clutch is supposedly disengaged.
In summary, here are most of the possible causes of clutch engagement/disengagement problems and their solutions. They are ranked in rough order of least difficult/expensive to most difficult/expensive. Most of these symptoms also apply to shifting problems that can manifest due to poor clutch disengagement.
| Cause | Solution |
| Air or water in clutch hydraulic fluid | Bleed clutch fluid and replace. |
| Master cylinder is leaking. | Replace master cylinder. |
| Slave cylinder is leaking. | Replace slave cylinder. |
| Clutch pedal rod is worn out. | Replace rod. |
| Master cylinder pushrod is incorrectly adjusted. | Readjust master cylinder rod. |
| Incorrect clutch pedal free play adjustment. | Readjust clutch pedal free play. |
| Transmission is loose, resulting in movement when clutch is depressed. | Tighten loose transmission bolt(s) by front engine mount. |
| Master cylinder rod too short for current clutch setup. | Lengthen master cylinder rod. |
| Master cylinder worn out. | Replace old master cylinder. |
| Slave cylinder worn out. | Replace old slave cylinder. |
| Poor lubrication on clutch fork and/or pivot ball. | Grease moving parts well. |
| Worn clutch fork pivot ball. | Shim pivot with one or two 3/8" washers to regain missing travel. |
| Poor lubrication on pilot shaft or throwout bearing. | Grease throwout bearing very well. |
| Worn or bent clutch release fork. | Replace fork. |
| Worn clutch pivot ball. | Replace ball. |
| Worn out or incorrectly installed clutch / flywheel. | Replace clutch / flywheel with new clutch and flywheel machined to correct specifications. |
Paying attention to the above items can make your next clutch swap a real success.
Visit: Why does my clutch engage/disengage very close to the floor? for how to adjust your clutch properly
QA #219
Last Updated:
2023-05-23 09:04
Why does my shifter moves around in 5th gear?
Similar Questions:
Why does my shifter move around in [1st-4th] gear?
Why does my shifter keeps popping out of gear?
This is a symptom of a serious problem, at least on 1G DSMs. Shifter movement is not generally normal in DSMs. Having the shifter move around, especially in 5th gear, or popping out of gear (even once or twice) could be an indication of a loose retaining nut inside the transmission. Several 1G DSMers have had the rotten experience of having this nut come off completely, and consequently blasting a hole in their transmission. This problem only affects FIFTH gear - gears 1 through 4 and reverse do not appear to suffer from this difficulty.
Those who are uncertain must know that both by Paul Lyons and Ashok Babu had their transmissions fail on them. Don't take a chance on this one, since the inspection procedure is easy.
This problem does not appear as common on 2Gs, and at least one owner has reported that there was a loose nut in his shifting assembly that was causing the shifter to pop out of 5th. This is NOT the same nut that is involved in the 1G problem.
2G owners who suffer from problems with the shifter moving around in a gear OTHER than 5th gear have a different problem. David Gowlowski reported that his transmission failed because of a bad bearing on the input shaft, which corroded away until his car would not shift into second gear. He believed that this bearing was part of a bad lot.
"I received an email the other day about the moving shifter I had last year and realized I hadn't sent something to the collective unconscious for the archives, so here goes.First of all, if any of you have a shifter moving when you get on or off the gas in 2nd, go pound a beer before you continue.
Okay, now go pound another. And another, and another... Okay, do you have a hard time focusing yet? Good. Final warning- this happened over 6 months ago and I have struggled to forget the whole thing, so some of my terms and descriptions might be off...
Some cars may have the shifter move in 5th gear because the retaining nut for the drive shaft is loose. Unfortunately, because of the way the tranny is put together and the tolerances involved, this is the only moving gear that can be fixed by the excellent vfaq out there about this. If the shifter is moving in another gear it is probably because of slop in the tranny. How is that possible? Well, on my 53K Talon AWD it happened because the load bearing on the input shaft was part of a bad lot. As a result, the bearing corroded and pitted and basically slowly disintegrated until the bearing (cage type- holds rollers) was so loose that the whole input shaft could move. Not a lot, but enough that the shifter could be seen moving about 3/4" when a load was applied or removed from the tranny, and eventually enough of a slop that I couldn't even engage 2nd gear. Interestingly enough that bearing was the ONLY one that showed that level of deterioration- you can see it below.
With the help of TJ from DST (thanks man!) I got the tranny to DRW in Poway (by San Diego). They've built trannies for GN's and 4x4's forever and even offered an unconditional 12 month warranty, and did an excellent job (I also highly recommend them). Inside my tranny enough metal had ground off components from the slop that I ended up needing almost a complete tranny rebuild, to the tune of ~1800 bucks. The worst part was that if I had bought an Eclipse it would have still been under their 60K warranty, instead of Chrysler's 36K ;( I talked to a lot of people about what to do and what the problem might be before I knew, and RRE, DST, M&S Recycling, and other digest members indicated that more and more 2G's are needing tranny work for loss of 2nd gear, so maybe that lot of bad bearings was a big one. For the sake of the DSM community I hope not. Anyway, I did take the opportunity to put in an ACT 2100 and lightened flywheel from RRE, so it was not a total loss. Yeah honey, the bill was $2300...;) Good luck- I hope this did not apply to you."
QA #220
Last Updated:
2018-11-06 04:33
Why does my automatic transmission sometimes refuse to accelerate?
David Cox had a problem where the engine RPMs would jump and the car wouldn't accelerate. In his case, it was the torque converter. Dan Henderson also had this problem, but all that was required was to refill the transmission with the correct amount of fluid.
In the case where the automatic transmission works except for the overdrive (4th gear), Kurtis Bredda had the "end clutch" (Mitsubishi part # MD723508) fail. Please see http://www.plymouthlaser.com/ for information on end clutch replacement.
QA #221
Last Updated:
2018-11-06 04:33
Why does my transmission 'howl' or whine a lot when slowing down?
According to Terry Livermore in the July 8, 2000 Digest:
"Winding down or "coast down" whine or howl noises that go away when the accelerator is depressed are often caused by a loose or worn drive pinion bearing in the rear differential. These are usually loudest between 45 to 25 MPH. I once pulled the transfer case and driveshaft and drove a little to make sure before I decided where mine was coming from."
QA #222
Last Updated:
2018-11-06 04:34
Why is my transmission output shaft is wearing away?
Transmission shaft spline wear can incorrectly be blamed on 'rusting'. It is usually the result of loose parts in the driveline setup that shift around, eventually grinding away the splines.
Read Jack's Transmissions page about output shaft spline wear
QA #223
Last Updated:
2018-11-06 04:34
My dash lights / headlights / interior lights dim when I press the brakes! Is there a fix?
Similar Questions:
My dash lights / interior lights dim when the turn signal is on! Is there a fix?
My headlights dim at idle! Is there a fix?
This is normal for most DSMs. The alternator output drops slightly when the engine is idling, and the headlights will dim slightly.
Similarily, turning on the brake lights or turn signal puts an additional electrical load on the alternator. As a result, the alternator output voltage drops slightly, resulting in slightly dimmer lights. This holds true even for Canadians-spec DSMs equipped with the larger 90A alternator, and especially at idle. It is not a sign of malfunction.
QA #224
My power windows are slow or sticky. Is there a fix?
Most DSMs have this problem. Here are the fixes, courtesy of Tom Stangl (the VFAQ man), from a post in the Digest of Sept 25, 1998:
"The fixes are, in increasing order of difficulty
1 - Clean and lube the rubber channels in the window frame everywhere you can get to them without tearing the door apart. Do this by getting any rubber/vinyl cleaner, putting it on a rag, and wiping the channels until the rag comes out clean. This may take a LOT of cleaning. Then lube with NuVinyl, anti-static ArmorAll, or even dielectric grease (YES, this grease works well and does not gum up if put on VERY lightly and then rubbed off).
2 - Open up the door, and clean/lube the bottom section of the rubber channels you couldn't get to in #1. This will take raising and lowering the window to get all the areas.
3 - Check the bolts that hold the window to the window guide bar to make sure they are not loose.
4 - Loosen the bolts that hold the guide bar to the door, and move it forward or back to get the window to go up perfectly straight (not a lot of adjustment here, but it doesn't take much).
5 - Loosen the window guides (the metal brackets covered in bristly material) a little so they don't push on the window so hard."
Michael Reisin reported good results with using silicone grease of the type normally used on stock plug boots. He recommends greasing the window glass run channels in the interior of the door very well with this grease for a semi-permanent fix to the sticky window problem.
For those who are truly sick of the problem and don't mind using a little judicious force to set things right, Jeff Earl's solution involves bending the window track (only a little, so chill out) and removing a fastener that appears to interfere with the window operation.
Tom Stangl has a FAQ for this particular problem up now. Also try using the FAQ Locator to find it, or other FAQs on this problem.
QA #225
My power locks don't work right! Is there a fix?
Problems with the power lock switches, lock mechanisms and actuators seem to be more common on 2G cars than 1G cars. Some of the problems have been caused by loose window switches, while others have been blamed on contamination of the lock mechanisms with debris, or simply worn out actuators.
Also, one DSMer reported a factory build problem on certain limited '99 model cars. Apparantly, the factory applied too much sealant to the inside of the door. The extra sealant (or 'gunk') can run and leak into the door locks, causing them to progressively freeze up or otherwise misbehave.
Unfortunately, the only solutions are to repair or replace the affected parts. Loose window switches can usually be fixed by repairing the screw mounting points that hold them in the door. Actuators generally must be replaced, as do door lock mechanisms.
QA #226
My factory alarm doesn't work right! Is there a fix?
If the doors unlock themselves, it's often because the alarm "thinks" there is a key in the ignition. Improper installation of a turbo timer can cause this. This is a feature designed to prevent you locking your keys in your car.
If the alarm does not go off when the door is opened, the door pinswitches require cleaning or replacement. The switches corrode over time. Sometimes cleaning with baking soda is all that is required.
QA #227
My stock battery died after only (x) months! Is there a fix?
Similar Questions:
My battery keeps dying! Is there a fix?
The stock batteries in DSMs are not reputed to last very long. Many people experience failures within the first year.
Most people recommend replacing the stock battery with another brand, such as an Optima, Diehard or other aftermarket make.
It should be noted that poor contact (corrosion) on the battery terminals can cause the battery to behave as if it were dead, even though it may be ok. Also, persistently dead batteries may be the fault of the alternator or voltage regulator, not the battery. Poor idle and other problems can be caused by a defective battery.
Another little-known and highly annoying fact is that auto batteries, with few exceptions, are not designed to be run dead and then recharged, making them very different from most other rechargeable batteries. Recharging the battery too quickly will result in large amounts of internal heat, causing battery damage. Typical recharging methods (auto battery chargers, or running the car for a while) may damage even "bulletproof" batteries. Charge dead batteries gently to avoid this problem.
Those caught in the dead-battery trap will want this refresher course in how to properly jumpstart a car. A few notes on these techniques: the negative is connected away from the dead battery (onto the frame) to minimize the chance of creating a spark that might ignite hydrogen gas leaking from the dead battery. This is what can cause a battery to explode, not the 'parallel' nature of the batteries, as described in DDD#7. Fortunately, few modern automotive batteries are prone to leaking flammable gases, but better safe than sorry.
For lots of info on batteries in general, read Alex's Electronic Resource Library
The Last Word: Some DSMs just seem to eat batteries. The proliferation of stock and aftermarket electrical accessories such as headlights, fog lights, in-car entertainment and navigation systems can strain a 12V system. That's why some car makers have changed to the 42V system. Storing a car for the winter with the battery connected can also draw down the cells owing to current draws from accessories in standby modes.
Battery-eating monster cars may also eat a corresponding number of alternators, making things extra hard on the battery. Investing a hardy deep-cycle battery like an Optima yellow or blue top might prolong your battery life - or, possibly, just give you enough to limp home the next time your alternator fails. Remember, the less times you discharge your battery, the better - even one discharge to 9V or less can be quite hard on it.
QA #228
I just installed a [fuel pump] and it's really noisy! Is there a fix?
No. Aftermarket pumps are almost always louder than the stock pump - it is one of the prices you pay for getting the increased pump performance. The Walboro upgrade pumps are notorious for this 'problem', while ND and the Supra fuel pump are reportedly a little quieter (but more expensive). Adding soundproofing to the rear of the car should help.
Deatschwerks fuel pumps are turbine based and are reported to be much quieter and are E85 compatible.
QA #229
Last Updated:
2016-07-13 09:35
My fuel pump changes pitch when the [turn signals/radio/lights/other electrical device] is on! Is there a fix?
This is normal, and is a symptom of the alternator voltage dropping while under load - the same reason why headlights tend to dim at idle. Tom Stangl did some testing with a fuel pressure gauge and found that his fuel pressure remained 'rock solid' despite the changing noise of the fuel pump, indicating the pump is still pushing more fuel than the fuel pressure regulator needs.
Those who find this problem annoying or worrisome can fix it (or at least mitigate it somewhat) by doing the fuel pump wiring upgrade described here.
QA #230
My fuel gauge reads incorrectly! Is there a fix?
This is largely a 2G problem, where the fuel gauge sender unit has been knocked out of position. This often happens when the dealer does the gas tank recall on the car.
2G owners should look into getting the sender unit fixed.
QA #231
My dash switches do not light up at night anymore! Is there a fix?
If all your lights are out, all at once, it is likely that the fuse for either the rear brake lights or rear marker lights has burned out. This fuse is linked to the dash lights to alert the driver that something is wrong. Check the fuses.
Most DSMs will have at least one switch light burned out by now. Probably more.
QA #232
My instrument warning lights glow/flicker under acceleration! Is there a fix?
This is often because your battery is sliding around and contacting the top of the hood momentarily. Check your battery and make sure it is secure.
QA #233
My cruise control doesn't work! Is there a fix?
Similar Questions:
My cruise control won't set! Is there a fix?
My cruise control won't maintain a set speed! Is there a fix?
This is usually an indication that the speed sensor [[What is a speed sensor?]] behind the speedometer has failed. Without an accurate speed reference the cruise control refuses to set.
Another possible problem is wear on the clutch pedal, preventing the clutch pedal from coming up all the way. If this occurs the pedal will not press the switch that tells the ECU that the clutch is engaged. Consequently, the ECU "thinks" the clutch pedal is down and it won't allow the cruise control to be set.
An easy test is to pull up the clutch pedal with your foot and try the cruise control again. If it works, you have clutch linkage problems. For more information on this problem, read the answer to this question.
If the cruise control will set, a split vacuum hose caused cruise control to continually drop the vehicle speed. Eventually the hose popped off completely, and the cruise would not maintain any speed at all. Several DSMers have run into this problem
If the cruise control sets and holds speed, but 'hunts' (oscillates) around the correct speed, don't worry too much. Even stock DSMs have a certain point where the cruise control will oscillate slightly. This is due to the nature of the turbocharged engine - when the cruise control speeds the car up, the turbo kicks in and the car accelerates faster than the cruise control expected it to. The cruise is forced to decelerate to compensate, but the car will also slow down faster than expected as the turbo pressure dies out. The net result is a slight, constant surging on and off boost.
QA #234
There is a loud "click" sound whenever I use my intermittent wipers! Is there a fix?
2G cars have this sound. It is normal.
1Gs have this sound too - for the rear wiper.
QA #235
Is the "Check Engine" light supposed to come on when I start the car?
Yes. It should turn off after a few seconds.
If your "Check Engine" light does not turn on, the bulb is probably burned out. Replace it.
QA #236
Is the "Check Engine" light supposed to be on all the time?
No. Get it serviced.
QA #237
What does the "Check Engine" light mean?
This indicator is lit every time the ECU detects a problem (any kind) with the car. Often the cause is a sensor failure.
QA #238
How can I find out what the "Check Engine" light means?
The ECU outputs a diagnostic code whenever the "Check Engine" light is lit. For 1G owners, you can:
- use a Chrysler scan tool to read the code. Not an option for most people, but still.....
- use a multimeter to read the code, as described in the shop manual, or as in this post by an early club member.
- use an LED to read the code, as described in this post by another club member, and this post from December 1998. The December post also details many of the output codes.
- use a buzzer to read the code, as described at the Diagnostic Engine Codes and Procedure page. This page also has a list of many of the codes.
2G turbo owners need an OBD tool to read the ECU codes. Non-turbo owners can cycle the ignition key on-off-on-off-on, and the "Check Engine" light will blink out the codes. For NT owners, the codes are the same as a Neon. For the meaning of the codes, check the Digest archives, look in a shop manual, or check out this link from the 2G non-turbo pages.
Lots of 2G turbo owners mistakenly try to cycle the ignition key to get the 'Check Engine' light to blink out the codes. It doesn't work on Mitsubishi engines - only Chrysler engines. 2G NT cars have 420A Chrysler engines very similar to the Neon cars, while 2G T cars have 4G63 Mitsubishi engines similar to 1G cars. For this reason the codes are also different between 2G turbo and non-turbo cars.
Check this section of the Club DSM Homepage [Technical Difficulties/ECU Problems/Error Code Readers] for more information.
QA #239
How do I get rid of the "Check Engine" light? How do I reset the ECU? Why should I reset the ECU?
It is usually not a good idea to reset the ECU without first figuring out what is wrong. See "How can I find out what the "Check Engine" light means?", above. In many cases, resetting the ECU will increase the learn time, not decrease it.
For instructions on resetting the ECU and what this can accomplish, read this issue of The Diagnostic Port, and this section of the ECU Theory Series, both by Technomotive
QA #240
I installed an [exhaust/test pipe/cat] and now my "Check Engine" light is on? Is there a fix?
This is usually a 2G problem. For a good explanation of why it happens, read the comments at the bottom of this post, and Scott Evans' description of ODBII functions. So far the only "fixes" are to replace the missing oxygen sensor, or to try and create and electronic replica "sensor" that makes the ECU believe the original sensor is still in place. Since the OBDII software in the second generation ECU also does sensor diagnositics, creating a fake sensor can be a touch tricky. Information on how this might be accomplished can be found here courtesy of Blake Heisler.
QA #241
I keep getting a code 44 (ignition problem) from the ECU! Is there a fix?
Here is an excerpt from message #7 of the December 22, 1998 Digest, where Todd Day (the 'talon mgr') summarizes this problem:
" What to do if you get a code 44? Well, it seems that no one on this list (myself included) ever got this code thrown for a legitimate reason, like the coil being blown or the drive transistors being dead. I would start with the connections that go from the ECU to the drive transistors, the connections between the drive transistors and the coils, and finally the "tachometer" feedback link from the transistor unit to the ECU. Lastly, check the ground on the transitors as well as the power lead to the coils.
Oldtimers on this list might remember that this very problem happened to me the morning of the Virginia City Hillclimb a few years back. I tried messing around with a lot of stuff, including wiggling all the coil connections. The problem magically went away and didn't come back until a few days later. I wiggled the connections again and it didn't come back until the next roadtrip I took. Again, after that, it happened on a long roadtrip. I've not since seen it in over four years. I have done nothing special to solve the problem other than wiggling the connections. Guess the last time was the charm."
Fortunately, Darrick Yezak has come up with a more specific answer to the code 44 gremlin. On his 1990 AWD, the wiring harness leading to the power transistor was short enough to actually end up pulling the wires out of the connector. After he extended the wires to eliminate the tension, his code 44 problem went away. He said he had similar success with two different cars. Aaron Litt found a similar problem - the bottom two connections on his '90 pack connector became corroded and caused a code 44 problem. Those plagued with the code 44 will want to check their harness and connector ASAP.
Code 44 CAN come up legitimately, but you will know it, because you'll suddenly be driving a 3000 lb go-kart. The power transistor is easier to change, so try it first.
QA #242
My hatch struts/supports do not work anymore! Is there a fix?
Similar Questions:
Has anybody ever replaced the hatch struts/supports on their [DSM]?
Just replace the supports - it's not hard. They are available at JC Whitney, Canadian Tire and other automotive supply stores. The respective shops can look up the correct part number for you.
Read Tom Stangl's VFAQ on the subject for everything you need to know about how to do it.
To help prevent the struts from wearing out prematurely, James Williamson suggests not 'helping' the hatch rise by pushing it upwards. This apparently helps keep the pressurized gases inside the struts.
QA #243
Last Updated:
2016-06-09 07:55
My paint is flaking/cracking/spiderwebbing/disintegrating/turning to powder! Is there a fix?
Many owners, both 1G and 2G, have had problems with paint. Certain owners have found the clearcoat layer of the paint turns to powder, making black cars appear grey. Others have had problems with cracking, flaking, or imperfections in the paint.
Those who have problems can sometimes get satisfaction from a dealership - Chrysler and Mitsubishi are dealing with complaints on a 'one-on-one' basis. Dealers will sometimes repaint the affected areas for free. Unfortunately this is not a recall, and usually the car is out of warranty, but it's worth a shot. 1995 owners may have an edge, as there is a TSB for this problem on 1995 cars only (TSB-95-51-001), but it's still not a recall.
There is a nationwide class-action lawsuit being brought against Chrysler for paint problems. Check out the Hagens Berman website for some more information on this lawsuit. You can also read Kim's Peeling Paint Page for more links relating to the problem. Kim apparantly took Chrysler to court over her paint problems, and has advice which is generally applicable to all automotive problems. The class-action lawsuit is not a substitute for trying to work out problems with your local dealer.
Hey, it's a used car, and probably an old one at that. Most of them will have flaking clearcoat somewhere.
QA #244
My headlights are cloudy/foggy/yellowed/scratched! Is there a fix?
There are several things you can try to fix headlight lenses that have become cloudy, yellowed or scratched. Click on the method to find the referring poster:
- metal polish;
- plastic or plexiglass polish;
- C.L.R., or another similar rust remover;
- Wet sanding the lenses with ultra-fine grit sandpaper;
- or
- simply replacing the headlights with newer ones.
Robert Thompson had this to say regarding his headlight polishing experience (edited):
"Cataract Surgery on a 1993 TSi
- 1500 wet
- 2000 wet
- Mothers Mag & Alum polish ($8.49 CT) ( this contains Kerosene, no wonder it "works" on plastic )
- Mothers Stage 1 Cleaner (wax kit) ( also contains Kerosene )
- Mothers Stage 2 Sealer
- Mothers Stage 3 Wax
- Buffed, more Buffing, still more.
Had to repeat this 3 times!
The results? Well, to start, my lens looked like they had been sand blasted. Millions of little craters that had blended and smoothed into a dull crappy looking plastic lens. You really could not look into the light and see a bulb. (I was amazed as just how crappy they were when I sat down and really looked at them)
What made this job a lot easier to do was I have a Black & Decker "Mouse". So I just strapped on the appropriate adapter and buzzed away....
Speaking of the Dremel, DO NOT use it for this project. You can't get it to turn slow enough and in a nano second you will "burn" the lens. (Gee, how would I know? Well... It takes about 30 min to sand out the burn.)"
Be sure the check the FAQ Locator for up to date information.
Replacement headlights are available on eBay. Just replace them.
QA #245
My [2G] has leaky windshield washer nozzles. Is there a fix?
There is a TSB for this problem, number TSB080795, NHTSA Item Number: SB039984. Unfortunately, no summary or listing of this TSB is currently available on the web. (Anyone who is willing to take the time to separate the 1995 DSM TSBs from the 1995 Sebring/Avenger TSBs should contact Todd Day for information on obtaining a copy of the TSB reference book.)
One DSMer suggested simply sticking a pin into the vent hole on the windshield washer reservoir cap. The stock hole is so small that it is hardly visible, and can easily get clogged. Cleaning or enlarging the hole keep pressure from building up in the system.
QA #246
My [2G] sunroof leaks water! Is there a fix?
It is likely that the drain hoses underneath the sunroof are plugged. You can unpluf them with some stiff, flexible cord like 18AWG wire or weed-eater line.
QA #247
Last Updated:
2016-06-08 07:17
My [2G] sunroof rattles/whistles/leaks air! Is there a fix?
..Unanswered..
QA #248
My [DSM] has too much understeer! Is there a fix?
All DSMs understeer from the factory. This is a natural consequence of using a FWD platform, since even the AWD cars were based on the FWD chassis. Understeer is generally considered 'safer' for the average driver, but can be a real pain for the advanced street or race driver.
Running a sway bar in the rear along with softening the front suspension and tightening the rear seems to help.
Fortunately, many vendors offer suspension upgrades for DSMs. With judicious tuning (possibly with the help of a FAQ page from the Calgary Area DSM site (mirrored here), the understeer can be reduced or eliminated.
QA #249
Last Updated:
2016-06-02 03:27
My wheels are tilted inwards! Is there a fix?
Similar Questions:
My [DSM] has too much camber in the [front/rear]. Is there a fix?
It is perfectly normal for the wheels (especially the rear wheels) of most DSMs to be tilted 'inwards' - that is, having the top of the wheels closer to the centerline than the bottom. This is the amount of camber that the car has stock, and is not a cause for concern.
For those with measureable excessive negative camber, there are several correction kits available from various vendors which involve plates, bolts, slotted struts or shorter control arms. Several DIY methods exist using off-the-shelf parts as well, meaning there is something available for both front and rear on 1G and 2G cars. Usually, these kits are not necessary unless the car has been lowered, in which case camber correction becomes a necessity.
Canadians will be happy to know that Canadian Tire sells the eccentric bolts (TRW part# 13251A) required to do the front camber fix. Americans can buy Ingalls Engineering bolts from NAPA. DSMers from both countries can investigate the Ingalls Engineering websitefor more information.
With regards to the control arm modifications, note that hardcore racers may prefer extending the upper arm, rather than shortening the lower arm, to prevent the rear wheels from being pulled in towards the centreline of the car. The difference is so slight, though, that most people can't tell the difference. Additionally, the upper arms need not be as strong as the lower arms, allowing the use of less beefy (and expensive) heim joints for adjustable upper arms. This is not a factor for solid welded arms. Brackets for extending the upper rear control used to be sold by Taboo Speed Shop but seem to be discontinued.
In August '99, Ingalls Engineering released a kit for adjusting rear camber on 1Gs using adjustable control arms. They also have a kit using brackets for the same task. Check their website for more information - it's the 3842 kit.
Several vendors also offer camber plates or other solutions for those wanting the ultimate in adjustability. For these, shop around the vendors page for Tiel, Carerra, Ground Control or other make camber plates. 1G owners be warned - they only fit the front.
QA #250
Last Updated:
2016-11-28 06:29
My car shudders/vibrates when cruising! Is there a fix?
Similar Questions:
My car still shudders/vibrates when cruising, even after wheel balancing! Is there a fix?
Vibration problems can be caused by a number of things, including:
- warped brake rotors - see brake wraping,
- badly balanced tires
- flat-spotted tires
- bent or out-of-true wheels
- mud or debris inside the wheel
If repeated tire balancing fails to solve the problem, the tires may not be 'match mounted'. This process ensures the tires and wheels are combined to make the most round combination possible. Since tires are never perfectly round, this can be important.
All good-quality tire manufacturers provide tire markings for match mounting, but sometimes tire shops don't know how to do it. See the Tire Rack Tech Page.
Drivers who experience an oscillating vibration (that starts, fades out and fades in again) may be the victim of flat-spotted tires. As the unbalanced tires rotate (at slightly different speeds), they will phase in and out of balance with each other. The only solution here is to replace the tires.
QA #251
Last Updated:
2016-11-28 06:33
Where can I get [longer/replacement] wheel studs for my [DSM]?
Similar Questions:
I broke a wheel stud! Is there a fix? Where do I get the studs?
Using wheel spacers usually requires using longer wheel studs. ARP makes some longer wheel studs available through vendors.
ARP Extended-Length Wheel Studs: DSM
Replacing the stud is fairly easy;
1. Hammer out the old wheel studs
2. Buy a good amount of thick washers fit the stud. (5-8 should do the trick)
3. Put the new stud through and stack washers on threaded end.
4. Grab an air hammer and with your new lug nut (should be open ended) tighten it down as much as you can with air hammer to pull the stud through.
You may have to heat the hub a little to get the new studs to seat. If you have ABS, be mindeful of the sensor.
QA #252
Last Updated:
2016-05-31 08:19
My stock wheels are bashed up! Is there a fix?
Similar Questions:
How can I refinish my stock wheels?
Some shops will refinish wheels. If you want to do it yourself, you can do what Dennis Camacho of Canada DSM did:
I just refinished my stock rims and very much pleased with the result. Here's what I did:
- I used a rotating wire brush to loosen that old flaky dull grey finish then I repeatedly soaked them with that automotive paint remover from CT [Canadian Tire] that Scharok mentioned. The old finish is so tough that further sanding is required to expose the aluminum totally.
- I purchased three spray cans of VHT rims paint at Performance Improvements at $11. each. Do not use the MM rims paint from CT. They 're so thin that you'll need at least 6 cans to get the right coating thickness. VHT covered well in just one coat. Follow the instructions on the can for best result.
-If you want to keep the ouside part of the rims in natural aluminum, use a 320 sand paper to remove the oxidized surface then buff to shine with a red rubbing compound using a 4" cloth buffer attached to an electric drill. To preserve the shine, spray a good coat of VHT rims clear coat. As it says on the directions, DO NOT use clear coat on the painted surface as flaking and yellowing will result and it will be most obvious on a white finish. Good luck!
Here is an archived copy of the "Stock Painted Aluminum Wheel Refinishing Step by Step" VFAQ written by Jeff Brinkerhoff
QA #253
Last Updated:
2016-12-01 06:55
Has anybody ever installed a turbo timer on a [DSM] with a factory alarm system?
Similar Questions:
My turbo timer won't work with the factory alarm! Is there a fix?
If you're having problems with a Greddy Turbo Timer, you can check the manual from the Greddy website.
QA #254
My steering goes away at high RPMs! Is there a fix?
This is a 'feature' of the DSM power steering system, which includes a speed-sensitivity feature that is intended to decrease operating effort at lower RPMs. This also means poorer response at high RPM, including the low speed/high RPM combinations required forautox.
DSS sells a modified power steering pump that fixes this problem - other vendors may as well.
Victor Del Col has worked out a fix for the high RPM cutout problem on 2G cars. There is a similar fix for 1G cars; a few details are available at this Calgary Area DSM FAQ page, and there is a VFAQ on how to modify the pump here, courtesy of Matt Price. [You would have found the latter VFAQ (hint, hint) had you checked the FAQ Locator.]
QA #255
The carpet in the front of my car is wet! Is there a fix?
WATER:
- If it is water, this is usually caused by the air conditioning condensor drain/dump tube becoming plugged or clogged. Water condensing inside the A/C system runs out onto the carpeting. Cleaning out the tube solves the problem.
- Rot on the firewall and water pooling then draining into the car.
- Drainage for body panels blocked.
COOLANT:
- Check your heater core connections.
QA #256
Last Updated:
2015-08-14 10:51
Has anybody ever washed the engine on a [DSM]?
Similar Questions:
How do you wash the engine on a [DSM]?
What parts do I need to cover when washing the engine bay?
I washed the engine on my [DSM], and now it won't run! What's wrong? Is there a fix?
My [DSM] won't run! I washed the engine, and it started fine then! What's wrong? Is there a fix?
Many people who experience problems immediately or shortly after washing their engine have damaged the crankshaft angle sensor on the car. Without this sensor, the ECU cannot tell what position the crankshaft is in, and the engine cannot run.
Usually, people who wash their engine are able to cover the electrical sensors prior to washing. If this is done, the engine will probably start up fine right after washing. However, driving the car with a wet engine will create steam, which can get inside the crankshaft angle sensor housing. Once the car is shut off, the steam condenses into water, which wrecks the sensor.
Some owners are able to 'revive' their sensors, but most are dead. Some Digesters have investigated if they can be repaired, but so far nobody has been able to do so.
To prevent crank angle sensor damage, either wait until the engine is mostly dry before driving, or drive it for a while and then raise the hood to allow the steam to escape.
Video: (non descriptive) Project DSM Engine Bay Cleaning
Video: Tom's Turbo Garage VR4 Engine Detail
##############################################################
Here is one way to do the engine:
** Important. NEVER USE A PRESSURE WASHER **
Start with a cold engine.
Run the engine until the engine is warm to the touch.
Shut the car off.
Place plastic bags / Saran Wrap / Baggies over the
- Alternator
- Cam Angle Sensor
- any other sensitive electronics
Choices of cleaner:
- Scrubbing Bubbles has been reported to work very well and safe for painted surfaces. I like the Foam as it clings as it cleans and easier to see.
- For more stubborn areas, diluted degreaser (or natural degreaser like orange).
Spray and scrub the engine. Avoid getting water in the electrical connectors.
Use a light mist of water to rinse everything.
Once done, remove the bags and either wait until dry or start the engine (at your own risk) again with the hood up. Let the water evaporate.
OPTIONAL: Once the engine is up to temp, if you like your rubber (and painted parts) shiney (NOT THE BELTS!), spray regular Armor All on them, then go for a non dusty drive. In 30 mins, the heat applied to Armor All will have coated the rubber in shiney even coat.
QA #257
Last Updated:
2016-11-28 08:11
What should I do to make my car faster, or handle better?
This is probably the #1 question that people love to hate. Performance upgrades to the DSM cars have been extensively discussed since 1989, resulting in a easy-to-follow and initially inexpensive upgrade schedules for our machines. These schedules, when followed, willeventually make your car the Godzilla you've always dreamed of owning.
Before posting questions, please do the following:
- DSMTuners Thread: Basic Horsepower Upgrades - 1G 4G63T
- Check out the Go Faster Recipe for Turbos (1G cars)
- Check out the Go Faster/Turn Faster/Look Faster Pages for Turbos (2G cars)
- Road Race Engineering's suggested 2G DSM upgrade path
- Even more tech guides at DSMtuners.
- Check out Luis Haddock's Newbies Page.
- For handling, read Benjamin Sabini's Shocks & Springs FAQ.
- More handling in the Race Car Dynamics series, written by Dennis Grant.
- A quick reference guide to handling can be found at this FAQ page of the Calgary Area DSM site (mirrored on this site here).
- Auto owners: check out Club DSM Automatic. (Recommended for MT owners, too.)
- Look at the staged upgrade series from Buschur Racing, Extreme Motorsports, Doug's Dynopower, Archer Racing, and Diamond Star Specialties.
- Look around at the other vendors.
- Read the VFAQs at Tom's site for information on common upgrades.
- Finally, a brief guide to how to drive your new beast can be found at rallycars.com.
The Last Word: Given the current age of these cars, you'd better be prepared to invest in a lot of replacement stock parts to keep everything together during the upgrades.
QA #258
Last Updated:
2016-06-01 10:52
I have a [DSM] and I want to run [this time] in [a race]. What do I need to buy?
Similar Questions:
I have a [DSM] with [components] and I want to beat a [non-DSM] in [a race]. What do I need to do this?
This is the pretty much same question as [[What should I do to make my car faster, or handle better?]] above.
You will also want to check the Fastest DSM Drag Times page, maintained by James Heck, to see who is running times similar to those you want. Auto owners can check out the Club DSM Automatic pages for more auto times.
You will likely also need practice. As one Digest member said:
"The single best investment you can make ... is *seat time* as the adjustment range on the nut behind the wheel is really large. :)"
QA #259
What is the best [component]?
Including:
| Air intake system | Exhaust system | Turbo upgrade | Boost controller |
| Fuel computer | Fuel pump | Brakes | Tires |
| Spark plugs | Plug wires | Blow-off valve | Clutch |
| Injectors | Roof rack | Hitch | Performance fluids |
| Wheels | Stereo system | Alarm system |
or any other parts/modification
These questions have no easy answer as they are all related to how you wish your part/system/car to perform and how much money you are willing to spend. Also, the sheer variety of upgrade parts available prohibits even a partial listing here.
Before posting questions, please do the following:
- Look at the staged upgrade series from Buschur Racing, Extreme Motorsports, Doug's Dynopower and Diamond Star Specialties.
- Check out the product info from other vendors.
- Go to the Product Review Pages to read opinions on the parts you want.
- 2G non-turbo owners will also wish to read the 2G NT Product Review Pages.
- Read the VFAQs at Tom's site or Brad's site for information on common upgrades.
- Use the FAQ Locator to research more specific questions.
- Search the Club DSM archives for information on the product(s) you are interested in
There are many popular accessories, parts and upgrades for many aspects of the DSM cars. By reading the above material you will get the required basic information and background necessary to make a decision for yourself.
For information on which parts to buy first, look at making your car faster, above.
QA #260
Where can I buy a [component]?
Similar Questions:
How much should a [component] cost?
Does anybody have a [component] for sale?
Including:
| Air intake system | Exhaust system | Turbo upgrade | Boost controller |
| Fuel computer | Fuel pump | Brakes | Tires |
| Spark plugs | Plug wires | Blow-off valve | Clutch |
| Injectors | Roof rack | Hitch | Performance fluids |
| Wheels | Lights | Audio system |
or any other parts/modification
There are obviously many choices for sources. Local shops often have common items such as plugs, wires and fluids. Don't forget specialty speed shops for more esoteric stuff, such as clutches and fuel pumps. Other retail chains handle audio, cosmetics and accessories. Non-automotive outlets, such as industrial supply stores and aviation equipment vendors, often have equipment which can easily be adapted for DSM use at a fraction of the cost. For a good example, see Brad Baur's Westech EGT installation page, where he installs an EGT originally means for airplanes.
Several vendors specialize in equipment for DSM cars; many have comprehensive online catalogs. Between them all, they offer just about every possible upgrade for both first and second-generation cars. Look around! Check the archives, too, as many people have posted good deals on various parts.
For those who are interested in used parts, be certain to check out the DSM Parts Trader and DSMtrader.com. These classified ad databases specialize in DSMs only, and good deals are not hard to find. Some vendors post their current specials there, too.
QA #261
Where can I buy the following accessories for my [DSM]?
| Headlight covers | Taillight covers | Spoilers/ wings | body kits |
| ground effects | side skirts | window tinting | decals / stickers |
or any other appearance item
With so many companies offering to part you from your money for these accessories, I sincerely hope you don't need to ask this question. Hundreds of shops sell these types of accessories world-wide. Start with your local Yellow Pages. Failing that, a quick web search would have netted you the following manufacturing companies:
- G.T. Styling - headlight/taillight covers, sunshades, etc.
- Wings West - body kits, spoilers, etc.
- Squidskins (Canada) - hoods and parts for DSM and motorcycle.
- Aero FX - spoilers, wings, rims, etc.
- Factory Wings
- Sportwing
- Wholesales Hyperformance - body kits
- FX Designs
- Taboo Speed Shop
- On-Der-Ground Designs
- Spoilers-4-Less
There are dozens of other manufacturers, and thousands of retailers. Look around!
QA #262
Has anybody ever installed a [component] on a [DSM]?
Including:
| Air intake system | Exhaust system | Turbo upgrade | Boost controller |
| Fuel computer | Fuel pump | Brakes | Tires |
| Spark plugs | Plug wires | Blow-off valve | Clutch |
| Injectors | Roof rack | Hitch | Performance fluids |
| Wheels | Lights | Audio system | Thermostat |
any other parts/modification
Probably. Over the past 25 years people have applied a lot of thinking and a great deal of innovation to DSMs.
Before posting questions, please do the following:
- Check out the How-To section at Club DSM.
- Look for comprehensive install information at the Toms VFAQ site and Brad's VFAQ site.
- More FAQs are located at Club DSM Automatic, as well as various regional groups.
- Don't forget the FAQ Locator.
- Search the Club DSM archives for information on the product(s) you are interested in
- Check out the product info from vendors to see if the product you want is commercially made. Also check at local vendors that specialize in the item(s) you are searching for.
- Read further down in this FAQ for information on specific components, products or upgrades.
QA #263
How do I do [a procedure] on my car?
Including:
| Tune ups | Air filter replacement | Component installation |
| Scheduled service | Minor repairs | Major repairs |
The simple answer to this is to buy a shop manual. The manual contains all the information you will need on disassembly, repairs, and maintenance of the Diamond Star vehicles. Go here for information on how to purchase your very own copy.
However, despite their value, not everybody has a shop manual. Additionally, most upgrade procedures, which deal with non-OEM parts, are obviously not covered in the manual. The DSM community being what it is, though, many nice folks have written FAQ and VFAQ files which detail many common upgrades. Take a look at [[Has anybody installed a component?]].
QA #264
I want to install a [component]. How do I get the [connections] through the firewall?
There are several methods. A good starting point for 1Gs is this post by Sean Costall (look for the section beginning "WHERE TO CROSS THE !#@$%@#$^@$#% FIREWALL ON 1G TALONS"). For the more ambitious, Brian Hood has pointer out that this location can also be accessed by removing the driver's side fenderwell (after taking the wheel off, of course).
2Gers should read this one by Brent Cook. There have been comments that 2G NTs may find the steering column boot the easiest to work with, since the other opening mentioned on turbo cars doesn't seem to be present on NTs.
QA #265
My [component] broke while I [was doing something]. How do I fix it?
Similar Questions:
I have a problem with my [component], has anybody fixed it?
Including:
| Air intake system | Exhaust system | Turbo upgrade | Boost controller |
| Fuel computer | Fuel pump | Brakes | Tires |
| Spark plugs | Plug wires | Blow-off valve | Clutch |
| Injectors |
or any other part/modification
This is essentially identical to the installation question, above. If you are having problems with something that you believe is unrelated to your modifications, also check out the NHTSA recall information, and the TSB page to see if there is a Technical Service Bulletin (see the Glossary) about the problem. Don't forget the FAQ locator, and take a look at David Gawlowski's Turbocharger Troubleshooting diagnostic chart for a good look at some common problems and their causes.
QA #266
Does anybody know the specifications for the [component]?
Similar Questions:
Can somebody please tell me how a [component] works?
What does this [component] do? How does it operate?
Including:
| Air intake system | Exhaust system | Boost controller |
| Blow-off valve | Turbocharger | Wastegate |
| Injectors | Engine Control Unit (ECU) |
and most other components
Most aspects of DSM operation have been thoroughly discussed over the past decade, so most of these questions have already been answered at least once. Please check the main archives, or do an archive search to locate the answers you need, before posting questions to the mailing list. Most answers come from the owners of the shop manuals, which should tell you something. See below for information on how to order your very own copy.
Some popular questions regarding turbos and other components have been answered in Benjamin Sabini's Top Ten FAQ page. Dennis Grant posted an excellent Turbo Fundamentals series, which is a must read on turbo theory and operation. You can also read the Race Car Dynamics series, which details the basics of suspension components.
Having said this, however, there are questions which have not been asked, or perhaps have been asked but not answered in the Digest. Should you find such a question, please do ask, and summarize the responses in a [SUM] posting.
QA #267
Everybody says that I should have a [component]. It seems like a lot of money. What's wrong with the stock one?
It depends on the component, and what you are trying to do with the car. In most cases, the component (or something similar) is a requirement if you are to meet the performance levels you want. Other parts are a requirement so you are able to accurately monitor the automobile in it's modified condition, and prevent serious problems from destroying your car.
Sometimes the stock components are simply not able to fulfill their requirements, once the automobile has been modified. Prime examples are the 'boost gauge' on turbo models, which does not really measure boost, or the blow-off valve on 2G cars, which is often unable to hold anything more than factory boost levels. Not replacing the blowoff valve will result in a loss of performance, but no real damage. However, altering the turbocharger system without a replacement boost gauge is a recipe for disaster, and is absolutely not worth the risk for a lousy $30 gauge.
QA #268
What's wrong with the stock boost gauge, and why should I replace it?
A 'boost' gauge is actually a pressure gauge, measuring the amount of pressure in the intake manifold. Problem is, none of the DSM cars actually have a pressure sensor anywhere along the intake path, so the car cannot directly measure intake pressure.
The stock 'boost gauge' actually reads out an educated guess from the ECU as to what the boost should be. The guess is based on RPM and airflow into the engine, both of which the computer does monitor for other reasons.
The guess is reasonably accurate, but is based on the stock engine. As soon as the engine is modified, the intake/RPM relationship changes and the guess is no longer accurate. This holds true even if the only modification is a K&N air filter.
Technically, you do not need to replace the boost gauge unless you are planning to add modifications which change the amount of boost, such as modifying/disconnecting the wastegate solenoid, installing an electronic or manual boost controller or a bigger turbocharger. In this case, you absolutely must have an aftermarket boost gauge installed in your car before proceeding. Failure to install one means you will be changing critical aspects of engine operation without having reliable feedback as to if the changes are safe or not. However, the stock boost gauge will still be unreliable with other engine modifications, such as air filter, exhaust, downpipe, and cat modifications which have only a peripheral effect on intake pressure.
Overboosting the engine can be extremely damaging, even to the overbuilt 2.0 Mitsu four-bangers. Tom Stangl had an unfortunate experience when he accidentally overboosted his engine, resulting in very serious and expensive damage. See here for details. Because of the potential for this type of damage, it is highly recommended that an aftermarket boost gauge be #1 on any DSMers list of modifications.
For more on this topic, see Danny Yoo's boost gauge page, which contains more details as well as links to installation information.
QA #269
Does installing a [component] void my warranty?
In the United States, it does not do so automatically. According to the Magnuson-Moss Warranty Act, the Federal Trade Commission (FTC) has made it illegal for modifications to automatically void your warranty. The important point is that the dealer has to be able todemonstrate that the modification was the cause of the failure. More information can be found at the Specialty Equipment Marketing Association (SEMA) site and the Diesel Injection Service page. You will also want to search the archives for posts by Scott Borders and Jeff Fritz for important highlights of the Act.
However, some dealers are not keen on modified vehicles and may claim that the problem is somehow related to the vehicle modifications. Plus, it is usually better to avoid the entire mess rather than enter an antagonistic relationship with your dealer. Most people recommend talking to the service managers and finding out which ones dislike modifications, and which ones don't mind. Other people install modifications that can be easily reversed, so the car can revert back to stock for each trip to the dealer.
Sometimes, however, you will find yourself in a serious dispute with the dealer. Should it come to this, you will probably need the phone number for either the FTC or SEMA. The FTC, on request, will send out legal information regarding warranty claims. SEMA is actively promoting the MMW Act; more information can be had from SEMA's Steps To Take if Your Warranty Claim is Denied page.
[Tip: you would have already found the SEMA FAQ if you had checked the FAQ Locator.
For audio or electronics enthusiasts, there is also a < href="http://www.cemacity.org/gazette/files/knyrights.htm" TARGET="_top">warranty information page from the Consumer Electronics Manufacturer's Association (CEMA). This page deals specifically with aftermarket mobile electronics and their effect (or, rather, their non-effect) on automotive warranties.
Also keep in mind that different states have different emissions laws in place. By modifying a component that may affect emissions (read: everything engine-related) you may have difficulties with smog checks.
Members outside of the United States may have similar legislation in place; you will have to check with your local authorities for details.
The Last Word: Warranty? What warranty?
QA #270
Can I use a [component] from a [model year] on a [different year]?
Components are largely interchangeable between 1G [1990-94] and 2G [1995-98] cars. However, it is best to check the aspects of a specific component, as detailed in 'Has anybody installed a [component] on a [DSM]?', above. There are a few gotchas between various model years that you have to be wary of. Component swaps between 1Gs and 2G, with few exceptions, should be researched carefully before the attempt is made.
QA #271
Can I use a [component] from a [transmission type] car on a [different transmission type] car?
Tread carefully on this one, as there are now additional differences between the automatic transmission and manual transmission cars to worry about. Some components from some years will be interchangeable, but do double-check before buying. Also see "Can I use a [component] from a [model year] on a [different year]?", above. However, as 90% of the stuff is the same between M/T and A/T, the outlook should be viewed as hopeful.
QA #272
Other cars have "chips" (ECU upgrades) available. Is there a chip for DSMs?
Superchips, Cyntex, Jones Electronic Technologies (JET), GP Performance, and other vendors claim to sell ECU upgrades. However, few DSMers use them.
Many vendors have offered upgrades which are clearly fraudulent. Some vendors, such as Superchips and Richie Broden Racing, have been guilty of selling 'ECU upgrades' with manual boost controllers as part of the kit. In reality, the chips sold with these kits were identical to the stock chips; the performance gains were all by virtue of the MBC. Other vendors have pulled the same trick without including the MBC, counting on human nature to fool the purchaser into believing there is a significant difference between 'their' chip and the normal chip.
Examination of several DSM and non-DSM ECU 'upgrades' by responsible Digest members have revealed no less than seven (7) fraudulent products. Needless to say, trust in these vendors has diminished to nonexistence. Read all about it!
In addition, there are several items that work against ECU upgrades:
- Many DSM ECUs do not have external memories that can be easily swapped out.
- Most vendors do not support non-external-EPROM ECUs; they require much more work.
- ECU upgrades typically assume the car is stock - modified cars may realize zero performance gains, or actually run slower.
- Most vendors do not offer meaningful features, such as fuel cut elimination.
- Zero documented evidence that such upgrades work.
- High cost.
A dead giveaway of inflated performance claims, at least for turbo cars, occurs whenever a vendor claims the ECU upgrade provides an increase in boost pressure. This is an impossibility on the DSM cars without additional equipment. Watch for it!
Special disclaimer for non-turbo cars: no DSMer has ever examined the chip upgrades for NT cars in detail, so no opinion on NT ECU upgrades can be drawn from the above information. However, these are the same vendors which sold the 'upgrades' described above. Evidence supporting the effectiveness of chip upgrades for any year, make or model of automobile is scarce; of this, little of it is the result of well-designed and well-documented experimentation.
Fortunately, Technomotive has come up with solutions that actually work, and are accurately aimed at the needs and desires of the DSM performance enthusiast. They also offer the apothesis of all tuning tools: a true DSM datalogger.
XS Engineering also offers legitimate ECU upgrades. Nobody knows how effective they may be, however, and their upgrades are reportedly expensive - about as much as a PMS unit.
The Last Word: Most of the above-mentioned vendors are long since out of this business. TMO used to sell chips, but stopped some years back. Try DSMchips.com, they're the real deal.
QA #273
How do I jack up my [DSM]?
The correct jacking points on any unibody car for the front end are always the pinch weld closest to the front wheels. For the rear of a unibody car, it is also, you guessed it! Closest to the wheels. The metal is reinforced and double layered only at those points for a reason. So you can jack up the car on the reinforced part.
The majority is failing to understand is that you can't put jack stands/jack on the rocker panel around the pinchweld. You have you use a jack or jack stands on the actual pinch weld or things will get crushed and the underside of the car will be very damaged.
The proper way would to jack the car up on those jacking points, then put a jack stand on the lower control arm or crossmember closest to the wheels, as long as you're not disassembling around those points obviously.. Also remember that using small blocks of 2x4 as a cushion helps a lot.
QA #274
Last Updated:
2016-11-30 02:44
How much horsepower can a stock turbocharger make?
Leon Reitman ran his 4G63 AWD Eagle Summit to 12.04 on a 14B turbo, which is pretty darn good and most likely close to 300WHP.
Here is Leon Reitman's 12.6 Run
Others have similarily achieved low 12s. Actual HP numbers unavailable.
QA #275
Last Updated:
2016-06-01 01:37
How much horsepower can a stock clutch hold?
Technically, clutches don't transfer power, they transfer torque. According to Dirk Starksen of Advanced Clutch Technology (ACT), the formula is T=NxRxFxP, where:
- N=number of clutch surfaces
- T=torque capacity (foot-pounds)
- R=radius of gyration, or size (feet)
- F=coefficient of friction
- P=pressure plate pressure (pounds)
For stock clutches, N is 2, F is about 0.25, and P is 1500-1650 lbs, yielding a maximum hold of about 250 ft-lbs of torque.
QA #276
Are [DSM] injectors high or low impedance?
Turbo models have low impedance injectors (2-3 ohms), and include a resistor pack in the electrical system. Non-turbo models (including the Spyder 2.4L) have high impedance injectors (13-16 ohms) and do not have a resistor pack.
The resistor pack is installed to ‘fool’ your ECU into thinking it is driving high impedance injectors. Vehicles that have low impedance injectors AND resistor packs have ECUs that use a saturated signal to operate low impedance injectors.
If you are unsure because your vehicle is modified, you can measure the resistance across the two electrical terminals of the injector. If the resistance is between 1.5 and 4.0 Ohm you have low impedance injectors. If the resistance is between 8 and 16 Ohm you have high impedance injectors.
Low impedance injectors are designed to be driven by peak and hold signals. Most of the OE manufacturers that produced cars with low-Z injectors chose a “workaround” to using the low-Z injectors since it wasn’t cost effective to produce an ECU with the necessary circuitry and injector drivers to produce these P&H signals for the few high performance cars that needed it.
The way they solved the problem was to add a resistor box into the fuel injector harness, thereby increasing the resistance in the circuit to the higher value needed to prevent the ECU injector drivers from overheating due to excessive current draw. (e.g. low-Z injector resistance is 3.0 Ohm, plus in-line resistor of 7.5 Ohm, making a total resistance of 10.5 Ohm, which is safe for the ECU).
For more information about Injectors, visit the Fuel Injector Clinic FAQ page
QA #277
Last Updated:
2016-11-28 10:11
What are the stock spring rates for a [DSM]?
Stock (Non Turbo/Auto Tranny/Manual Tranny):
OEM Stock 1G FWD
Front: 134
Rear: 128.8
OEM Stock 1G AWD
Front: 146
Rear: 140
95-96 OEM Stock 2G AWD
Front: 265
Rear: 162 (+/- 8)
97-99 OEM Stock 2G AWD
Front: 246
Rear: 151
95-96 OEM Stock 2G FWD
Front: 246
Rear: 173
97-99 OEM Stock 2G FWD
Front: 246
Rear: 151
QA #278
Last Updated:
2016-11-28 06:36
What are the impedances of the stock speakers on a [DSM]?
According to the DSM technical manuals and the Talon Digest archives, the stock speakers are:
- 1G: dash, door and rear are all list as 4 ohms. Unfortunately, some DSMers have reported 4, 6, 8 and 12 ohm speakers.
- 2G: in-dash tweeters and fronts are reported to be 4 ohms, while rear are 2 ohm. The tweeters and fronts are wired in parallel to achieve a 2 ohm load. Unfortunately, some DSMers have reported 4 ohm loads rather than 2.
There is some indication that different model years have different speakers, but the factory manuals list only 4 ohm speakers for 1Gs. Ian Blumgart reported a mix of speakers in his 1990 Laser with the optional six-speaker system: 12 ohms in front, 6 ohms in doors, and 4 ohms in rear. The fronts were wired in parallel for a net 4 ohm load.
2G speaker impedances are not listed in the shop manuals, but were previously reported to be 4 ohms all around. Dan Juell reported his front speakers were 12 ohms. Best to check your speakers to be sure.
QA #279
How do I adjust the idle on a 1G?
Similar Questions:
How do I adjust the idle on a 2G?
Where can I find the BISS on the engine?
Where are the grounding plugs required for 2G idle adjustment?
Everyone needs to read the the 1G idle VFAQ. 2G owners need a little more information - as provided by Dirk Koenig (edited for presentation):
"Under the hood, in the middle of the firewall,near the top of the engine compartment, there is a bundle of wires. In this bundle you should find a brown plastic plug. Open this plug (pocketing the very important cap for later installation) and follow the VFAQ instructions for grounding.
For the inside plug, while sitting in the drivers seat, grab the corner of the dash where the center console and the underside of the dashboard meet. You should now be holding the diagnostic port in your hand. Get under the dash and take a look at the plug. There is a pink wire going into it. This is the wire you should ground, how you do it is up to you. (I shoved the probe from my voltmeter into it and grounded the other end)."
There is also now a VFAQ for 2G idle adjust - see here for details.
QA #280
Where can I find the BISS for sale?
Similar Questions:
What is the part number for the BISS?
The dealership says they don't have the BISS available! Now what?
The part number is Mitsubishi part #MD614948, available from any Mitsubishi dealer - even the ones that don't know what it is.
QA #281
How do I check the timing on a [DSM]?
Similar Questions:
How do I adjust the timing on a [DSM]?
You would already know this if you had checked your shop manual. (You do have a shop manual, right?) Also, owners of late 1996 to 1999 DSMs need read no further - base timing cannot be adjusted on these engines - any attempt to do so will result in a 'check engine' light.
Adjustment of the base engine timing is done through adjusting the crankshaft angle sensor. There is a trick, and here it is : the ECU normally controls the engine timing, so unless you disable the ECU control, you are not seeing the base engine timing when you hook up your timing light. Instead, you are viewing the ECU-controlled timing, which may be substantially different. Adjusting the timing without first disabling the ECU control will have little effect, as the ECU will re-adjust the timing to the original value.
Fortunately, the factory provided an easy way to disable the ECU timing control - a small electrical connector in the engine bay. All you have to do is connect it to a ground to temporarily disable ECU timing. On 1Gs and 1995-1996 2Gs, the connector is located on the firewall, near the middle. (Owners of 1997+ cars please note: these engines lack the timing adjustment connector, and timing cannot be adjusted.)
After you ground this connector, hook up the timing light and check if the engine timing is +5 degrees BTDC . (For instructions on how to use a timing light, check Brad Bauer's Timing Light FAQ.) Timing adjustment is done by adjusting the crankshaft angle sensor. After the adjustment is complete, unhook the connector and re-check the timing, which (owing to the ECUs intervention) should now be around +8 degrees BTDC.
Please note that it is possible for the operator to set the timing further ahead than +5 deg BTDC. Doing so will not generally help power output, and may limit or disable the ECUs ability to safeguard your engine. See Chapter 6 in the ECU Primer for details why.
QA #282
Last Updated:
2016-11-30 12:38
Why do I have to unplug my datalogger / Pocketlogger in order to set/check my timing?
The reason is that the datalogger system grounds the connector in the diagnostic plug that sets the ECU to idle speed set mode, rather than timing check mode. In other words, when you ground the timing check connector with the datalogger plugged in, the ECU will go to idle speed set mode instead of timing check mode. Unplugging the logger will fix the problem and allow the ECU to enter timing check mode.
QA #283
Has anybody ever installed a 180 degree thermostat in a [DSM]?
According to Todd Day, the acknowledged expert on DSM ECUs, this is not a good idea for 1Gers in search of serious speed. He also stated there are at least 17 temperature-dependant tables in the ECU, so skewing the engine temperature might not be a good thing. However, many people have installed them with no ill effects.
It is possible that the lower temperature thermostat will operate ok in the summer but not in the winter. Some owners have commented that their datalogger temperatures stay in the 190 degree range in the summer when using a 180 degree thermostat. This is usually high enough to keep the car operating as intended. In the winter, though, the average temperature drops too low, and the car never exits "warm-up" mode. This causes the car to run rich and drop significant gas mileage.
2Gers are different. Apparantly, 2G cars have a 180 deg. thermostat from the factory, and at least one DSMer has installed a 170 degree one. However, the same caveats about lowering from the stock temperature apply equally well to 2G cars.
QA #284
Has anybody ever installed an EGR blockoff plate in a [DSM]?
Check the FAQ Locator, since Brad Bauer has had the VFAQ for this subject available for some time now. It's also discussed in the DSM Top Ten FAQ.
Many people have installed these devices. It is now commonplace to see EGR blockoff plates sold by private individuals on the DSM Parts Trader and DSMtrader.com. However, they may not work quite the way you think.
Experience has shown that the only true benefit to installing an EGR blockoff plate is that it helps keep the engine intake clean. This is because the EGR recirculates dirty exhaust gases back to the intake. The carbon and other contaminants from the exhaust tend to coat the intake piping.
While it is true that you should theoretically get a performance increase by blocking off the EGR, in practice the change is so slight as to be negligible. Even this advantage is debateable, since some people claim the EGR only functions when the car is not boosting in any case. Also, 1994 California cars and 1995+ models are equipped with additional sensors to check that the EGR is operating correctly. Installing a blockoff plate will probably cause a 'Check Engine' light on these vehicles.
Blocking the EGR should also affect emissions performance - again, in theory. In practice, it has been argued that the EGR valve is so small on our cars as to provide little benefit for emissions.
QA #285
How do I install a different shift knob?
The shift knob is just screwed onto the shifter. Grab it tight and turn it counterclockwise. Use lots of force, it will begin to unscrew. Just screw the new one on, or mount it in place with lock bolts if that is required.
Many 1990-1992 owners find the 1993-1994 shift knob a nice replacement.
Thread pitch on 1G/2G shifter is M10 x 1.25mm
This thread pitch is shared with some mazdas Ex: Mazda 3 Miata MX3 MX5 MX6 Eunos Protégé 5 323 626 Mazdaspeed JDM
QA #286
Last Updated:
2018-11-06 04:34
Has anybody ever installed fog lights on a [DSM] that didn't come with them installed?
Similar Questions:
Is the wiring harness for stock fog lights installed on a [DSM] that didn't come with them installed?
According to Robert Arrowood, Tyler Hodgson, and Micheal Astor, 1G Talons and Lasers have the fog light wiring installed, even if they did not come with the actual lights. They also give a list of components that must be added to enable the harness to work properly. Since another user reported the same was true for his 1994 Talon DL, this may be true for all 1G Talons.
Unfortunately, Micheal reports that Eclipse cars may not have the harness. This is only the impression of an anonymous Mitsubishi technician, however, and may or may not be true.
2G owners might also be out of luck as both Patric Sansoucy and David Parker both had to run new wiring when installing fog lights on their cars.
The Last Word: Brian Chapman states definitively that the 1990-1994 Eclipse cars do have the fog light wiring harness installed, even when the fog lights themselves were not installed. [Thanks, Brian!]
QA #287
Has anybody ever disabled the daylight running lights (DRLs) on a Canadian [DSM]?
Some people have. Note that this mod is usually illegal - do it at your own risk.
Read the FAQ.
QA #288
Has anybody ever installed 100W headlight bulbs on a [DSM]? Are they any good?
Similar Questions:
Has anybody ever rewired the headlights on their [DSM]?
Many people have done this mod. However, there have been occasional reports from 2G owners that the 100W bulbs drew enough power from the car to damage the headlight wiring harness.
To combat this problem a few people have rewired the headlights with larger gauge wire. Curt Shambeau did so on his 1996 Spyder convertible and reported an increase in light output of 250 foot-candles on both stock and aftermarket bulbs. For the electrically inclined, this is obviously a good modification. For the non-electrically inclined, some companies now market plug-n-play wiring harnesses to upgrade your wiring. Often marketed as "SUV" or "heavy duty" lighting harnesses, they usually come complete and ready to put in.
QA #289
Has anybody ever installed "Superwhite" headlight bulbs on a [DSM]? Are they any good?
Lots of people have. While they obviously work, opinions on their utility are still a matter of some debate. A few owners claim they are vastly superior, while a few claim they are vastly inferior. Most people fall into a moderate camp, claiming little or no difference (good or bad).
For some more information on blue bulbs, Superwhite bulbs and HID lighting systems, please consult the bulbs page of Daniel Stern
QA #290
Has anybody ever installed a high-intensity discharge (HID) headlight system on a [DSM]? It is worth it?
A few people have installed HID systems in their DSM. These systems are often installed in place of the factory fog light system, rather than as a headlight replacement system. There is at least one person that is selling HID conversion headlight systems for 1G DSMs, however.
Current information seems to indicate that some of the HID kits are not worth the cost. Some owners have complained that the HID kit was "worse than stock". Research carefully before buying.
QA #291
Has anybody ever installed a power antenna on a [DSM]?
Since many Eclipse cars came with power antennas, changing a manual-antenna Talon or Laser to a power antenna is fairly easy. According to Sam Reed, you need:
- the power antenna unit;
- the mounting bracket;
- a chrome nut (for the outside of the car);
- a wiring harness adapter; and
- a black plastic 'plug', or cover, for your spoiler (if any).
QA #292
Has anybody ever installed clear corners on a [DSM]?
Similar Questions:
How can I make clear corners for my [DSM]?
Clear corners are available for both 1G and 2G DSMs. Or, at least, they are at the time of this writing.
According to Brad McIntyre, stock 90-91 DSM corner lenses are two part assemblies that can be converted to clear corners. All that is required is to soak the lenses in boiling water to soften up the glue. The lens halves can then be separated, and the amber lens removed. He also suggests painting the lamp housing chrome, and cleaning the lenses really well before putting it all back together.
Unfortunately, this mod does not work for 92-94 DSMs, or 2Gs. You can often find the clear corners you want on eBay, though.
Those installing clear corners will want to polish their headlights. The headlights will not appear faded or yellowed, until you put the brand-new clear corners next to them. To fix up this problem, wet-sand the headlights with 1000-2000 grit sandpaper, available at any Canadian Tire or other store that carries basic autobody repair materials.
The Last Word: With aftermarket replacement headlights now available at low cost on eBay, polishing the headlights is probably more trouble than it's worth. Just replace them.
QA #293
Has anybody ever put slotted / drilled / vented brake rotors on a [DSM]?
Similar Questions:
Should I buy slotted / drilled / vented rotors? Are they worth it?
It is possible to buy these types of rotors. Opinions on them vary, but it is unlikely that the average owner (or weekend racer) is likely to see much improvement.
The idea behind all of these altered rotors is to keep gas from becoming trapped between the pad and the rotor. The vents, slots or drills are intended to give the gas an escape route. Also, they are thought to improve rotor cooling. Both of these factors are intended to combat brake fade, where the brakes stop performing well when hot.
Unfortunately, they can all weaken the rotor and make it more susceptible to warping and cracking. Complaints of cracking are especially common on from owners of cross-drilled rotors. And most people have problems with overall brake performance rather than brake fade.
In most cases owners would be better off upgrading to Big Brakes or performance brake pads. These will certainly provide better overall braking performance.
Those who legitimately have problems with brake fade can also switch to higher-temperature Ford Heavy Duty brake fluid.
QA #294
Last Updated:
2016-11-28 06:38
Has anybody ever painted the brake calipers on a [DSM]?
Similar Questions:
How do you paint the brake calipers on a [DSM]?
What is a good paint for painting the brake calipers on a [DSM]?
Many people have done this quite successfully. However, you need a high-temperature paint, or you risk setting fire to your brake calipers. Folia Tec (888-486-0067) sells speciality caliper paint in a variety of colors. Other people have used engine enamel, exhaust manifold paint, Tremclad rust paint and bar-b-que paints. Some paints are air-dry, while others require baking at high temperature to cure. It is essential that the brakes be clean and masked properly before painting.
No matter what paint you get, track-driven cars can count on getting brake dust embedded in the paint, which will deteriorate the color. Street-driven cars need not worry, since the brakes rarely get hot enough to cause the brake dust to stick to the painted surface.
Check out YouTube - How to Properly Paint Your Brake Calipers
QA #295
Last Updated:
2016-11-28 09:53
Has anybody ever installed bumper / intercooler grilles on a [DSM]?
Some members who have admired bumper grilles on other cars have found an inexpensive copy in a product called "Gutter Guard", sold at Home Depot. This chromed grille can look very good when installed behind the DSM bumper. Doubters need only examine this photo from Canada's own Mark Scheitzbach (the "Purple Plymouth Guy") that shows his car with the grille installed.
QA #296
Has anybody ever painted the interior panels of a [DSM]?
Similar Questions:
Has anybody ever painted interior plastic parts on a [DSM]?
Jim Tomarchio recommends you investigate a company called Eastwood that sells restoration and touch-up products. Also, at least one DSMer has successfully obtained interior paint from a dealership.
Tristan Santoniello recommends you use acrylic paint and clear coat on the panels, using 3-5 coats of each. He also suggests you remove the panels completely before trying to paint them. Another DSMer suggests vinyl paint, again using several coats until you can get a smooth coat, and sanding lightly between each coat. The sanding helps the paint stick to the previous coat.
QA #297
Has anybody ever removed the exterior decals / stickers from their [DSM]?
Similar Questions:
How do I remove the exterior stickers / decals from a [DSM]?
How do I remove that @#$$%@#$% dealership sticker from my beloved [DSM]?
The exterior decals, for all that they stay on the cars for years, are not that hard to remove. The same applies to dealership stickers, which many DSMers prefer not to have on their car.
To remove the stickers, usually all that is needed is a little heat from a hair dryer. A heat gun may also be used, but beware - the gun can develop much higher spot temperatures than the hair dryer and could damage the paint. The same can be said of using a cigarette lighter, but both methods can be used successfully with due caution.
After the sticker is hot enough, scrape it off with a plastic tool. You can also try and use fishing line. A little WD-40 or bug n' tar remover with some elbow grease will take off the residue.
QA #298
How do I drain the gas tank on my [DSM]?
Racers often want to drain their pump gas and replace it with race gas beforehand. According to Steve Wells, the easiest way to do this is:
- remove the fuel line from the back side of the fuel pressure regulator;
- connect a 5- 6' piece of fuel line to the regulator;
- put the other end in a gas can;
- connect the fuel pump test connector in the engine bay to +12V.
Steve credits Norm Schilling for this method. He has also connected a switch in the engine bay for turning the fuel pump
Never leave the car unattended while draining fuel.
QA #299
How do I install a child seat in my [DSM]?
If you buy a child seat, ensure it has the two metal clips that clip between the rear seat and the backrest. (Feel in there, you will find two little metal bars you can hook to). To fasten the top, look in the trunk. Under the carpet in the hatch area close to the back bumper there are 2 bolts (one per side).
For those without the trunk bracket, canadian tire sells a kit.
Please refer to your owners manual for more information.
QA #300
Where do I get the 'special tools' listed in the shop manual?
The vendor most-often mentioned for the special tools is Miller Special Tools. They are listed in the front or back of every shop manual.
Unverified Vendor: http://www.etoolcart.com/chryslermillerspecialtools.aspx
QA #301
How do I replace my timing belt?
Here are a few videos to help you
- In Depth - 6-Bolt Mitsubishi Timing Belt Replacement (Part 1)
- In Depth - 6-Bolt Mitsubishi Timing Belt Replacement (Part 2)
- Basic Overview - DSM Graveyard 4g63 Timing Belt Tutorial
- Technical Bulletin - 1G Timing Belt
Checked the FAQ Locator. Tom Stangl has put together a comprehensive list of VFAQs on the subject.
QA #302
Last Updated:
2016-08-15 09:33
Has anybody ever installed a shield to protect the timing belt?
This idea has been discussed before. No DSM owner is very enthusiastic about having their engine wrecked by such a minor event as a broken balance shaft belt.
Unfortunately, the consensus was that there was not enough room between the belts to provide a strong enough shield. The shield would have to be so thin that the belt would likely tear right through it, causing it to contribute to the problem rather than solve it.
Those who are interested in such protection may wish to remove the balance shafts completely. See this section of the 1000AAQ and theFAQ Locator for the latest information.
QA #303
Has anybody ever installed a manual/fixed timing belt tensioner?
Micheal Hamilton did this with his car, after he became dissatisfied with the factory automatic tensioner. Not for the average owner, it requires frequent and consistent timing belt inspections to ensure everything is A-OK.
QA #304
Has anybody ever removed the balance shafts in a [DSM]?
Similar Questions:
Has anybody ever installed a balance shaft eliminator kit in a [DSM]?
How do I remove the balance shafts in a [DSM]?
What sort of performance improvement will I get by removing the balance shafts in a [DSM]?
Tom Stangl has a VFAQ on the subject.
The disadvantage to removing the shafts is increased engine noise and vibration. By removing the balance shafts, you are removing the primary mechanism for controlling engine shake. The engine will sound rougher, noisier, and 'buzzier' than normal.
As for the advantages, opinions vary, and the debate is too exhaustive to report in full here. Proponents have the following reasons for removing the shafts:
- no balance shaft belt to worry over;
- more power from the engine;
- faster acceleration from the engine; and
- no long-term effect on engine durability.
Of these, only the removal of the balance shaft belt is uncontested, and is most cited as the reason for removing the balance shafts. Owners who have experienced $2000+ in engine damage as a result of a broken balance shaft belt generally don't want to repeat the experience.
Opponents counteract the other claims with arguments that the power increase from the engine might be negligible, and removing the shafts might affect long-term engine durability. Some say that getting the engine balanced and blueprinted will alleviate durability problems, but others disagree with this.
It would seem that claims of increased horsepower from this mod are difficult to make. Todd Day is highly skeptical about any claim of power increase by reducing rotating mass. He points out (quite correctly) that once a rotating mass is spinning, it takes much less energy to keep it spinning than it did to get it spinning in the first place. This makes any static estimate of power difficult to credit.
Overall, the majority of owners who commented on it said they were happy with the mod, and found the increased engine shake quite bearable. Of course, most of these individuals were probably enthusiast drivers or racers, and so don't mind the extra noise.
QA #305
Last Updated:
2016-11-30 12:21
Has anybody ever installed stronger motor mounts in a [DSM]?
Similar Questions:
What sort of performance improvement will I get by installing stronger motor mounts in my [DSM]?
Lots of owners have done this. In addition to simply strengthening the existing mounts, many people found that their stock mounts were torn or broken. Others say that stiffer mounts reduce the chances of wheel hop, which is in itself a large benefit. However, stiffer motor mounts don't really contribute to more power - it simply helps a high-power DSM stay together during hard launches.
There are several vendors that offer upgraded motor mounts for DSMs. Some are complete replacements, while others are inserts that fit into the holes of the stock motor mounts.
For those interested in more do-it-yourself solutions, Tom Tharp successfully improved the motor mounts on his 1G FWD by adding homemade polyethylene inserts. He wrote a VFAQ on the subject, which you would have found if you had looked in the FAQ Locator(hint, hint).
Other people have done similar things by simply filling the stock motor mounts with silicone or urethane caulking. This is apparantly a commonplace trick on the Nissan SE-R mailing list, and has been written up by an unknown SE-R owner here.
DSM owners who have tried similar methods of strengthening the mounts include Mike O'Flaherty, Spencer Hutchings, and Mark Purney, who wrote another FAQ on the subject here.
On a different note, Colby Leonard had a solid aluminum motor mount machined for his car. Read his impressions on this mod here. Also, Colby Leaonard had a solid aluminum mount fabricated for a small cost
QA #306
Has anybody ever installed upgraded cams in a [DSM]?
Not a popular or often-discussed upgrade on DSMs, it nevertheless seems to show up regularly in highly modified engines. It also seems to be catching on more with non-turbo owners interested in performance mods, perhaps partly because of their middling price point. Scot Gray has reported good results using cams from the now-defunct Mutiny Racerwerx shop, and many of the faster cars include cams in their modifications list.
On the flip side, those who have installed new cams have often reported negative side effects, such as low vacuum and poor idle, which appear to be endemic to cam changes. Much more rare are first-hand reports of verified performance gains, making DSM cams a doubtful upgrade when compared to other modifications. (Owners of highly modified engines often change several things at once, making the effect of any single component unverifiable.)
To add to the confusion, Leon Reitman actually removed upgrade cams from his car after finding they provided no performance gain, despite HKS' claim of 11hp. David Buschur stated here that cams would not be a worthwhile upgrade for 99% of drivers, as the cam change only makes more power in the higher RPM ranges. It has also been reported by Kyle Zingg in the Dec. 21, 1998 Digest that a prominent vendor recommends against changing the cams, as the stock cams provide the most power.
The bottom line is that most owners do a great deal of work on their DSMs before thinking about cams. Turbo, intercooler and other such advanced upgrades are known to provide significant gains, so owners are recommended to pursue them first.
The Last Word: The more modern cams for DSMs can be great - as long as you have enough air running through the rest of the system to make them worthwhile. Most people opt to 264/264s, but 272s are - theoretically - also available They can be hard to get a hold of,
QA #307
Has anybody ever installed a cold air intake (CAI) on a [DSM]?
Several people have done variations on this. A fairly elaborate scheme can also be seen here.
The Last Word: With the advent of the MAF Translator, a cold-air intake system is a lot more practical than it used to be. Check the vendor websites for current offerings.
QA #308
How do I replace the clutch in my car?
Similar Questions:
What parts should be repaired/replaced when I replace the clutch?
This is by far the best video series. Made by Jafromobile for a Clutch & Tranny in AWD 2G.
A clutch swap is not a simplistic procedure and should only be attempted after due experience, or when you have lots of time to learn.
Note that there are two possible replacement throwout bearings for DSMs. One is all-metal, one is lined with plastic. Many DSMers recommend using the plastic lined one. This is because the throwout bearing rides on an aluminum shaft, and the metal bearing can score this shaft over time.
Along with the clutch, the following items should be considered for replacement. Note that not all parts need be replaced each clutch swap; most can be retained unless you are having problems with poor clutch disengagement or poor pedal feel.
- Clutch master and slave cylinders.
- Clutch pedal rod - especially if the clutch pedal can be pulled up with your foot.
- Clutch pedal line.
- Clutch release fork.
- Clutch pivot ball.
- Flywheel.
The master and slave cylinders will generally show signs of leaking if they require replacement. The pedal line will probably not, but won't help much beyond possibly improving the pedal feel. The release fork and pivot ball may not show any significant signs of wear, but might be worn nevertheless. The flywheel need only be replaced if you desire a lighter version, or if the present flywheel is damaged beyond the capacity of resurfacing to repair.
QA #309
Last Updated:
2018-11-06 04:35
Has anybody ever installed a lightened flywheel in a [DSM]?
Lots of people. Opinions vary on driveability, but most racers seem to like them.
A popular option is the XACT Streetlite Flywheel.
QA #310
Last Updated:
2016-05-29 05:57
Has anybody ever installed an welded differential on a [DSM]?
Many people have, although few recommend doing so for street-driven cars. There are actually two different versions of this modification - one for FWD cars and one for AWD cars.
FWD vehicles often suffer from excessive wheelspin on one drive wheel. While the one wheel is spinning, the other wheel loses power and cannot drive the vehicle forward. Winter drivers may recognize this situation from experience, as many drivers have become stuck in icy conditions when one drive wheel starts to spin. Although the other wheel might be on solid ground, it cannot get power, and the vehicle goes nowhere.
In this case, welding the front axle differential forces both front tires to rotate at the same speed, so the lost power is recovered. It is no longer possible for one wheel to spin without the other also spinning.
Of course, you don't get something for nothing - the differential is there for a reason. The main reason is that, when cornering, the wheels at the inside of the corner must travel a shorter distance than the wheels on the outside. The differential allows the wheels to rotate at different speeds. Eliminate the differential, and cornering becomes a lot more difficult, causing unusual suspension and drivetrain stresses.
AWD vehicles have a different problem. Many AWD car owners would like to measure their engine output on a chassis dyno - a big set of stationary rollers that can measure the force imparted to the wheels. The problem is that there are almost no dynos capable of handling a four-wheel-drive vehicle.
The simple solution to this problem is to remove the AWD transfer case, which distributes power between the front and rear driveshafts, and temporarily convert the car to a FWD vehicle. Alas, it is not that simple. Most AWD DSMs have a limited-slip differential installed between the front and rear axles. This component is designed to allow the front and rear driveshafts to rotate at different speeds - up to a point. If the front and rear axles start to rotate at radically different speeds, the hydraulic mechanism in the differential 'lock' the driveshafts together and force the front and rear axles to rotate in sync.
So? Well, removing the transfer case creates a situation where the front and rear axles are out of sync, all the time. The limited-slip differential 'sees' no rotation from the front driveshaft (which is now disconnected), yet there is rotation of the rear driveshaft (which is being rotated as the car moves). The limited-slip mechanism promptly locks, and stays locked. The differential was never designed to operate in this permanently locked state, and serious damage will quickly result.
To get around this problem, the limited-slip differential in the AWD DSM can be welded to ensure it is mechanically, and not hydraulically, locked. This eliminates problems with removing the transfer case, and allows an AWD DSM to be converted to FWD operation for dyno runs. Converting back is as easy as replacing the transfer case, although this isn't really that easy.
Unfortunately, it also means that the front and rear axles must always operate perfectly in sync, which is not usually the case while cornering. One or more tires in this setup with inevitably slip, as they are pushed off their direction of travel; odd handling and strange driving behavior might result. The situation is similar to the operation of manually-locked 4WD vehicles (trucks & off-road vehicles) while making tight turns - wheels will drag, and the drivetrain will 'hitch' or 'catch' as the 4WD mechanisms try to keep all four wheels rotating at the same speed while they travel different distances.
The handling problems with welded differentials usually restrict them to drag racing applications only.
QA #311
Last Updated:
2016-05-29 05:57
Has anybody installed a fuel pump in a [DSM]?
Similar Questions:
How do I install a fuel pump in my [DSM]?
What are the specifications for the various fuel pump upgrades for a [DSM]?
Tom Stangl has several VFAQs up on how to install the fuel pumps, and recently added a section showing the specifications for common upgrade fuel pumps.
QA #312
Has anybody ever installed an upgraded ignition system on a [DSM]?
Some people have. It's not high on the list of things to do, since the ignition system is DSMs is reportedly very strong. In general, if you don't have a problem with it, there is no need to replace it.
Those interested in the theory behind ignition systems should read Dennis Grant's Ignition Theory Series.
QA #313
Has anybody ever installed an alarm system on a [DSM]?
Information on alarm and radio wiring for DSMs can be found at the Club DSM Southeast subregional web page. More information is atDSM Alarm Wiring Codes page, written by Jamey Vester, and from this post from the archives.
QA #314
Has anybody ever installed an AFC on a [DSM]?
Similar Questions:
My AFC tachometer display is wrong! Is there a fix?
My AFC doesn't work right! Is there a fix?
You would already know the answer to the 'install' question (hint, hint) if you had checked the FAQ Locator. The tachometer display will be wrong until you reset the AFC for a 2 cylinder engine. DSMs only have 2 coils for the four cylinders. People who try to install shift lights have the same difficulty.
Those experiencing other problems should look up the on-line documentation on the A'PEXi USA website and the wiring diagramsprovided by the Super-AFC-DSM users group.
AFC owners should check out the Super-AFC-DSM mailing list on Yahoo! Groups. You need a Yahoo! ID since membership is now restricted. To join, click here.
QA #315
Has anybody ever installed a PMS on a [DSM]?
Similar Questions:
What are good settings for an PMS on a [DSM]?
I can't get my PMS tuned correctly! Is there a fix?
Lots of DSM owners have installed the PMS. In fact, there are so many people using the PMS that the it has its own mailing list ategroups. There also exists two page on PMS tuning: here and here.
The manufacturer, EFI Systems, apparantly provides good support for the PMS. Unlike the AFC, PMS owners rarely plead for installation instructions.
It is in the nature of the PMS that it takes time to fully understand how to tune with it. Most PMS owners are willing to share their experience to save others from the same mistakes.
The Last Word: The PMS is a fairly primitive tuning system with only three RPM points. Do yourself a favour and get a DSMlink (available for 1G and 2G) or at least an AFC.
QA #316
Has anybody ever installed an ignition timing controller (ITC) on a [DSM]?
The ITC is generally only useful on 2G DSMs from late 1996 to 1999. All prior model years have adjustable base timing.
QA #317
Has anybody ever installed an intercooler fan on a [DSM]?
Gary Selph did try this mod on his upgraded Alamo sidemount intercooler. His testing shows that the fan makes no difference in intercooler performance.
On the other hand, Mark Purney installed one on his stock sidemount intercooler. He reported good results with his installation, although other owners have found it makes no appreciable difference. Unfortunately, Mark has no experimental data to verify his results.
Mark and Gary seem to concur that the stock intercooler might benefit from the fan, but upgraded units are unlikely to benefit. Gary also noted that a fan might work well with an intercooler sprayer installed.
QA #318
Has anybody ever relocated the battery to the rear of a [DSM]?
There are many videos on the relocation of the battery to the trunk. See Jafromobiles GSX battery Relocation Video. It is important to choose the right gauge of wire to use.
To choose an adequate wire gauge, determine the amp draw (amperage) that the wire circuit will carry. Then measure the distance that the wire will travel (length) including the length of the return to ground (the ground wire running to the chassis or back to a ground block or battery. Using these two numbers, Amps and length, locate the nearest gauge value in chart below. For 6 volt automotive systems typically a wire gauge 2 sizes larger than what is shown should be used.
| Amps @ 12 Volts |
LENGTH OF WIRE American Wire Gauge (AWG) |
||||||
| 3' | 5' | 7' | 10' | 15' | 20' | 25' | |
| 50 | 16 | 14 | 12 | 10 | 10 | 10 | 8 |
| 100 | 12 | 12 | 10 | 10 | 6 | 6 | 4 |
| 150 | 10 | 10 | 8 | 8 | 4 | 4 | 2 |
| 200 | 10 | 8 | 8 | 6 | 4 | 4 | 2 |
SRC: http://www.offroaders.com/tech/12-volt-wire-gauge-amps.htm
Other items you will need are a marine battery box (or fab your own), fusible links and distribution blocks), venting tube if not a sealed battery.
Since many proponents claim this reduces the understeer on DSMs, there has been quite a bit of discussion over the years on this subject.
QA #319
Can I replace a front ball joint without replacing the lower control arm?
Your local dealer will probably swear on a stack that you cannot, as the joint is not sold as a separate part. According to the archives, the joint is available as a separate part and can be installed without replacing the lower control arm. Tom Stangl reports the joint is available at NAPA from Beck-Arnley, will fit both front and rear (at least on 1Gs) and costs around $40.
There have been reports, however, that the aftermarket joints that are available are not OEM-type joints, but generic joints that include a grease fitting. Despite this, there are apparantly no practical differences between the OEM joints and the aftermarket joints. Both types are "sealed" (by necessity), but the factory doesn't provide grease fittings for their ball joints.
For thos who really want OEM-style joints, Paul Lyons has found them at Autozone. They are made by a vendor called Perfect Circle; a part number is not available at the moment.
Those who prefer the original sealed-boot type may be stuck with purchasing the lower control arm, or shopping the boneyards for used control arms.
The Last Word: Ben Lauterbach very helpfully provided the part number from Advanced Auto Parts. It is TRW part 10371 for a 1g and reportedly runs about $30. Sorry to 2G owners, I don't know of a part for you. [Thanks, Ben!]
QA #320
Can I replace a front ball joint boot without replacing the lower control arm?
Yes. Dealers and vendors sell the boots as a separate part. Energy Suspension also makes the boots as a separate part. Phone around.
QA #321
QA #322
Has anybody ever installed a fiberglass / carbon fiber hood on a [DSM]?
Similar Questions:
Where can I get a fiberglass / carbon fiber hood for a [DSM]?
The following vendors sell them. There may also be others. This list may be out of date.
- Magnus Motorsports
- Squidskins
- Wholesale Hyperformance
- Xtremewhite
- 2Loww
- Showcars / Bodyparts Unlimited
- Adventon
QA #323
Has anybody ever installed a body kit on a [DSM]?
Several people.
If you're having problems finding a kit, try Google.
Those seriously interested in a kit will want to read Richard Howell's complaints against his Andy's Autosport body kit.
QA #324
Has anybody ever installed [colored / indiglo] needles on a [DSM]?
Similar Questions:
Has anybody ever converted their needles to [colored / indiglo] needles?
Many people have done this. It is not difficult to do. The process is essentially the same as installing white faces, described above.
Converting the stock needles to a different color simply involves scraping the orange paint off of the bottom of the needles. They can then be repainted in any color. The backlighting color may also be changed. There is a VFAQ on the process here; also try the results of this Google search.
QA #325
Has anybody ever converted a non-turbo [DSM] to a turbo [DSM]?
Similar Questions:
What is required to convert a non-turbo [DSM] to a turbo [DSM]?
Has anybody ever converted a 1.8L NT to a 2.0L NT?
Most people who research this topic come to the conclusion that it is cheaper to sell the NT and purchase a turbocharged DSM, rather than attempt to convert the NT to turbocharged form. It has been pointed out that the difference between a turbo FWD and a non-turbo FWD 1G DSM was roughly $1000 in 1998 - suffice it to say that the conversion will be significantly more than that, regardless of the method chosen.
With AWD DSMs running in the $1500 - $8,000 area, why would you want to do this? Do yourself a favor and just buy an existing AWD.
QA #326
Has anybody ever converted an auto tranny [DSM] to a manual tranny [DSM]?
Similar Questions:
What is required to convert an auto tranny [DSM] to a manual tranny [DSM]?
Micheal Hamilton has done this on an unspecified 1G FWD. It is complex procedure requiring an estimated at 9 hours, install only, plus additional time or cost for removing/acquiring the required transplant parts.
In addition to Micheal's work, you may read the [[What are the differences between a automatic tranny car and a manual tranny car?]] for an idea of what you may need in addition to the transmission components.
Here is a thread about what you need on DSMTunners - AWD Automatic To Manual Swap
Important: DSMs are cheap. Just buy what you want.
QA #327
Last Updated:
2016-05-29 06:00
Has anybody ever converted a FWD [DSM] to an AWD [DSM]?
Similar Questions:
What is required to convert a FWD [DSM] to an AWD [DSM]?
Most people who research this topic come to the conclusion that it is cheaper to sell the FWD and purchase an AWD DSM, rather than attempt to convert the FWD to AWD form. Road Race Engineering has done this; the cost is $6000.
With AWD DSMs running in the $1500 - $8,000 area, why would you want to do this? Do yourself a favor and just buy an existing AWD.
Important: DSMs are cheap. Just buy what you want.
QA #328
Last Updated:
2016-05-29 06:01
Has anybody ever converted a [DSM] to rear-wheel drive (RWD)?
Yes. Dave Buschur had what was perhaps the first-ever RWD DSM back in 1998. To do it, he rotated the engine ninety degrees in the engine bay and adapted it to a Powerglide racing transmission. For more details see Dave Buschur's biography.
While it is possible to do this type of conversion, the difficulty level is (to put it mildly) very high.
QA #329
Last Updated:
2016-05-29 06:03
Has anybody ever converted their [DSM] power steering to manual steering?
A few people have done it. The "best" method involves finding a manual rack, which is difficult to do for DSM cars.
Apparantly most people who run into problems with the power steering end up with a modified power steering pump from a vendor. The pump provides improved steering response where the stock system is lacking.
Here is the procedure on Removing Power Steering from a 1G DSM provided by prostreetonline.com. (archived document)
QA #330
Last Updated:
2016-11-28 07:01
Has anybody ever converted a 1G Talon to a 1G Eclipse?
This is possible, at least for 1990-1991 models. You need to swap the front garnish (between the headlights) and change the Chrysler rear clip for the Mitsubishi one. However, the Mitsu parts will go exactly where the Chrysler parts were without any need for modification.
QA #331
Has anybody ever put a 1G Talon spoiler on a Laser?
Yes, it can be done. Digest writers recommend that the spoiler come from a like-styled car - a 90-91 Talon spoiler for 90-91 Lasers, and a 92-94 Talon spoiler for a 92-94 Laser. Cross-body conversions may also be possible, but you must verify that the spoiler will fit beforedrilling holes into your car. Information on this subject is limited - Laser owners often prefer their car without the spoiler, so it doesn't appear that this is a popular conversion.
QA #332
Has anybody ever converted their popup headlights to non-popup headlights?
This can be done too, but it is a significant amount of trouble. It appears that most people purchased the front end they wanted with their car, as information on this modification is limited.
According to Paul Bratina:
"The following parts must be replaced: hood, fenders, headlights, side marker lights. The front bumper can be kept (as in my case) but must be slightly modified. Replacing the bumper with a 92-94 makes the conversion easier. Replacing the hood is strictly bolt-on. The fenders are bolt-on except for where they attach at the very front (easily accommodated). Mounting the headlights (and to a lesser extent, the side marker lights) is by far the hardest part of the conversion, and is definitely not a bolt-on procedure. I certainly wouldn't consider it technically difficult. Mostly just time consuming.
I think it's worth mentioning a little bit about the costs involved in the conversion. First, assuming you get all the parts necessary at the wreckers, the parts alone would run somewhere in the $500-$1000 area. (Of course, some of this cost could be recovered with the sale of your old parts.) Then you have the issue of repainting the car. Unless one is interested in a multi-coloured car (all the various body parts that were necessarily replaced), I consider repainting the car to be absolutely mandatory. So whatever the paint job costs, could theoretically be added to the cost of the conversion. In my case, I was going to be repainting the car anyway, so that cost didn't "count". I really feel the thought process on this conversion should be something like: "I'm going to get the car repainted and while I'm at it, I'll throw in a conversion." Not the other way around--you know, do a conversion and throw in a paint job."
A quick & dirty method for keeping the headlights down is to remove the fuse that controls the headlight motors, or to rewire them under manual control. This keeps the lights down when they are on, and thus is sort of a 'non-popup' mod.
The Last Word:: George Johnson adds:
"I looked for what I believed to be a good amount of time for the popup to non-popup conversion wiring schematic. I apparently failed to find it, so I figured you might like to add it into the answer to the swap.
Popup Non-popup
Solid Red Solid Red
Red w/Blue Stripe Red w/Blue Stripe
Red w/White Stripe Black
Turn signal/running light assemblies will interchange." [Thanks, George!]
QA #333
Has anybody ever installed 2G pistons in a 1G engine?
Similar Questions:
Has anybody ever installed 1G NT pistons in a 1G T engine?
This has been done on occasion. 2G turbo pistons are a higher compression ratio (8.5:1 instead of 7.8:1) and are capable of delivering more power, with a higher probability of detonation. The same should be true of 1G NT pistons (9.0:1), but the NT pistons are not designed to withstand the stresses inherent in turbocharging, making the 2G turbo pistons the next best choice.
In most cases, the 1G connecting rods must be machined in order to fit the 2G pistons.
As a side note, Mitsubishi sells factory overbore pistons in sizes 0.5mm and 1.0mm larger than stock.
QA #334
Has anybody ever installed a 1G non-turbo head onto a turbo?
Similar Questions:
What are the differences between a 1G non-turbo head and a 1G turbo head?
All 1G 2.0L heads are the same except for the camshafts. Apparantly the 1990 heads had slightly smaller coolant passages, but the difference is not enough to be significant. Also, prepared non-turbo heads had a plug where the turbo oil feed would connect on turbo models.
QA #335
Has anybody ever put a 1990 ECU into a [1991-1994 DSM]?
This works - kind of. Read this post by Todd Day (of Technomotive) for the results. Technomotive recommends that only 1990 ECUs be used in 1990 cars, and that only 1991-1994 ECUs be used in the later cars.
However, you can make the switch, if you want to. Mike Hamilton has a FAQ on installing a 1991-1994 ECU in a 1990 DSM. This may be an option for people who have difficulty finding a 1990 ECU - they are becoming increasingly rare.
QA #336
Will an ABS ECU work in a non-ABS [DSM]?
Similar Questions:
Will a non-ABS ECU work in an ABS [DSM]?
Those few that have tried it have not reported any significant side effects from interchanging ABS and non-ABS ECUs and cars. However, several of them had already disabled the ABS systems.
The engine ECU does control the ABS on the DSM cars. It is not known for certain if a non-ABS ECU has the ABS circuitry installed at all. As in the case with knock sensor circuitry, different ECU models (in that case, turbo and non-turbo) might be the same ECU without certain parts.
In theory, an ABS ECU should work on a non-ABS car just fine. However, there is a strong possibility that the ABS ECU might "see" the lack of ABS equipment and cause the ABS light to turn on, because the ECU tests the ABS system on each startup.
Also in theory, a non-ABS ECU should work on an ABS car. In this case the ABS system might not work since the ECU may not have the circuitry necessary to operate it. If it did work, warning lights indicating an ABS malfunction might not work as intended.
As always, YMMV. There are few examples of DSMers trying this swap.
QA #337
Can I put a manual transmission from a [1990-1994 DSM] into a [different 1990-1994 DSM]?
Similar Questions:
What years of manual transmissions are compatible with my [1G DSM]?
DSM transmissions come in two types with different output shafts. 1990 and some 1991 cars have 22-spline output shafts. Later 1991 through 1994 cars have 23-spline output shafts. Please note that 1991 cars that are 'later' (i.e. have later production or serial numbers) may still have the 22-spline shaft. The best way to check is to look, or to check part numbers with a dealership.
The number of splines on the transmission output shaft must match the number of splines on the transfer case input shaft, or else the transmission will not fit. Some people have found it possible to swap shafts between the transmissions in question to match the parts up correctly. Alternatively, the transfer case can also be changed to match up with the transmission, with an associated greater cost.
There have been several syncro changes over the years to try and combat problems with 1G cars not shifting well. It is generally accepted that later transmissions have superior syncro designs, so if all other things are equal a later version may be superior to an earlier version. Also, 2G transmissions can be put onto 1Gs with some simple modifications, and can provide superior performance. However, most people do not have free choice of transmissions due to economic reasons.
It must also be noted that the manual transmissions from turbo FWD and non-turbo FWD cars are different. Non-turbo FWD 1Gs have a F5M22 transmission (manual) or F4A22 transmission (automatic). Non-turbo 2Gs have a F5MC1 transmission (manual) or F4AC1 transmission (automatic). Turbo FWD 1Gs and 2Gs have a F5M33 transmission (manual) or F4A33 transmission (automatic). These transmissions are not interchangeable, and they are geared differently.
QA #338
Last Updated:
2016-05-29 06:03
Has anybody ever converted their automatic seatbelts to manual (Canadian) seatbelts?
Yes. You would already know this (hint, hint) if you looked at the FAQ Locator, or the archives. Tom Stangl has a VFAQ on this subject. Go there now.
QA #339
Has anybody ever converted their U.S. spec (75 amp) alternator to a Canadian spec. (90 amp) alternator?
This is possible, and the Canadian part is a direct bolt-on. Some dealerships may get confused over what you are asking for, however. You may be able to get around this by ordering a Galant VR-4 alternator instead - it is also 90A and will bolt right on.
There are some indications in the archives that the 90 amp alternator is the same as the 75 amp U.S. stock alternator, except it is rated for 90A. (Read about this here.) Wes Grueninger asserts that the two alternators are, in fact, different, with the 90A having an extra output tap attached to the wye terminal in the diode rectifier pack. In any case, the 90A alternator has a rated minimum output of 50A, with a 90A typical output rating. Even Canadian DSMers complain that the alternator on the car is undersized.
Read this post by Gary Selph for a description of possible alternator replacement options, including the Mitsubishi part number for the Canadian alternator. Also read Dean's Daily Discussions #8 for a little encouragement on how simple the replacement process should be.
For auto owners, Kyle Zingg posted that the alternator for the auto cars has a different part number, at least for 1Gs. The part number for the 1G auto alternator is MD153843. Manual owners have the same alternator on both the turbo and 2.0L non-turbo engines. It has also been reported that 1G and 2G alternators are the same aside from the actual output plug, which can be swapped.
It has been reported that Mitsu alternators rotate in the opposite direction of most alternators, making aftermarket units problematic. Read about this here. For this reason it is possible that aftermarket parts may not ventilate correctly, leading to premature failure.
With the creation of at least two Canadian sub-regional chapters of Club DSM, those who find themselves in a bind may be able to work a deal with a Canadian DSMer to provide a Canadian alternator. Owing to logistical difficulties, currency exchange and the possibility of taxes and/or duty on the imported part, this should be considered as a last-resort option.
As a companion to this question, you will likely want to read the Battery FAQ, and the dead battery question in this file.
QA #340
Has anybody ever installed a 1G manual transmission turbo (TD05) onto a 1G automatic [DSM]?
This is a relatively easy swap since the engines in the cars are the same. The manual turbo is almost a bolt-on replacement for the automatic transmission TD04.
According to Kevin Watson, the oil and coolant lines are larger on the manual TD05 turbo. Also, the exhaust manifold is different and needs to be changed to a manual transmission manifold.
QA #341
Last Updated:
2016-05-29 06:04
Has anybody ever installed 1G pistons in a 2G engine?
Similar Questions:
Has anybody ever installed 2G NT pistons in a 2G T engine?
So far no one has done this swap. The change is not attractive since 2G turbo pistons have a higher compression ratio (8.5:1) than stock 1G turbo pistons (7.8:1), meaning the 1G pistons will produce less power.
2G NT pistons, despite their higher compression ratio, are not generally considered suitable for a swap into a turbo engine because they were never designed to handle the stresses of turbocharged engines. This is the same argument that keeps people from swapping 1G NT pistons into 1G T engines.
Also, since 1G rods must be modified to accept 2G pistons, it is safe to assume that 2G rods would either have to be modified to accept 1G pistons, or replaced with 1G rods, making any such swap that much more complicated.
Anyone interested in such changeovers should know that Mitsubishi sells factory overbore pistons in sizes 0.5mm and 1.0mm larger than stock. Ben France gives the details here.
QA #342
Has anybody ever converted a 2G Talon to a 2G Eclipse?
Not many people have done this change, since it for appearance only. Canadian DSMers are more likely to find it attractive, since the Eclipse is not sold in Canada.
According to Micheal Wong, you will need the following parts to convert a 1995-96 Talon exterior to a 1997 Eclipse exterior:
- front end
- rear end
- headlights, taillights,
- foglights, reverse lights
- spoiler.
This list is likely not comprehensive.
Morgan D'Antonio did this swap on his 1995 Talon, using 1997 Eclipse parts.
QA #343
Has anybody ever installed a 2G engine in a 1G?
Not so far. This modification is not likely to be popular, since the 2G engine is more expensive than a 1G engine. Also, it has other characteristics (such as a smaller stock turbocharger) that may make it unattractive to 1G owners.
Anyone wishing to attempt this swap should be warned that it is not trivial. Although many of the mechanical attachments will work correctly, some 2G engine sensors operate differently than 1G sensors, making it virtually impossible to use without an ECU and wiring swap as well.
QA #344
Has anybody ever installed a 2G transmission on a 1G?
Yes, Greg Clayton successfully did so, as did Jeff Hanko (95 to 91 AWD) and Brad Degrazia (96 to 92 AWD).
More and more DSMers seem to be seriously considering this swap as worthwhile.
This information was added by Randy Gonzalez in August of 2000:
"ONE: If you have a 1990 or even a 1991 with a 22 spline transfer case, then you will need to swap the xfer case as well. This is just so that the xfer case will be able to mate with the 23 spline output shaft of the 2g tranny.
TWO: When you drill holes in the dust shield to mount the starter, this CAN be done with the flywheel/clutch disk/pressure plate intact. On the VERY TOP starter hole in the dust-shield (hole that is higher above the ground), drill downwards towards the other bolt. On the hole in the dust-shield that is lower to the ground, drill upwards towards the higher hole. It is very simple, this can be done with even a file if you wanted to.
THREE: the shifter cables mount to the tranny via shift cable giudes. The information given is kinda foggy. In short, just make the guides look identical to your 1g tranny. Do this by whatever means necessary. I just grabbed a pair of pliers and bent the guides until they looked decent enough to install. It didnt' look all great or anything, BUT it shifts great now. I think that is all that really needs to be mentioned to better the information already given to the archives... And to let DSMers know, the 2g tranny is such a BIG upgrade over my 91 tranny. It used to be SO damn notchy all the time no matter how well you pampered it into gear. Now with the 2g tranny, all the shifts are as smooth as a knife through butter. I haven't track tested it yet but I am sure it will hold to my expectations. I didn't cut off the ballast weight. Mainly because I figured that if Mitsu put it there, then it had to serve some sort of function other than to slow down shifts. If that IS the only reason, then my loss. but I just rather be on the safe side on this one; plus, I never hear about 2g DSMers cutting it off their tranny. So why should I? Hope this helps someone in the future of those that are pondering whether to do the install or not."
QA #345
Last Updated:
2016-05-29 04:50
Has anybody ever installed a 2G MAS on a 1G?
You would already know this (hint, hint) if you had looked at the FAQ Locator. Alexander Shikhmuradov, Lowell Foo, and John Christou (among others) have done this, and helpfully provided instructions to Eric Porter, who made this Mini How-To page of how to do the wiring. The full VFAQ is here, courtesy of Dallace Marable.
The reasons for doing this are threefold:
- the 2G MAS, being shared with the Stealth, flows much better than the 1G MAS.
- the 2G MAS does not have difficulties with very high flow rates, where the 1G MAS will eventually start 'missing' counts.
- The 2G MAS, apparantly, has lots of 'whoosh'.
Doing this swap generally requires some type of fuel management computer, as the 2G MAS is not a drop-in replacement for the 1G MAS. However, Keith McDonnell reported that the 2G MAS will operate almost perfectly with the stock 1G computer when larger 550 cc injectors are also fitted. The bigger injectors add more fuel to offset the additional 'uncounted' air flowing through the larger MAS. Keith was experimenting on a Galant VR-4, , which could possibly behave slightly differently than other DSMs, but his results were confirmed second-hand by Dallace Marable. For more details, read his Keith's post here.
QA #346
Has anybody ever installed 2G brakes on a 1G?
According to Tom Stangl and Kyle Zingg, who wrote the Big Brake VFAQ, 2G front brakes will fit the 1Gs in the same manner as the 1993-1994 brakes fit the earlier cars.
Here is an archived copy (PDF): '90-94 DSM Big Brake FAQ
QA #347
Last Updated:
2016-12-05 07:24
Has anybody ever installed a 2G exhaust manifold on a 1G?
2G manifolds are a bolt-on replacement for the 1G manifolds. 2G manifolds are larger than 1G manifolds, are easier to port, and are more resistant to cracking and warping. Those who do this changeover might have to grind away a small part of the 2G manifold to clear the 1G engine parts.
QA #348
Has anybody ever installed a 1G alternator on a 2G?
Similar Questions:
Has anybody ever installed a 2G alternator on a 1G?
1G and 2G alternators have been reported to be the same aside from the actual output plug, which can apparantly be swapped. The information is unconfirmed so this experiment is best done with junkyard parts first.
QA #349
Has anybody ever installed a 1G engine on a 2G?
Similar Questions:
Has anybody ever installed a 1G head on a 2G?
Jason Neal had this done with his car, buying a 1990 engine to put into his 1997 FWD. Details on how he did it can be read here.
Changing the 2G cylinder head for the 1G version has also been done. Road Race Engineering has done this swap to a few cars. Besides checking out their web site article, read Mike's archive post on the subject, and his subsequent follow-up post. Josh Rivel also successfully did this swap, although it took a lot of tuning to get the engine operating correctly. Also, Todd Hayashi posted a list of potential gotchas while doing this conversion, and Nathan Crisman described a changeover kit he once had for sale here. Unfortunately, he never had a chance to use it.
Finally, there is an excellent photo gallery walk-though of installing a 1G head onto a 2G here, courtesy of Shawn Gradek. The photography on this site is worth any download time you may encounter.
Those who are seriously interested in this type of changeover must read the archives on the subject to obtain the latest information.
QA #350
Has anybody ever used a one-wire / 1-wire oxygen sensor on my [DSM]?
Similar Questions:
Can I use a one-wire / 1-wire oxygen sensor on my [DSM]?
How do I use a one-wire / 1-wire oxygen sensor on my [DSM]?
According to some DSMers, you can use a one-wire oxygen sensor on your car instead of the four-wire OEM version. However, there may be some restrictions on their use.
Stock DSM oxygen sensors include a heating element that allows them to heat up to operating temperature faster, especially in cold weather. It is almost certain that a large number of owners have oxygen sensors with broken heaters. They don't notice the lack because the heater is not essential for O2 sensor operation. At worst, the oxygen sensor will take some additional time to heat up to operating temperature, and gas mileage might drop a little bit. So two of the four wires on the O2 sensor may certainly be considered optional, especially for those living in warmer climates.
The one wire on the non-DSM sensor is the oxygen sensor signal. Since there is no ground wire, the sensor must use the mounting point as ground. There is a small possiblity that this point might not be a good ground on some cars. Cars with upgraded downpipes might be suspect, as there is a grounding strap on the OEM downpipe that is frequently removed during the upgrade. This may affect the ground reference of the oxygen sensor to some extent.
Even in the worst-case scenario, this is highly unlikely to affect the operation of a stock or near-stock DSM. The precise reading of the oxygen sensor is not important, and is not used by the engine computer, so the ECU will not 'see' any shift in ground potential on the single-wire O2 sensor.
Owners of upgraded cars who use the O2 sensor for tuning purposes might have to be a little more careful. In many cases, owners rely on their oxygen sensors providing a consistent (if not accurate) reading. A shift of 0.100V might be enough to make their tuning more difficult. Thus, individuals who switch to a 1-wire sensor may have to spend some time re-learning their tuning methods to compensate for any differences in the new setup.
It must be noted, however, that tuning by OEM oxygen sensor is quite possibly the worst method of tuning a DSM. Owners with upgraded cars will hopefully have better and more reliable methods than relying on their O2 sensor.
QA #351
I have a [DSM] with the following [mods list] and I ran [this time] in the 1/4 mile.
- Is this a good time?
- Should it be running faster?
- Is this as fast as it goes?
- Is there something wrong?
- Is this in keeping with the modifications I have done?
The best thing you can do is check out DSMTimes.org page, maintained by UNKNOWN, and compare your times to the times posted by other members.
As a very rough guide, you should expect the following 1/4 mile times, given a good launch and decent driving on your part:
|
Mods |
Non-turbo |
Turbo FWD & AWD |
|
none (stock) |
16.high - 17.low |
14.high - 15.low |
|
mild |
16.xx |
14.xx |
|
medium |
? |
13.xx |
|
heavy |
? |
12.xx |
|
absolutely killer |
11.xx |
11.xx - 9.xx (if you're lucky) |
Normal Automatics can add 1 second to these times.
QA #352
How much boost can I safely run on a [DSM] with the following [mods list]?
Quick answers:
- stock fuel system, pump gas: 15 psi, or an O2 sensor reading of 0.85V minimum, or an EGT reading of 1650 degF maximum.
- upgraded fuel pump, stock turbo, pump gas: same as above.
- upgraded fuel pump and injectors, stock turbo: same as above. You will probably hit fuel cut first. Here's why.
- turbo upgrades: varies, but typically lower than 15 psi. You'll need a fuel management system before you can do much of anything more than that. Here's why.
Owing to individual variations between cars, the 0.85V O2 reading mentioned above should be treated with extreme care. Most people prefer 0.90V or better.
Detailed answers:
By changing the intake pressure in your car, you are changing the mass of air entering the engine. In order to maintain a proper air/fuel mixture, more fuel must be delivered to the engine to compensate. Therefore, the 'safe' amount of boost on any DSM is primarily determined by the fuel delivery system in the car. Also, local factors will change the actual mass of air entering the engine, which again changes the required fuel.
Under all circumstances, remember this simple rule: intake air pressure does not equal intake air flow. Flow is what matters.
The amount of boost pressure you can run without risking damage to your engine depends on the following factors:
- fuel pump
- injector size
- turbo efficiency
- intercooler efficiency
- mass airflow sensor modifications
- gasoline octane rating
- operating altitude and temperature
There may be other factors that affect maximum intake pressure. Those interested in a more detailed discussion can read Morgan D'Antonio's post about what limits boost levels on DSMs.
In the above list, the fuel pump and fuel injectors determine the amount of fuel that can be delivered to the engine in a given time. Aftermarket pumps and larger injectors increase fuel delivery capacity.
Turbo and intercooler efficiency determines the temperature of the air going into the engine at any given pressure. Lower temperatures reduce combustion temperatures, but also increase the actual mass of air entering the cylinders. Colder ambient temperatures also increase air mass. Higher altitude cars, though, have less dense air to push than sea level cars, meaning less air mass enters the engine.
MAS modifications introduce an additional element of error into the mass air calculations done by the ECU. Because the ECU, under some conditions, does not check to see that the amount of fuel provided is adequate to safely operate the engine, the operator must monitor the engine operation. Most 'free' mods do not change the MAS operation enough to cause problems, but there is always a small possibility of engine damage, as well as idle and misfire problems.
Gasoline octane is important in that it also reduces the occurance of knock. Running too much boost on bad gasoline with leave your engine pinging like crazy, forcing the ECU to cut boost and reduce timing, thereby losing power.
The rule, accoding to leading DSM performance authorities, is to run at least 0.85V from the oxygen sensor at all times. This corresponds to exhaust gas temperatures of about 1650 degrees F maximum. Failure to observe these limits will often result in melted engine parts.
As a general guideline for those without air/fuel or EGT gauges, sea-level cars may safely run 15 psi (1.0 bar), with the stock fuel pump and turbocharger. The addition of other mods does not generally change this figure, provided the intake pressure remains at 15 psi maximum. This is the level that most owners run in their cars, at least until further upgrades are possible.
For those not operating near sea level, the 'safe' boost you can run seems to increase by about 1 psi (0.07 bar) for each 1000' over sea level. For example, a car at 3000' over sea level can safely run as much as 18 psi of boost. This rule is less reliable than the above 15psi rule, though, since high-altitude owners are understandably reluctant to repeat the boost-related engine damage experienced by some unlucky sea-level owners.
Those owners with upgraded fuel pumps may also run higher boost levels than 15 psi. If you want to do this, presumeably you have installed air/fuel (A/F) and/or exhaust gas temperature (EGT) gauges in your car to monitor the engine operation. Moving to higher boost levels without at least one of these instruments can be hazardous to your cars health. Provided you meet the above-mentioned 0.85/1650 rules, there is no limit to the boost you can run until you hit fuel cut.
It should be noted, however, that the stock DSM turbochargers are pretty much incapable of making more power somewhere around the 15-17 psi level. Above this limit, the turbocharger heats the intake air so much during compression that any power gained from additional air density is lost. Many people have reported this effect, which leads to less power at higher boost pressures.
Also, higher boost pressures exact more stress on the engine components, regardless of the air mass. After all, 18 psi is still higher than 15 psi. Owners that run pressures higher than 15 psi may experience failures on other components that cannot take the stress. One good example is the intake manifold gasket, which was made of rubber in 1990-1992 cars, and sometimes cannot handle the increased pressure. (Fortunately, the replacement 1993-1994 gasket is metal.)
Those interested in the factors responsible for limiting boost should read Morgan D'Antonio's take on what really limits your boost levelson a DSM.
QA #353
Last Updated:
2018-11-03 07:57
I just installed a [16G/20G/other turbo] on a [DSM] with [mods list]. How much boost can I run?
Owners of newly upgraded turbochargers often find, to their dismay, that they experience a severe loss of power at the same boost levels they ran with the old turbo. This is because that the upgraded turbocharger has better flow rates and efficiency than the old turbo - that's why it's an upgrade - and the stock ECU/fuel system cannot handle it. Too much air is entering the engine, leading to low O2 sensor readings, high EGTs, even severe knocking under acceleration. The only solution to this problem (besides lowering boost, or removing the turbo upgrade) is to purchase a fuel management computer of some type. These devices allow the owner to 'trick' the ECU and manually adjust the fuel delivery back to correct levels.
Owners which already have a fuel computer installed should run a mimimum of 0.85V from the O2 sensor, and a EGT maximum of 1650 degrees F. Exceeding these values may result in engine damage.
QA #354
How do I launch a [DSM]?
Similar Questions:
I have a [DSM]. I have trouble launching it. How do I do it?
Read this entry in the Top Ten FAQ.
Automatic owners should note that power-braking their cars too much will build a fair amount of boost. This may cause the BOV to open while you are still standing still, leading to a crummy launch. The moral of the story is there is such a thing as too much boost, at least at the line. Taking it easy will not only save your tranny, it will give you a better launch.
QA #355
Who has the fastest [year/make/model] DSM?
OUTDATED INFORMATION!
Top Ten as of July 2015 (Source: http://www.dsmtimes.org/times.php?Page=1)
|
Rank |
Name |
1/4 Time |
MPH |
1/8 Time |
MPH |
60' |
Turbo |
N2O |
Shop/Sponsor |
NABR |
|
Tony Niemczyk |
6.521 |
206.64 |
4.175 |
168.77 |
1.016 |
BW 76mm S400SX3 |
No |
Extreme PSI / turbo4.com |
NABR |
|
|
Bob Niemczyk |
6.573 |
204.17 |
4.195 |
166.76 |
0.997 |
BW 76mm |
No |
http://turbo4.com |
NABR |
|
|
Brent Rau |
6.970 |
198.00 |
0.000 |
0.00 |
0.000 |
81 mm borg warner |
No |
ACT, osofastracing.com |
NABR |
|
|
Albert Lioe-a-tjam |
7.660 |
175.04 |
4.880 |
142.47 |
1.118 |
GT45R |
Yes |
Buschur Racing |
|
|
|
John Shepherd |
7.700 |
191.32 |
5.104 |
148.07 |
1.296 |
FP GT42R |
Yes |
Shepracing.com, FP, ACT, Polk, AMS, Busc |
NABR |
|
|
Ryan Garcia |
7.797 |
174.41 |
4.964 |
140.66 |
1.159 |
T 72P |
Yes |
SKF/ United Auto & Performance Ltd. |
|
|
|
David Buschur |
7.810 |
174.46 |
5.010 |
141.02 |
1.140 |
T67 P trim |
Yes |
Buschur Racing |
|
|
|
Jeff Bush |
7.940 |
175.72 |
5.148 |
142.26 |
1.229 |
hta 105 |
No |
English Racing/ETS/sparktech/metro trans |
NABR |
|
|
Nick Zervos |
7.943 |
176.96 |
5.200 |
138.97 |
1.185 |
GT42R |
No |
APC, Castrol, Haltech, ARE |
|
|
|
Kevin Jewer |
7.961 |
171.10 |
5.112 |
138.23 |
1.226 |
FP Super 99HTZ |
Yes |
POS Racing |
NABR |
[Note: From time to time, debates on the definition of a 'DSM' emerge on the Digest. These debates usually center around a record-breaking car which, because it does or does not have a certain component or feature, 'should' or 'should not' be considered a 'DSM' in the 'true' sense of the word.
Such judgements are entirely subjective and cannot be resolved, except by arbitrary rules; resist the temptation to reopen any such debate on the Talon Digest, as the moderator (and membership) are tired of hearing about it. All race results that can reasonably be deemed related to DSMs are reported - whoever is king in your own mind is best kept to yourself.]
QA #356
What are the best shock settings for [shocks]?
This depends on a number of things, including:
- the model of your car (FWD, AWD, Eclipse, Galant]
- the springs you are using
- the shocks you are using
- your driving style
- the proportion of "street" use and "race" use
- the type of racing (drag, autox, or others)
Owing to the large variety in desired performance and spring/shock combinations, there are few well-established guidelines as to how to set up the car. Most people agree that DSMs benefit from a somewhat stiffer suspension, especially in the rear, but most shocks have no difficulty providing that. Lowering the car seems to be more important to improved handling.
Drag racers have noticed that a stiff rear suspension seems to promote wheel hop in AWD cars. The same may hold true for stiff front suspensions and FWD cars. On the other hand, dedicated autox racers usually desire the stiffest, lowest, most balanced suspension package available.
Cars which are lowered a great deal demand stiffer suspensions to keep the car off of the bump stops. A setup that is too soft will have the car always bottoming out, leading to an uncharacteristically harsh ride.
Here are some quick searches that will provide other opinions on how to select and/or set shocks:
- Go read the Product Review Pages
- search for opinions on Koni shocks
- search for opinions on GAB shocks
- read Benjamin Sabini's Shocks and Springs FAQ
And, on a related note:
- search for opinions on Eibach springs
- search for opinions on Suspension Techniques springs
- search for opinions on Intrax springs
QA #357
What wheels will fit my [DSM]?
Similar Questions:
What tires will fit my [DSM]?
For answers to these questions, refer to Ed Hahn's Wheels & Tires FAQ. 2G owners can check out the newer 2G DSM Wheel & Tire Fitment FAQ. Also search forums for information on what wheels and/or tires members are currently using.
Shop Discount Tire or Tire Rack (Tire Rack has Wheel Rack available but have removed DSMs from their image based viewer)
One recent addition are 18" wheels from the Chrysler 300M, which are reported to be a direct fit for some DSMs, including 1Gs.
18x8 wheels with offset of 40mm with 225/235 width tire fits nicely with no rubbing.
As always, YMMV.
QA #358
Last Updated:
2016-06-04 09:11
My wheels are [this size]. How big of a tire can I fit on them?
According to Paul Bratina, rim width should be 70-100% of the tread width. That is, the wheels are generally narrower than the tires fit to them. The optimal ratio is to have the rim about 90% as wide as the tire.
Fitting tires that are too wide for the wheels will pinch the tires too much, resulting in the tire having a poor shape. It might also slip off of the wheel, not to mention being almost impossible for the poor tire tech to get mounted. Narrow tires on wider wheels will tend to slip around. For more information, consult a good tire shop.
QA #359
Can I mount 18 inch rims?
At least one member, Allen Lau, has successfuly mounted 18" wheels on his 1G, using Racing Hart Tracer 18 x 8.5 wheels with a 41mm offset. Allen described the wheel offset as being a key point in fitting the wheels; any more than a 41mm offset and the tires will hit the strut towers. Less than 39mm offset may result in suspension problems, as the stock offset is 46mm. Tires used were 235/40/R18. 18 x 8 wheels with 225/40/R18 tires were reported to be equally good.
Several members have mounted 18" wheels on 2Gs; it is easier, since 2Gs were designed with factory 17" wheels. Jeff Mitchell reported that 18x8 wheels and 245 tires fit, but stuck out a little. See the Wheel Rack or Wheel Machine for information.
For more info on offset, see the Wheel Offset FAQ, which also has a fitment guide for 2G DSMs.
QA #360
Last Updated:
2023-05-23 10:44
Can I use the wheels from a [non-DSM] on a [DSM]?
Similar Questions:
Will the wheels from a [non-DSM] fit my [DSM]?
As a quick reference, the following wheels from other models have been reported to fit on DSMs:
|
Year/make/model |
1G |
2G |
Comments |
|
1995-97 Eclipse GSX / Talon AWD 16" |
Y |
Y |
picture available (1) |
|
1997 Eclipse GSX / Spyder / Talon AWD 17" |
Y |
Y |
|
|
1993/94 Ford Probe GT 16" |
Y |
Y |
|
|
Y |
|
stick out |
|
|
1993 Mazda RX-7 16" |
|
Y |
|
|
Mitsu 3000GT / Dodge Stealth 16" |
Y |
|
pictures available (1) |
|
1994 Mitsu 3000GT / Dodge Stealth 17" |
|
Y |
235/45/17 tires work; 245/45/17 do not. Rear wheels may hit trailing arms. pictures available (1) |
|
1990-91 Nissan 300ZX 16" |
Y |
|
|
|
1992 Nissan 300ZX 16" |
Y |
Y |
|
|
1993 Nissan 300ZX 16" |
Y |
|
centerbore wrong, stick out |
|
Dodge Avenger |
Y |
|
pictures available (1) |
|
Mazda 626 15" steel |
Y |
? |
Will fit big brakes -see here for details |
|
Dodge Caravan 15" steel |
Y |
? |
Will fit big brakes - a popular winter wheel. |
Note that some of these wheels do not fit inside the stock wheelwells and will stick out a bit. Some others require modifications to either the car or the wheels, so are not ideal bolt-ons.
As an example, Scott Willard mounted 93-95 stock RX-7 wheels on his 93 Talon. Here's his December 31, 1998 post on the subject.
QA #361
Where can I get wheel spacers for my [DSM]?
Most people seem to have them manufactured. Rick Roeske has a simple recipie - cut the outer rim off of an old pair of stock brake rotors. Any machine shop should be able to do this, in addition to machining the remaining spacer down to the required thickness. You can also read Scott Willards description of his wheel spacers.
Using wheel spacers usually requires using longer wheel studs, which may be hard to find. Where can I get [longer/replacement] wheel studs for my [DSM]?
QA #362
Last Updated:
2016-05-31 08:14
Why do these cars require premium fuel? Is it worth it?
Strictly speaking, DSMs do not require premium fuel. However, the car was designed to accept higher-octane gasoline for a reason.
Octane is not a measure of the amount of energy in gasoline - rather, it is a measure of how well the fuel resists preignition, also known as detonation or 'knock'. Detonation is very hard on the engine, and must be avoided. The DSM cars incorporate a knock sensor specifically for the purpose of detecting knock. Higher-octane gasoline resists knock better than lower octane gasoline.
During normal operation, the engine control unit (ECU) adjusts the engine timing as far forward as it will go. This provides maximum power, but also increases the possibility of knock. This is especially true for turbocharged or supercharged engines, such as the 2.0L turbo 4-cylinder found in the upper model DSMs. Note that the ECU hears knock all the time - the problem has to be persistent to generate a reaction from the computer.
If the ECU detects excessive, continuous knock via the knock sensor, the engine timing is retarded until the knock goes away. This results in a power loss, but saves the engine from damage. So, if you fill up with 87 octane gas, your ECU will be forced to retard the timing quite a bit, and you will not get the rated power from the engine. Not only that, but the ECU may also be forced to limit turbo boost levels to accommodate the lesser quality gasoline, which again means a significant power loss. And yes, the ECU does have the power to do that - see [["My boost is not strong enough. Is there a fix?]]".
Once you switch back to premium, the ECU will eventually advance the timing back to original levels - after a while.
For full details on this and the role of the boost control solenoid (BCS) refer to the September 22nd edition of The Diagnostic Port, byTechnomotive.
QA #363
What is the best brand of gasoline to use?
The true way to answer this question is as follows: analyze gasoline samples from all the prospective gas stations in your area for a period of three to twelve months, then pick the consistently best gas.
In other words, this is an imposible question to answer. Gasoline quality and formulation vary enormously over the continent. Leaving aside race gas (100+ octane) there is no real way of telling which gas is the 'best' in your specific area. Just pick a high-octane brand and stick to it unless you have a problem.
For those unsatisfied with this answer, read the Gasoline FAQ (alternate link here), and seek out information from other local DSMers. Don't ask the Digest - somebody in California isn't going to be able to help you if you live in New York.
QA #364
Can I use 100+ octane racing gas in my car? Is it worth it?
DSMs will realize some performance benefits from ultra-high octane gasoline. The extra octane will allow the ECU to advance the engine timing more. Some people report significant gains with race gas, while others describe only minor improvement. The prohibitive cost of these fuels generally restrict their use to drag racing applications only.
Note that this applies only to true racing gasoline, and not pump gas plus octane boosters. For more information, read the very detailed Gasoline FAQ (alternate link here), and this essay on high-performance gasolines.
For those who can't afford "straight" race gas, try using the gasoline blending chart provided by Osborn's Auto. Be certain to read thearticle that accompanies it.
QA #365
Can I use leaded race fuel or aviation gas in my car? Is it worth it?
You can use leaded fuel, with the following caveats:
- leaded fuel will quickly destroy the catalytic converter.
- leaded fuel will damage and eventually destroy the oxygen sensor.
Leaded gasoline also leave white deposits on the O2 sensor and housing; some mechanics may recognize this as being from leaded gas, and deny your warranty for a new oxygen sensor.
Some people also believe that aviation gas is dirtier than normal pump gas. Opinion on this is divided, with some people saying it is and others saying it isn't. Max Burke reports that aviation gas has none of the detergents usually present in automotive gas. This could be called a 'purer' fuel, but since it can't clean the engine as well, the engine might get dirtier inside as a result.
The most popular AVgas is 100LL (100 octane low-lead mix), which nevertheless still contains at least as much, and possibly more, lead as normal leaded automotive gasoline. The "low-lead" rating is in comparison to other aviation fuels; this amount of lead WILL wreck the above mentioned auto components. One Digest member suggested adding the Alcor TCP additive to the avgas to help prevent lead buildup in the engine. Consistent use of leaded gas or AVgas will probably lead to significant clogging of spark plugs and oxygen sensors.
Except for the above details, it appears that for practical purposes AVgas can be considered the same as normal leaded automotive gasoline. According to the Gasoline FAQ (alternate link here), even 100LL has more octane than most auto gasolines, so you will get the same performance benefits as with unleaded race gas, as described above. Also, some people can get aviation gasoline much cheaper than typical race gas prices, making the prospect more attractive. For more information, read the very detailed Gasoline FAQ (alternate link here), and this essay on high-performance gasolines.
For those who can't afford "straight" race gas, try using the gasoline blending chart provided by Osborn's Auto. Be certain to read thearticle that accompanies it.
QA #366
Can I use octane boosters in my car? Is it worth it?
Many people use them. No concrete drawbacks or benefits have surfaced despite the heated debate that surrounds these products, making them appear similar to highly publicized 'magic products' (some of which are listed here). As with 'magic' products, virtually no experimental data is available to either confirm or deny the claims. For more information, read the very detailed Gasoline FAQ.
The only legitimate exception to the above paragraph may be gasoline additives that incorporate the tetraethyl lead additive, or TEL. TEL was the original 'lead' in leaded gasoline, and has since been banned from pump gas in North America. TEL was used because of its anti-knock properties, which have been well documented. TEL additives can still be purchased from Kemco Oil & Chemical; their effect on DSM engines is unknown, but presumeably TEL additives will have the same problems as leaded race gas.
Formulas for do-it-yourself octane boosters have been circulating various automotive lists for a while now, including the DSM list. Read all about them in this post from 1996 - there are some interesting 'facts' on commercially produced octane boosters as well. GS-Xtra claims original publication of the formulas, which are also listed on in the maintenance section of the Vintage Triumph Register home page and the Team.net Scions of Lucas (SOL) Technical section on fuel and octane boost formulae - they got it from Vettenet. Mario "Porsche Killer" has added his day-glo version of the homebrew formulae here, and there used to be a link in the (now amalgamated) F-Body organization page.
Although this information obviously gets around, there are no known records of anybody actually mixing and using their own octane boosters.
QA #367
Can I use gasoline tablets / fuel line magnets / other gasoline savers in my car? Are they worth it?
Don't bother - they are just more 'magic products'.
Don't believe me? Read what the FTC has to say on the subject.
QA #368
What kind of brake fluid should I use?
Similar Questions:
What is the best brake fluid?
What is DOT-3 / DOT-4 / DOT-5 brake fluid?
What is "silicone" brake fluid? Can I use it? Is it worth it?
Factory specifications call for DOT-3 fluid in DSMs. Many DSMers use Ford Heavy Duty brake fluid - it reportedly has a high temperature limit. Canadians will be happy to note that Canadian Tire sells this fluid as well, listed as "For Fords".
Brake fluids are rated according to DOT (Department of Transportation) ratings, which were established in 1972 to provide standardization. Note that DOT-3 and DOT-4 fluids are NOT compatible and may not be mixed in the same system. Silicone brake fluids are DOT-5. They are not recommended for use because they have strange temperature characteristics, and allow water to accumulate in the brake system.
All brake fluids are hydrophilic ('liking water') meaning they tend to absorb water. This decreases their effectiveness, and is a reason why brake performance decreases over time. Replacing the fluid with new, unopened fluid is the only remedy.
QA #369
Could somebody from [city/state/province/country] that owns a [year/make/model] DSM please mail me?
We suggest you google DSM Forum + Your Area or Country
QA #370
Is there some kind of problem with the DSM ECU?
Several 1G owners have found that the electrolytic capacitors in their ECUs leak after roughly seven years. This problem is not limited to DSMs, engine computers or even the automobile world - many types of equipment suffer from similar problems, as electrolytic capacitors are commonly used in electronic equipment.
Excessive leakage can cause very troublesome damage to the printed circuit board (PCB) inside the ECU. This is very difficult to fix unless you have access to professional soldering equipment and tools. For those that do, they will find the repair difficulty on a par with any typical conformally-coated through-hole PCB repair.
For more details see the "How to Replace the Capacitors in a 1G ECU" page, from our friends at Technomotive.
Andreas Santoso offered to provide the required replacement capacitors for $1 plus a SASE. He later changed this to $2. See the archivesfor details. This offer is old and is likely out of date, but others may make the parts available.
As a special note for 1999 owners, the 1999 ECU may have had some type of build problem involving the throttle position sensor and the ECU. The single owner that reported the problem apparantly had it fixed under warranty. As a bonus, the replacement ECU was EPROM-based. No other owners have reported any problems, so this was likely to be an isolated case.
The Last Word: Still need caps? Try here.
QA #372
Why should I get 105 degree rated capacitors for my ECU?
Several manufacturers of electrolytic capacitors have confirmed that 105 degree capacitors will last roughly twice as long in any given application as 85 degree rated capacitors. This holds true even if the capacitors are not operated anywhere near their rated temperatures. (Note that capacitors are invariably rated in degrees Celcius, not Farenheit.)
The difference in longevity is directly related to the temperature ratings of the device because 105 degree capacitors must be of much better construction in order to survive at that high a temperature. The highly robust design requirements naturally lead to a longer-lived part. 105 degree capacitors can also survive higher ripple currents, a prime suspect in the premature failures of the factory DSM ECU capacitors.
It must also be noted that each different capacitor series from each different manufacturer usually has a different rated lifespan. Those who have the means should attempt to procure high-temperature, high-reliability capacitors when repairing their ECU.
For those who cannot procure 105 degree rated capacitors, 85 degree capacitors will work. They will simply wear out faster. Those who can practice cap replacement as part of a routine maintenance schedule will certainly be able to utilize 85 degree caps will virtually zero risk of ECU damage.
QA #373
What are the differences between different ECUs?
Similar Questions:
Which ECUs are compatible with my [DSM]?
Will an ECU from a [year DSM] work on my [different year DSM]?
Read the FAQ page at Technomotive.
QA #374
Does anybody have electrical schematics for the ECU of a [DSM]?
Similar Questions:
Where can I find electrical schematics for the ECU of a [DSM]?
Unfortunately, electrical schematics for the ECU are not available from any known source. No one has seen fit to release such documentation from within Mitsubishi, and the ECU is too complex to be easily traced out by hobbyists. If someone does have such diagrams, they are keeping them a secret.
One small consolation may be that the ECU pinout is available in every shop manual.
You can check http://www.lilevo.com/mirage/
QA #375
Where can I get parts for the ECU of a [DSM]?
Some of the parts can be found at mail-order retail shops such as Digikey, Newark Electronics and Allied Electronics. Please note that these shops cannot help you identify parts inside the ECU. If you require such assistance, try a local electronics parts store.
QA #376
Where can I get program code for the ECU of a [DSM]?
Similar Questions:
I don't understand! Other people sell upgraded program code for DSMs. Where do they get their code?
You can't get code for the ECU, unless you can download it yourself. There are several people and businesses who have downloaded and disassembled the ECU code for the various different DSM cars, but they have not made the source code public.
While this might seem like an unfair thing to do, it is important to realize that some of these individuals spent years figuring out the DSM ECU, which is based on a proprietary microcontroller not generally available to the public. They had to figure out not only how to access the program code, but how to decipher it into instructions, and how the instructions operated the engine - all without any kind of documentation or support from anyone. This amount of effort is not to be taken lightly.
Also, many people have either built this specialized knowledge into a business, or was operating on the DSM ECU as part of a business venture. Private individuals are understandably reluctant to share their hard-earned work for nothing, and employees have legal and ethical responsibilities to their employers to not divulge trade secrets. Either way, they have little incentive to give away the information.
It is important to realize that this is very much like any business operates - on the strength of specialized and/or restricted information that they have gained through hard work. There is nothing stopping anyone from following in their footsteps, if they are willing to invest the necessary time (and money) . Most people would rather do other things, of course, which provides a foundation for commerce.
The Last Word: DSM code may be available from various websites or vendors. At least, the people I know didn't have a lot of problem getting it.
QA #377
Is the automatic transmission controlled from the ECU, or is there a separate transmission control unit?
Similar Questions:
Do the ECU and the TCU communicate with each other?
The engine control unit (ECU) only does the engine - there is a separate transmission control unit (TCU) that operates the automatic transmission. The ECU and TCU do not talk to each other. The TCU gets information regarding throttle position, RPM, etc. by sharing the same sensors used by the ECU.
On 2Gs, the TCU may communicate an error code at the ECU, so the "Check Engine" indicator will light, but that seems to be all. Apparantly, the ECU and TCU do not communicate in any other way.
QA #378
Last Updated:
2016-11-25 07:06
How can I tell if my ECU has an EPROM?
One fact that is not mentioned on this page is how to quickly check ECUs *after 1990* for an EPROM. There is a label on the top of the ECU (not the sides). If this label has an "E" in the lower right-hand corner, you have an EPROM. If it has an "M" or "T" in that corner, you do not have an EPROM. 1990 owners have to open the ECU to find out, as there are both EPROM and non-EPROM 1990 ECUs. This tip is also on this page from the developers of the DSMlink.
Galant VR-4 owners, again, have an edge - owing to the low production volume of that model, GVR4s are almost guaranteed to have an EPROM.
Great thread on DSM tuners: http://www.dsmtuners.com/threads/how-to-identify-an-eprom-ecu.337343/
QA #379
Last Updated:
2016-11-23 07:04
How do I get the error code out of a [DSM] ECU?
These are all listed on the Club DSM Error Code Readers page.
QA #380
What are the ECU codes for a 1G [DSM]?
The 1G ECU codes can be found at Brad Bauer's Diagnostic Engine Codes & Procedures page, and also in this post from the archives. You can also read your shop manual.
The Last Word: OK, so Brad's site is gone. What do you want me to do about it?
QA #381
What are the ECU codes for a 2G [DSM]?
The 2G ECU codes can be found at the 2G NT page, and also at the Avenger/Sebring Owners Group homepage. You can also read your shop manual.
QA #382
I keep seeing the "Check Engine" light, but I can't get a code! What's going on?
Here's what Todd Day of Technomotive has to say on the matter:
"As far as I can tell, there are only three ways that you can see a CHECK ENGINE light, but then not be able to clock out the code.
1) The ECU for some reason loses power or otherwise crashes and does a hard reset while driving. The CHECK ENGINE light comes on for five seconds because the ECU always turns it on for five seconds as a bulb test when power is first applied.
2) The ECU flags a legitimate error. After you turn off your engine, a Mitsu shop tech sneaks into your car with a MUTII scan tool and clears the codes while you are not looking. (1991-94 only)
3) The ECU flags a legitimate error. You turn the key to ACC or OFF, wait for the relay to go *CLICK* after seven seconds. The fuse that runs your radio memory and footlights and ECU BACKUP MEMORY is burnt out and your ECU loses its mind. You turn the key to ON to clock out the codes, but everything is gone.
If you have a case of #3, try turning the key to ACC to kill the engine, but immediately bring it back to ON. This will keep the main power supply to the ECU going, and you should be able to clock the codes."
QA #383
My O2 sensor might be dead, but I'm not getting a 'Check Engine' light! How can I tell?
Similar Questions:
I'm sure my O2 sensor is dead, but I'm not getting a 'Check Engine' light! Why not?
The ECU only checks the oxygen sensor under specific circumstances. If it doesn't get to check the sensor, it can't tell if the sensor is dead.
According to Todd Day of Technomotive:
" Your car must undergo a "cruise" session above 45 MPH for 30 minutes or two "cruise" sessions for 20 minutes (depending on [model] year) before the ECU will flag a dead O2 sensor. At least for the 1Gs - this probably got a lot tighter for 2Gs. This is why a lot of people won't ever see a code get thrown for O2 in their daily commute driving."
The best way to determine if an O2 sensor is dead is to monitor it with an air/fuel (A/F) gauge.
QA #384
Can the ECU's boost control solenoid (BCS) be used as a boost controller?
No. Or, at least, not directly. The operation of the BCS has virtually nothing to do with intake pressure. The only method of doing this is to disconnect the BCS and wire it to a customized boost controller. Theoretically, it could be done by by reprogramming the ECU, but the new ECU would also have to accept inputs from an additional intake pressure sensor. To date, nobody has created such an ECU modification.
QA #385
Can the BCS be wired as an 'economy/power' or low/high boost switch?
Yes. Mario Pennycooke has done something like this.
Subject: Poor Mans Profec B revealed (Long very long)
From: Blue Talon2
Date: 12 Nov 1997 00:40:52
[Bibliography] [Digest]
--------------------------------------------------------------------------------
Hey guys
Well due to the overwhelming popular demand, and despite the voice in the
back of my head that say hey PK this could be a way to make some $$$, I will
once again reveal the oh so simple directions to make you very own Porsche
Killer/Poor Mans Profec B so that you too can enjoy "Boost with a button."
Recipe:
2 DSM boost control solenoids
1 3-way rocker switch
1 Radio Shack IN4004 diode (Not Zener Diode)
Lots of wire
Bag of plastic "T"'s
Extra vacuum tubing
The rocker switch I used was from a set of Eclipse dual fog lights and light
up in either position. Power the rocker switch with a fused igntion wire (I
taped into the radio). Run a two power wires so that the switch turns on one
solenoid in each position. Then wire in the diode as shown in the diagram.
This diode allows power to flow in one direction so that when you flip the
switch in one direction you turn on one solenoid but when you power the
other, both turn on.
You may substitue the 3 way rocker and diode with two individual switches to
control each solenoid. This may give you further boost options.
I have to say thanks Sean RS Costall who gave me the neccessary diode number
as well as made the diagram you seeattached below, because this software eats spaces
The diagram has the switch turning the ground on and off but you may route
the power in whichever direction works best for you. Now come the tricky
part.
Calibration: Remove the hose from the stock solenoid and replace it with a
"T". Connect the two solenoids to this "T" with more hose. To adjust the
boost levels you adjust the size of the "T" and the lenghts and size of the
hoses before AND after the solenoids. Add more hose/use bigger "T"=bleed more
air and get more boost. Yeah I know this can be pain but you only have to do
it once. It took me only four runs to get it right. Calibration is by trial
and error so be very careful and watch your boost gauge.
Originally I had the setup working for 8lbs, 11lbs, and 15lbs. But once I got
Dave's fuel pump I now have it set for 8lbs, 12lbs, 18lbs. Another good part
to the system is that boost spike is minimal since you don't have 12ft of
hose running into the cockpit.
Thats it. Trust me once you set this up you'll never go back to bleeder
valves. Plus you'll laugh at your friends who paid $500 for a "Furry Logic"
boost controller which can't do much more the Porsche Killer Poor Man's
Profec B.
Make sure that you do the knock light at the same time so you'll know when
it's safe to turn the wick up.
Disclaimer: this intellectual property is offered free to the DSM world. Use
it at your own risk. The Porsche Killer is not responsible for you blowing
your engine sky high but will take the credit for you blowing the doors off a
Cobra. This information is for use by DSM owners on their own personal
vehicles and may not be used for profit. Any profits made must be split
between you, me, Sean Costall, and the Todd "all thumbs" Day M3 fund. This
offer is valid in 49 states...sorry Alabama.
Mario
Porsche Killer
90 Talon Tsi Awd 108k
Lots of variations exist.
QA #386
Last Updated:
2020-01-25 06:08
How does the AFC / S-AFC work?
The AFC works by changing the mass airflow sensor (MAS) signal going into the ECU. This signal is a frequency proportional to the amount of air passing through the sensor.
Picky tech-heads will realize that the MAS puts out three signals: air flow, air pressure, and air temperature. The ECU integrates all of these to calculate air mass. The AFC alters only the air flow signal.
Different levels of adjustment to the signal occur for the different RPM ranges. In-between ranges, the AFC uses linear interpolation to smoothly transition from one adjustment level to the next. Thus, if the AFC is set to +10 at 2000 RPM, and - 10 at 3000 RPM, the signal correction at 2500 RPM will be zero.
The Super AFC also has two different correction maps based on throttle position. The "Th" (throttle) points set inside the unit by the user determines the low-throttle and high-throttle boundaries. The AFC also interpolates between the low and high settings at part throttle. Thus, if the low throttle is set at 10% and has +10% correction, and the high throttle is set at 90% and has +20% correction, the correction at 50% throttle will be +15%.
Despite this flexibility the AFC suffers a few drawbacks. It does not "know" the engine load, only engine RPM. For this reason it is hard to tune each gear ideally, since the engine load at any RPM in 1st gear is different than that in 3rd or 5th gear.
AFC owners should check out the Super-AFC-DSM mailing list on Yahoo! Groups. You need a Yahoo! ID since membership is now restricted. To join, click here.
QA #387
Why does my Super-AFC shows 0% throttle and my TMO datalogger/Pocketlogger show 7-10% throttle at idle?
The S-AFC is set up to accept the lowest reading as 0% throttle. The TMO and Pocketlogger read the throttle setting from the ECU, which knows better. In other words, the S-AFC is wrong. However, this discrepancy does not affect the S-AFC operation in any way, so don't worry about it.
AFC owners should check out the Super-AFC-DSM mailing list on Yahoo! Groups. You need a Yahoo! ID since membership is now restricted. To join, click here.
QA #388
How do I tune my [DSM] with an AFC?
Similar Questions:
What are good settings for an AFC on a [DSM]?
Here is the "basic" tuning drill for the AFC, courtesy of Kyle Tarry:
"Ok, for all of you guys who are asking what to do since you just got a SAFC, here's the drill:
FIRST, BUY A LOGGER! Non matter what people say, you cannot maximize the capabilities of your setup without one. And, for the price of a good EGT gauge, a pocketlogger can be yours.
Now, on to the good stuff. Set the SAFC up, with the throttle poits at about 30% and 80%. Spread the RPM points across the rev range from 1000 to 7500 or 8000 rpm.
Start by getting the fuel trims in line. Adjust the 1000 rpm point with the car at idle until you get the low fuel trim in the 100%-115% range. Then, do they same for the mid and high fuel trims while moving in their respective zones. (probably about idle, then slow cruise, then a faster cruise). Once you have them all around 110%, then you can carry those numbers you used across the low throttle map, and also use them on the high throttle map.
Now, you should have the high throttle map set up with the same numbers you used on the higher RPM's of the low throttle map. Make a WOT run, and log it. Now, look at the log, and at every 1000 rpms simply decide if the engine is rich or lean. If it is lean (knock) then richen the AFC up a click or two, depending on the severity of the knock. If it is rich (no knock, good O2's) then lean it out a click. Keep doing this until you have all the rpm points set up to a few % right above where it starts to knock.
That's really about it!"
AFC owners should check out the Super-AFC-DSM mailing list on Yahoo! Groups. You need a Yahoo! ID since membership is now restricted. To join, click here.
You can also check out Road Race Engineering's FAQ page on how to initially tune your AFC, and TMO's guide to datalogger tuning.
QA #389
My rad support has rusted out. What do I do?
Similar Questions:
My front cross member has rusted out. What do I do?
Severly Rusted
Option 1: Order a new front rad support unit from
- Mitsubishi [[missing part number]]
- Aftermarket vendor
- Ebay
Please make sure you order the proper year / model.
Option 2: Some members have reportedly remove the entire front support and created a tubular cross member. See image of custom tubular cross member [archive copy]. This will require AC delete as there is no support for condenser (unless you custom fab extension)
Partially Rusted Option:
Members have cut out the affected area and replaced with a cutout from donor car. Many believe that a solid weld will affect crash, but as the lower section is one solid piece, as long as you are replacing only that and not touching the spot welds, there should be no ill effect.
QA #390
What does it mean when my battery light,coolant light,and my parking brake light flicker?
Get home asap! Classic alternator dying symptoms.
Check the output voltage while running.
Now would be a good time for saturn alternator & relocation! Some have reported great success with 160 AMP Saturn Alternator. Not quite simple plug and play though.
I can not find one good vfaq for this upgrade.
QA #391
What is a 'boost' gauge?
A 'boost' gauge is a pressure gauge that measures pressure (and, usually, vacuum) at the intake manifold. Ordinary vehicles only ever have vacuum at this location, as the engine attempts to suck in air. Turbocharged and supercharged vehicles pressurize the intake manifold by pushing in extra air. The intake pressure is referred to as 'boost'.
It is essential to have a boost gauge prior to modifying the turbocharger system on a turbo DSM. If the turbo is not set up correctly, it will push in more air than the engine can handle. This usually leads to a 'lean' condition - too much air, not enough fuel - which directly results in excessively high combustion temperatures and severe engine damage. For this reason, a boost gauge is always at the top of any DSM modifications list.
Non-turbo DSMs, having no turbo, have no need for a boost gauge. However, it is essential if the car is retrofitted with a turbo or supercharger system.
QA #392
How do I install a boost gauge in my [DSM]?
QA #393
What is an air/fuel ratio gauge?
Similar Questions:
What is an A/F gauge?
An air/fuel ratio (or A/F) gauge is a voltmeter attached to the oxygen sensor signal wire. The oxygen sensor reacts to the amount of air present in the exhaust stream, and provides an approximate indication of the relative amounts of air and fuel in the combustion mixture. It is a useful tuning tool, although limited somewhat by the characteristics of the oxygen sensor it is attached to.
There are many A/F gauges on the market. Those for DSMs usually read from 0-1V, although newer models may measure a restricted range similar to 700-1000 mV.
Because the A/F gauge is merely a voltmeter, many people have adapted existing equipment or built their own, rather than pay retail prices. One such design is provided free of charge by Brad Bauer, and is based (as most are) on the National Semiconductor LM3914 bargraph display driver IC.
Some DSMers have also offered their homebuilt units to other club members at lower prices. These offers are usually temporary.
For technical information on some of the drawbacks and limitations of DSM oxygen sensors, see this post by Dave Mertz; be sure to read the reply at the bottom from Todd Day. Also check out the oxygen sensor questions in this FAQ.
QA #394
What is an A/F meter?
Similar Questions:
Has anybody ever installed an A/F meter on a [DSM]?
How do I install an A/F meter on a [DSM]?
I can't find the O2 sensor wire! Where is it?
An A/F meter is simply a voltmeter, hooked up to the oxygen sensor. Most A/F meters are simple bar-graph displays, although some have LCD displays. Since the
Installing an A/F meter is as simple as connecting the meter to power, ground and the oxygen sensor signal. Owners of precise meters will want to be certain to get a good ground, since ground offsets may affect the A/F meter readings.
1Gs have a test connector, located in the passenger side of the dash, that is useful for A/F meter connections. This wire can be located by following the directions on Brad Bauer's O2 sensor wire PDF.
2G owners need to connect to the ECU wiring in order to monitor A/F ratios. You can find the correct wire by:
---------------------------------
Steps to Install an Air-Fuel Meter for the 2G Turbo Talons and Eclipses
Tools Needed:
One Phillips screw driver and three plastic T-connetors from radio shack (if your A/F gage kit does not already provide them).
1. Remove the driver's side access panel from the center console. There is one Phillips screw and one push-in plastic screw that holds the access panel on.
2. There are four plastic connectors plugged into the ECU, directing a myriad of wires going to and returning from the control sensors and relays. Connector 1 has 26 terminals, connector 2 has 16 terminals, connector 3 has 12 terminals, and connector 4 has 22 terminals. The terminal numbers are shown below. (Look at the ECU with your head under the steering column, with your left ear pointing to the floor. The connectors are from left to right, connectors 1, 2, 3, and 4.)
2G Turbo DSM ECU Terminal Numbers
Connector 1
1 2 3 4 5 6 7 8 9 10 11 12 13
14 15 16 17 18 19 20 21 22 23 24 25 26
Connector 2
31 32 33 34 35 36 37 38
39 40 41 42 43 44 45 46
Connector 3
51 52 53 54 55 56
57 58 59 60 61 62
Connector 4
71 72 73 74 75 76 77 78 79 80 81
82 83 84 85 86 87 88 89 90 91 92
4. The hot wire to power up the A/F gage should be teed onto the ECU power supply wire at terminal number 25. The ground wire for the A/F gage should be teed onto the ECU ground wire at terminal number 92. The air-fuel signal wire for the A/F gage should be teed onto the front O2 sensor return signal wire at terminal number 76.
5. Replace the access panel on the center console. You're done! Happy boosting!
--------------------------------------------------------------------------------------
Standard O2 sensors are pretty useless to monitor. Get a wideband O2. [[Why do I need a wideband O2 sensor?]]
QA #395
Last Updated:
2016-05-29 04:58
What is an exhaust gas temperature gauge?
Similar Questions:
What is an EGT gauge?
An EGT gauge measures (ahem) exhaust gas temperature. This reading is directly related to the internal combustion temperature of the engine, and indirectly related to the quality of the air/fuel mixture entering the engine.
The principle is obvious: if the engine gets too hot inside, parts melt. While other gauges can give an indirect indication, only an EGT can give a direct indication that the engine is operating correctly.
EGT gauges consist of a high-temperature thermocouple (usually K-type) attached to a analog or digital readout. A hole is drilled into the chosen measurement location - exhaust manifold, oxygen sensor housing, or downpipe. The thermocouple is placed inside the using air-tight compression fittings. Simple bandclamps can also be used, but only on downpipe installations - they are not air-tight and will allow exhaust to escape.
QA #396
How do I install an EGT gauge in my [DSM]?
QA #397
Where should I tap/install my EGT probe?
There are several places to install the EGT probe. However, EGT readings will vary depending on where the EGT probe is mounted, as pre-turbo EGTs are always higher than post-turbo EGTs.
Installing the EGT in the exhaust manifold is the preferred method. It is also one of the easier methods, since the manifold is easily accessible.
Although the 'traditional' manifold mounting point has been cylinder #1, recent information from Team Rip Engineering shows that the #2 cylinder is the hottest of the four. Recommendations for the distance between the probe and cylinder head range from 1 to 6 inches.
Another possibility is to install the probe in the manifold 'collector' - the place where all the runners converge. The idea here is to get an average reading of how all four cylinders are running, rather than a specific reading on one cylinder. Some people believe this is safer since you can monitor the entire engine. There is a good write-up on the difference between runner and collector placements here, courtesy of Steve Wells, that can help you decide between the two.
Other possibilities include the oxygen sensor housing and the downpipe. Diamond-Star Specialities doesn't recommend the oxygen sensor housing because the temperature drop between the manifold and the housing varies from car to car. Read about this here.
For downpipe installations you don't need a compression fitting, since a small exhaust leak at that location really doesn't matter. Also, if you accidentally drill a hole in the wrong location, it is more easily repaired. Unfortunately, the downpipe is fairly far removed from the engine, and only readily accessible from underneath the car. One solution is to have the probe pre-installed when upgrading or replacing the downpipe.
QA #398
How does the [DSM] knock sensor work?
Similar Questions:
Can you hook up an [LED/display/indicator] directly to the knock sensor? Will it work?
No, it will not work.
First of all, the knock sensor for a DSM engine is nothing more than a microphone. It picks up engine noise - all of it. There is no signal processing or filtering. The output signal is difficult to interpret, to say the least. It is not possible to hook up an LED, DMM, digital display or any other form of indicator directly to this signal.
The ECU is responsible for processing this signal and getting useful information from it. The results do not exist outside the ECU memory. So, to measure knock as the ECU does it would be necessary to duplicate the ECU's signal processing algorithms.
To make things more interesting, the ECU only 'listens' for knock in certain portions of the engine cycle. So timing would have to be known as well.
It is far easier for most people to simply purchase a datalogger or Pocketlogger. These instruments will read the correct knock sums directly from the ECUs memory.
The Last Word: Ages ago, there was a way to hook up an LED to the knock sensor "microphone" using a threshold detector. The LED would light up - sort of - when the signal from the microphone got "loud" enough, which supposedly indicated knock. Cute, but not necessarily a good idea.
QA #399
Has anybody ever installed [colored / indiglo / reverse indiglo] gauge faces on a [DSM]?
Those interested can also check out the install instructions from Black Cat Custom, a manufacturer of custom gauge faces for DSMs in both Canadian and American versions.
QA #400
Why do people monitor the O2 sensor?
The oxygen sensor reading is one of the primary indications of the operating condition of the engine. People monitor it to try and make certain that their engine is getting adequate fuel. Too little fuel and engine damage can occur. See the ECU Primer for the details as to why this occurs.
Caution must be exercised by anybody that is depending on an A/F meter for engine tuning. There is evidence that the oxygen sensors in DSMs are not designed to be accurate except at their 'switch point' of roughly 500 mV. In other words, different sensors may give different A/F readings under the same conditions. There are also many other variables that can affect what is a 'safe' O2 reading for any given car.
QA #401
I have a [DSM] with [mods]. What is a safe O2 reading to run?
There have been many 'safe' O2 sensor readings reported for DSMs. However, there is a growing consensus that O2 readings alone are not enough to guarantee safe operation of the engine.
DSM oxygen sensors should be thought of as more akin to oxygen 'thermostats'. They are designed to 'switch' states, from high to low, very rapidly, around the oxygen level that corresponds to a stoichiometric 14.7:1 air/fuel ratio. As long as they do this, there is no reason for them to be accurate anywhere else.
The principle of monitoring the A/F ratio is to check what the oxygen sensor is reading at A/F ratios that are greatly different from the switch point. However, the oxygen sensors may not be accurate at these levels, so any readings that are taken must be treated with caution.
Evidence to this effect is growing thanks to the introduction of the TMO datalogger, which gathers information about engine operation directly from the ECU. There have been many cases where owners have used the datalogger on their car, only to find (to their utter surprise) that despite sky-high A/F meter readings, they are losing power from not having enough fuel in the air/fuel mixture.
Another problem is that the O2 sensor reading shown by the A/F gauge may not exactly correspond to the O2 sensor reading inside the ECU. This is due to differences in the grounding points of the two devices, and can easily lead to a 0.1V difference, making the A/F meter reading 0.1V higher than the ECU reading. Thus, an owner might think that they are running a safer A/F ratio than, in fact, they are.
This does not mean that A/F meters are useless. Their fast reaction time and simplicity make them an excellent choice for monitoring relatively safe, early-stage modifications to DSMs. They simply have limitations that make them less-than-ideal for precision engine tuning, and new users need to be aware of them.
Having said all of that, authorities in the field have stated that 0.85V is the absolute minimum you can run. Most people prefer 0.90V or 0.95V, but running these levels is simply a guideline - it is not a guarantee that your engine is safe, or producing maximum power. This is because differences in engines, altitude, barometric pressure, gasoline, and other conditions all contribute towards varying this number.
The only sure method by which anyone can state that they must run a certain minimum O2 reading is if they have determined the perfect level for their individual car through experimentation. This type of experimentation is time-consuming. Many racers spend years perfecting their setups.
QA #402
My O2 sensor reading jumps around like mad while I'm driving. Is there a fix?
No - this is normal. You are viewing the ECUs attempts to supply exactly the right amount of fuel to the engine to achieve stoichiometric operation (equal masses of fuel and air). The cycling also means your O2 sensor is healthy.
For more information on how the oxygen sensor is supposed to behave, read the The Essential Primer on the DSM ECU.
QA #403
My O2 sensor reading stays constant all the time. Is there a fix?
Similar Questions:
My O2 sensor reading jumps all the time, except when I accelerate. Is there a fix?
If this occurs at idle, or during prolonged periods of idling, the oxygen sensor is likely too cold to cycle properly. Warming up the engine somewhat will raise the sensor temperature into a normal operating range. While DSM oxygen sensors are equipped with a heater to aid in keeping the sensor hot, many people find the heater is either broken or simply not adequate to the task of keeping the oxygen sensor hot.
If this occurs during normal cruising speeds, your oxygen sensor may be on its last legs. Poor cycling is often an early symptom of impending sensor failure. If it persists long enough, the ECU will throw the code for the O2 sensor, but the ECU is pretty conservative on this; the sensor has to really be DEAD dead for the ECU to notice.
On the other hand, the O2 sensor reading is supposed to peg high under acceleration. This is because the ECU no longer cares about theoxygen sensor reading, and supplies extra fuel to keep the engine cool. This is known as open-loop operation. The method of changing fuel delivery based on the oxygen sensor signal (which causes O2 readout cycling) is called closed-loop operation.
For more information on open and closed-loop operation, read the The Essential Primer on the DSM ECU.
QA #404
I can't get a reading from the oxygen sensor when the car is idling! Is there a fix?
If you just started your car, the oxygen sensor is cold, and will not give any reading for a little while. This can also happen if the car has been idling for a long period of time.
Also, if you have removed the lower honeycomb from your MAS, your oxygen sensor reading at idle will likely drop to zero (or almost zero) at idle. This is a common side-effect of removing the lower honeycomb, and does not represent a problem. This effect is only affects O2 sensor readings at idle, and will not change the sensor or car behavior while cruising or while accelerating.
For more information on how the ECU handles fuel, read the The Essential Primer on the DSM ECU.
QA #405
My O2 sensor might be dead, but I'm not getting a 'Check Engine' light! How can I tell?
Similar Questions:
I'm sure my O2 sensor is dead, but I'm not getting a 'Check Engine' light! Why not?
The ECU only checks the oxygen sensor under specific circumstances. If it doesn't get to check the sensor, it can't tell if the sensor is dead.
According to Todd Day of Technomotive:
" Your car must undergo a "cruise" session above 45 MPH for 30 minutes or two "cruise" sessions for 20 minutes (depending on [model] year) before the ECU will flag a dead O2 sensor. At least for the 1Gs - this probably got a lot tighter for 2Gs. This is why a lot of people won't ever see a code get thrown for O2 in their daily commute driving."
The best way to determine if an O2 sensor is dead is to monitor it with an air/fuel (A/F) gauge.
QA #406
Last Updated:
2016-06-20 12:11
I have a [DSM] with [mods]. What is a 'safe' EGT to run?
This depends a lot on where the EGT probe is mounted, as pre-turbo EGTs are always higher than post-turbo EGTs. It also varies somewhat from car to car.
In the past, HKS has recommended that downpipe installations not exceed 1380 degF, and pre-turbo (exhaust manifold) installations not exceed 1550 degF.
For more information, see Brad Baur's EGT Gauge Installation FAQ and Tom Stangl's Westech EGT Install FAQ. According to Tom, 1650 degF (900 degC) is the ideal point at which to finish a 1/4 mile run.
Do yourself a favor and get a datalogger. EGTs are nice, but they're not the be-all of engine monitoring - not by a long shot.
QA #407
What spark plugs go in my [DSM]?
Similar Questions:
What are 'hotter' spark plugs?
What are 'colder' spark plugs?
Why should I use hotter/colder spark plugs?
There is a great guide written here by MrBoxx of DSMTuners:
http://www.dsmtuners.com/threads/spark-plug-faq.233421/
You want to go with the non projected type plugs like BR6ES, BR7ES, BR8ES.
BR6ES = Stock to 20psi
BR7ES = 20psi to 30psi
BR8ES = 30+psi
Non projected plugs help fight against spark blow out in high boost applications.
If plug fouling occurs, go one step hotter and monitor performance and results.
QA #408
Last Updated:
2016-06-05 09:45
What is the best brand of spark plugs?
Except for 'trick' plugs, DSMers have used many brands with good results. NGKs appear to the be the most often-reported favorite.
QA #409
What is the correct plug gap for my [DSM]?
This is only a legitimate question for 1990 owners, as the 1990 shop manual had a mistake in the plug gapping specifications. The correct numbers are listed, but they are switched around between the turbo and non-turbo cars. According to TSBs 26-27-89 and 26-61-89, the correct gap for 1990 turbo cars is 0.028 to 0.031, while non-turbo cars use the larger 0.039 to 0.043 gap.
QA #410
Why should I change spark plug gaps?
Similar Questions:
My plugs are gapped to [gap]. Is this right? If not, why was it done?
TBD
QA #411
How do I 'read' a spark plug?
See this article: Guide to Reading Spark Plug Performance
QA #412
Last Updated:
2016-11-23 07:07
Can I use platinum plugs in my [DSM]?
Some owners experience idle or misfire problems after installing platinum plugs. Others use them with no ill effects. Most owners prefer to stick with the non-platinum plugs. Problems seem to be more prevalent on turbo cars.
QA #413
What spark plug wires are best?
Similar Questions:
What spark plug wires should I use?
With few exceptions, spark plug wires either work, or they don't. As with the 'trick' spark plugs described above, nobody has been able to prove a performance gain by using larger-than-normal or unconventional spark plug wires. They continue to be a popular upgrade, however, with Magnecores being mentioned the most often.
Owing to a number of owners who have experienced longevity problems with cheaper wires, it is possible that the superior build quality of the larger wires means they will last longer than 'normal' wires. This, in itself, would be a reason to get bigger wires, since replacing wires every 6-12 months isn't any fun. Also, plug wires can sometimes be tricky to diagnose, since tests will sometimes fail to reveal the wires are no good.
Nology and others manufacture 'special' wires that are supposed to provide better performance.Dennis Grant has some things to say about 'trick' plug wires. (You should also read the rest of the series.) Most Digesters concur with Dennis that 'trick' wires fall in into the category of 'magic' products.
QA #414
Has anybody ever imported a [DSM] into [country]?
The best place for information like this is your own government. US and Canadian residents, see below for more information.
Some information for other countries can be found here: Great Britain, Ireland, Australia, Austria, the Czech Republic, and Hong Kong.
Finally, those serious about importing vehicles may wish to investigate the Global Car Locator Import/Export forum, a web-based messaging forum devoted to worldwide cross-border vehicle transactions.
QA #415
How do I import a car into the United States?
US residents must pass customs, then get registration. Under current regulations, all vehicles before 1968 are allowed in without restrictions. Start with U.S. Customs; try their Field Office at (202) 927-0100, or read the "Importing a car" section of the U.S. Customs Service website.
Those looking to take their 1G DSMs with them to the USA may wish to read this account of how one DSM owner took his 1994 Laser across the border.
QA #416
How do I import a car into Canada?
Canadians can talk to Revenue Canada and get a copy of the "List of Vehicles Admissible from the US". This list published by Transport Canada. This list details most vehicles that can be brought into Canada with minimum fuss. At present, all Eclipse and Galant models after 1990 are on this list.
Vehicles may enter the country as is, but need to be modified to Canadian specifications and certified by Canada Customs before they can be registered. Talk to the Registrar of Imported Vehicles for everything you want to know (look at this guide for details).
For those interested in importing non-USA cars to Canada, you should refer to this page from the Transport Canada website.
Typically, the only additional components required for USA-spec vehicles are a daylight running light relay and a child seat restraining strap. The relay can be found at Canadian Tire or other automotive stores. There seems to be no special requirements for it; as long as the headlights light up when the ignition is on, it's fine. The car seat strap can also be found at Canadian Tire or Wal-Mart, and simply attaches to an already-existing bolt in the rear hatch area. A few people even say it doesn't have to be attached, you just have to have one.
Jerry Hong imported a new Eclipse GSX from the USA into Canada. Here's what he had to do:
- Sold his car.
- Got a 1 week temporary insurance.
- Went to Los Angeles and picked up the Eclipse.
- Drove back with the Eclipse, declaring the car at customs. Paid GST and 0.1% duty.
- Went home and got a British Columbia motor vehicle inspection for out of province cars.
- Insured the car as a Talon.
- Got the car inspected by Transport Canada.
- Re-wired the fog lights into DRLs, and bought a baby seat carriage strap from Canadian Tire, in accordance with Transport Canada requirements.
That was it! Notes: Jerry lost his warranty. Extended warranties are apparantly honoured in cross-border deals, but factory warranties are not. You may also need to pass emissions testing for your province.
Marta Cepek of Canada DSM also imported a car, in this case a 1990. Below is her 'mini-FAQ' on the subject:
First
Read the Registrar of Imported Vehicles (RIV) website, http://www.riv.com , phone their 1-800-511-7755 number, and they will send you a nice kit of all the info you need.
Costs
- $224 - (obligatory) covers the cost of "Form 1" & the Customs brokerage fee if you go through a "designated" border crossing. The RIV kit has a list of all border crossings and whether or not they're "designated". It's something like $60 more if you don't go through one. This fee includes "Form 2" and the inspection to ensure the required mods are done.
- $100 - Air conditioning excise tax. You have to pay this if there are any AC components, even if the AC isn't hooked up/working.
- Duty - Not applicable. The car was built in the USA. They tried to charge me duty, but I made the lady go outside and showed her the "Made in USA" sticker on the door panel and the duty was waived.
- Taxes - Federal GST payable at the border. This is based on the higher of the price written on your bill of sale or the "Red Book" value of your car. If the sale price is "ridiculously low" (e.g. under $2000 US), you should get the seller to have the car valuated at a Mitsu dealership and write the valuation on their letterhead. The Red Book only goes back 8 years, so when I was importing my 90 GSX in March 2000, they told me that a 92 with my mileage was evaluated at US$7,000... you might end up having to pay tax on the book value even if you only paid, say, US$3,500 for the car.
- Provincial Tax (if applicable in your province) is payable on the same amount that the GST was paid on. You pay this when you you get your plates / register the car.
Required Mods
First of all, all models of the Eclipse from 89-99 are admissible into Canada. Bumpers and seatbelts (even the electric "mouse belts") meet Canadian standards.
All cars built after Nov. 89 require DRLs (Daytime Running Lights). If you are handy with electrical, you could probably wire this up yourself. I'm not, so it cost me $100 to have mine wired up, including labour & relay. The little box that recieves the DRL circuit board and the wiring infrastructure are not there in the US-spec cars, so if you have the DRL module from another DSM (I did), it's not a plug'n'play scenario. But I believe I saved maybe 1 hour labour cost by bringing in all the pertinent schematics/wiring diagrams from the factory manual for the guy.
A child restraint tether anchor is required. This is a no-brainer. The kit is about $4.95 at Canadian Tire, Walmart, etc.
Inspections
The inspection to import the car into Canada only checks that these mods are done. The cost is included in that $224 fee.
As for provincial inspection, well, you'll have to check with your Provincial Authority whatever you need to do to get the car certified, emissions tested, and whatever it takes to get the car plated. The Quebec inspection costs $66. I got a real a$$hole inspector, so he flagged a couple of "minor defects" that would've cost me ~$500+ to repair if I'd gone to Satan. I ordered parts from a US Mitsu dealer and had a local garage do the repairs, all for about $150. Michel told me I should've put $50 in the ashtray when I was having it inspected, to tell you the truth, that idea would never in a million years occurred to me. If you have a connection for getting the car certified, you might have better luck than I did.
Well, that's about it for associated costs.
US Export
As distinct from Canadian Import - One thing that has no associated costs but could cause you problems (it did me) is that you must contact the US Customs Export people at the border point you intend to bring the car through a minimum of 72 hours before you plan to bring the car through. They need the car's VIN in order to run it through some kind of check. Not doing this runs the risk of having the car seized at the border.
Insurance
Prior to bringing the car onto Canadian soil, you need to have valid insurance.
Oh, and don't forget the cost(s) of travelling down to the US to pick up the car. In my case, that entailed a plane ticket to South Carolina, and about US$100 in gas (boy, their gas is cheap). You probably won't be going that far, eh? ;o)
Hope that helps. It's not that complicated, and definitely worth it for the right car.
Finally, Christopher Lewis (also of Club DSM Canada, has this to say:
"Considering I've imported both the cars I currently own plus a 3000GT I consider myself educated in this field. :-)
The DRL you can pick up for $25 at Canadian Tire, It takes me 10 minutes to install and you can just remove it after the govt. inspection.
You don't need to change your speedometer, it's fine.
The child infant kit is $5 and you don't need to actually install it, its is just required that you "have the kit".
You are required to buy a SRS maintenance sticker that is in both English/French. Check your glove compartment - if it has French (like mine did) you're fine. "
The RIV in Canada has all the info you need.
QA #417
Last Updated:
2016-08-09 10:11
What is duty?
Duty is the cost of importing goods into a country, levied by the government.
Duty rates in Canada range between 0% and 35%, where the average duty rate is 8.56%. Some goods are not subject to duty (e.g. certain electronic products, antiques, etc.).
Preferential duty rates
Canada has signed free trade agreements with a number of countries. To be entitled to preferential tariff treatment, a good must meet the "originating" criteria as set out on the Rules of Origin of individual FTAs. A certificate of origin is required upon importation, when the value of an import is greater than CA$1600, for preferential duty rates to apply.
NB:
- If the benefit of preferential tariff treatment under NAFTA, CCFTA, CCRFTA, CPFTA or CCOFTA is claimed for casual goods (i.e. goods other than commercial goods), the importer and owner of the goods are exempt from the Certificate of Origin requirements, provided that certain conditions are met.
- If the benefit of preferential tariff treatment under NAFTA, CCFTA, CCRFTA, CPFTA or CCOFTA is claimed for commercial goods whose estimated value for duty is less than $1,600, the importer and owner of the goods are exempt from the Certificate of Origin requirements, provided that certain conditions are met.
QA #418
Last Updated:
2016-06-05 09:26
How can I avoid duty when importing parts into the United States?
United States residents are allowed to bring back a certain amount of stuff with them after travelling out of country, duty-free. Check with U.S. Customs for the requirements.
QA #419
How can I avoid duty when importing parts into Canada?
- Mail items marked as GIFTS worth less than $60 ($CAN) have no duty.
- Mail items worth less than $20 ($CAN) have no duty.
- Automotive parts made in the United States have no duty.
Don't believe me? Read this brochure from the Canada Customs and Revenue Agency. The package value and contents are declared by the sender. Some people call new parts 'warranty replacements', which cites their value as zero but still allows them to insure for the full amount.
Note that factory DSM parts come from Japan, and are therefore subject to duty. This could hypothetically be avoided if the sending vendor were to accidentally forget to mention that the parts originated in Japan.
Also note that the parts may be subject to GST even though they are duty-free.
If you're fortunate enough to travel, Canadians are allowed to bring back goods into Canada duty-free, up to a certain limit. The current limits are:
- out of country for 24 hours: Up to $200 CAD;
- out of country for 48 hours: Up to $800 CAD;
- out of country for 7 days or more: up to $800 CAD;
which means that if you can carry it back, you should. Shipping from the U.S.A. is expensive, too. Alternatively, you could get somebody else to bring it back for you. Note that these limits are correct at the time of this writing; check with Canada Customs - Residents Returning to Canada for current information.
QA #420
Last Updated:
2016-06-20 01:15
What are brokerage fees?
Brokerage fees are the fees charged by non-government firms for handling Customs processing of imported goods. Since they are not duty fees, they cannot be avoided by claiming duty-exempt status on the imported goods.
QA #421
Last Updated:
2016-06-05 09:15
How can I avoid brokerage fees when importing parts into the United States?
Similar Questions:
How can I avoid brokerage fees when importing parts into Canada?
Don't use UPS Brown (ground) service.
UPS is the only carrier that does not include brokerage fees in their quoted prices, and only on their slowest service. UPS Blue (2-day) and Red (1-day) have the brokerage fees included; so do Federal Express, DHL, and Emery Worldwide prices.
If you do use UPS and get charged brokerage fees, they will ask for $30-$60 before they give you the package. Usually cash, usually exact change. Some people find it less expensive to use an expedited service instead of paying brokerage fees on the slower deliveries. Many people prefer U.S. mail to UPS ground, since the USPS does not charge additional brokerage fees.
The following is an unofficial guide to UPS brokerage fees, based on information graciously provided by on-line electronics vendorEtronics. It is not an official UPS guide.
| Value of goods ($CAD) | Brokerage fee ($CAD) |
| $0.001-$40.00 | $6.25 |
| $40.01-$100.00 | $16.75 |
| $100.01-$200.00 | $23.25 |
| $200.01-$350.00 | $30.00 |
| $350.01-$500.00 | $34.00 |
| $500.01-$750.00 | $38.25 |
| $750.01-$1000.00 | $43.25 |
| $1000.01-$1250.00 | $48.50 |
| $1250.01-$1600.00 | $51.50 |
| $1600.01-$5000.00 | $54.00 |
For each additional $1000 $CAD (or fraction of), there is an additional charge of $3.75 $CAD. These rates do not include taxes.
The Last Word: Didn't believe me, huh? Serves you right. Don't feel bad, everyone gets burned once.
I have personally seen many invoices from UPS that do not follow the guide above, or the "official" UPS Fuck-You-Canada brokerage fee table found here - usually the fees charged are a tad higher, and they will always add in tax and duty, making their "cut" appear even higher still. Nevertheless, maybe these guides will help you make an informed decision on buying that gotta-have-part from eBay. And UPS now takes credit cards at the door, making the process much less painful.
If you must order, do yourself a favor, and use Priority Mail - Purolator will forward it in Canada, and the brokerage is typically $6. Alternatively, look for vendors that have Canuck-friendly shipping options such as USPS or FedEx. Beware the words "Standard Flat Rate Shipping" - this almost always means UPS Ground.
QA #422
Last Updated:
2016-06-05 09:13
What's the cheapest method of shipping [parts] to/from the United States/Canada?
The members of Canada DSM have the following advice:
Bob Brown: " USPS is about 50% more expensive , but you just have to pay GST."
Jerry Hong: " I've found it to be least expensive to use a local trucking company that does freight to any US state. UPS/Fed-Ex wanted $1300US to ship a transmission/transfer case/diffs/4-bolt rear end from Halifax to Houston, Texas. The local trucking co. is doing it for $375US."
"Total_Eclipse" : " All i can say is, use Canadain Freight. They have a sister company in the USA called Consolidated Freight. They are awsome for shipping big parts."
Also see the information regarding brokerage fees, above. Parts may be subject to GST in all cases.
QA #423
Last Updated:
2016-06-05 09:12
I have a [component/car] for sale. Can I advertise on [DSM] Forums?
Yes. Better to keep it in the DSM club, but, you want $$$ so try these places also.
- Facebook DSM Classified (You must request access)
- Kijiji
- AutoTrader
Good luck!
QA #424
Last Updated:
2016-06-05 09:10
I want to buy [something] from [a person] over the Internet. How can I avoid getting conned?
From a January 19, 1999 post by Ken Okazak:
"Here's some things you can do to prevent doing business from a scam artist, crook, jerk, con, (uh, I think those are all the words I've seen used on the Trader recently):
1. Do a google or dsm forum search on the person's name . Is he/she an active Club DSM member? What kind of posts does they make? Who has he been associated with? Maybe others have posted about him/her? This alone has given me confidence to buy the first thing I ever bought on the Trader: An exhaust from Al Blaha. Being new, I had NO IDEA who he was. Read some posts from him and saw that other's wrote about him, so I knew he was REAL, people know him, he is an active member of the Club and that his car is fast. :-)
2. Scrutinize heavily people that have free email accounts from companies like Juno, Yahoo, Hotmail, etc... (and even aol to some extent). Why? Because anyone can get an email account and lie when registering for it. Lot's of honest people use these accounts too, so don't get me wrong. But if the email address is from a Corporation, it is likely to be legit...so at least you know the guy has a JOB.
3. Use these free e-mail accounts to your advantage. Register yourself under some assumed name and then pose as another buyer as you are closing a deal. Email him from your other account and ask if the part is still for sale. If the guy says "Yep, it's still available", then you have every reason to believe the guy is a crook.
4. Look the guy up in the Phone book. See if you can find him listed in the Yellow pages. Seeing his name/address there should give you enough confidence that the guy actually exists. Just another piece of evidence...Sometimes you can even find information on them by doing a web search.
5. Ask for references. No explanation needed here.
6. Finally, use iEscrow or one of the many other escrow services that let you perform transactions risk free. They only charge 5% of the purchase price, so if you are still unsure then isn't this worth it?
I have performed most of these checks on everyone who I've ever bought parts from. And you know what? I've never been burned."
QA #425
Last Updated:
2016-06-05 09:09
I want to buy [something] from [a DSM vendor]. How can I avoid problems?
[Note: the information discussed below defines a 'DSM vendor' as an established legal business that sells parts or services for DSM cars, and not private individuals selling parts or services.]
You can avoid some common problems by keeping the following in mind:
- Most speciality DSM vendors are extremely busy, and it can be hard to get into contact with them. Be patient.
- Know what you want. Most speciality vendors have web pages that describe their offerings in detail. See the vendors page for the appropriate URLs.
- Know what you have. Be prepared to tell the vendor not only the make and model, but if you have factory options (like air conditioning and ABS) or upgrades (such as Big Brakes, shocks/springs or 4-bolt rear ends) installed on your car.
- Be sure to ask if the part will fit your car before ordering it.
- Ask about warantees and returns. Understand the limitations of the return policies. If you don't like them, don't order the part.
- Write everything down! You may need the details later.
- Pay with a credit card. If you have difficulties later, you can have your bank reverse the charges on the card.
- Ship to your credit card address - the vendors require this so they can avoid credit fraud. If you need to ship to an alternate address, call your credit company ahead of time and establish an alternate shipping address - the vendors cannot do it for you.
- When purchasing parts, establish a shipping time for the part and a shipping method. Do not assume the vendor will automatically ship the way you expect.
- Foreign customers must expect additional delays and costs for customs when parts cross the border. Do not expect the vendor to understand what is involved here - it's not their business.
Support for DSMs has become very limited to niche areas, even at previously well respected vendors, due to lack of demand. Be prepared for lengthy delays, and discuss availability with the vendor before ordering. Face it, you own an obsolete car.
QA #426
Last Updated:
2016-06-05 09:06
I want to buy [something] from [a DSM vendor], but I can't seem to find them! Where are they?
Similar Questions:
I want to buy [something] from [a DSM vendor], but they won't get back to me! Why not?
[Note: the information discussed below defines a 'DSM vendor' as an established legal business that sells parts or services for DSM cars, and not private individuals selling parts or services.]
Most speciality vendors are very busy and are often difficult to contact owing to a large backlog of previous messages. In some cases there are only one or two people working in the shop, so when they are absent or busy there is no one to answer the phones or e-mail. Some shops keep restricted office hours to have time to work on parts. Finally, some vendors go out of business for various reasons, often when the principals involved move on to other things.
If you are looking for a vendor and cannot seem to find a current phone/fax number or e-mail address, it is possible the vendor is no longer in business or has moved. Check the vendors page for contact information. Also try phoning diectory assistance for the city where the vendor is/was located, to see if they are still listed. You can also write to the Digest for information, but please do not do so until all other avenues of investigation are exhausted.
If you know a vendor exists and cannot get a response from them, you have three choices - wait for a response, persist in trying to contact them, or contact a different vendor. If you choose to wait and do not get a response, don't get annoyed, as technical problems may have prevented the vendor from getting your message. If you feel this is not the case, don't bother getting mad, just go to another vendor.
QA #427
Last Updated:
2016-06-05 09:02
I want to buy [something] from [a DSM vendor], but they won't accept my credit card! Why not? What can I do?
Similar Questions:
II want to buy [something] from [a DSM vendor], but they won't accept my credit card unless I ship to my home address! Why not? What can I do?
I want to buy [something] from [a DSM vendor], but they won't accept non-U.S.A. credit card! Why not? What can I do?
Important: With the advent of Paypal, most of the issues below are no longer an issue.
Note: the information discussed below defines a 'DSM vendor' as an established legal business that sells parts or services for DSM cars, and not private individuals selling parts or services.]
DSM enthusiasts will frequently run across this restriction when ordering parts from DSM vendors. This is usually not a problem when you walk into a store and purchase an item, even for non-USA credit cards, but call or email your order in and you suddenly run into problems. Moreover, few vendors take the time or trouble to properly explain the reasons to their customers - a short "We can't do that" or a brief note on the website saying they can't do it is usually all the explanation one gets.
International customers get even more hassle. These customers are often told that a vendor cannot 'verify' their credit card unless it is issued by a U.S.A. bank. Canadians, in particular, get irked by this (after all, we are on the same continent), but most customers abroad quite rightly point out they can go virtually anywhere in the world and purchase items with the same card. Therefore, the card can obviously be 'verified', and no problem should exist.
The root cause of all this frustration and hassle is usually poor communication between the customer and the vendor*. Mail-order vendors are put at significant risk when accepting credit cards via phone or internet. This is because the rules are different for in-person purchases and mail-order purchases, and there is only one reason for that - fraud.
When you purchase an item in person, the vendor is able to get a copy of your signature on the form. You also require the physical credit card, with the correct account number, name and signature on it. In this manner the vendor can be reasonably certain that the card is, in fact, your own.
Mail-order purchases are entirely different. In this situation, you do not need the physical card, and the vendor cannot obtain your signature. There is, therefore, no way for the vendor to verify that you are you, and that the card is yours. This leaves mail-order vendors completely at risk for fraud by criminals using stolen credit card numbers.
Few people immediately realize the problems this creates for vendors. Unlike cardholders (customers), credit card companies do not protect vendors against fraud. If someone was to use your credit card to purchase an item, you would generally be protected against the lost amount by your credit card company. (In some cases there might be a small deductible, but that's not relevant here.) For example, if someone used your card number to buy $1300 worth of parts, you would have to pay nothing (or almost nothing) because you didn't buy the parts.
However, no such protection exists for the vendor. That vendor is out of pocket for the item sold. They will generally not receive any compensation from the credit card company for the loss. So, if someone presenting themselves as you were to buy $1300 worth of parts from (for example) your favorite DSM vendor, that DSM vendor would be out $1300 worth of parts. Police departments usually don't have the manpower, budget, or time to investigate such 'minor' amounts, and the vendor is left with nothing. It wouldn't take long for a vendor to be forced out of business if they were an easy target.
To combat this problem, mail-order vendors are forced to use alternative means to verify the credit card. These procedures, unfortunately, place additional restrictions on the cardholder as well.
The most sophisticated method available to date is for mail-order vendors to use a supplementary credit card verification system called AVS (Address Verification Service). The AVS service allows vendors to match user-supplied billing address information with information on file for the credit card number. If the card information, billing address, and shipping address all match, the vendor is unlikely to be taking a big risk by sending out the goods.
Unfortunately, the AVS system is limited. Firstly, it only works for cards issued through United States institutions. This is where international buyers run into problems: their cards are not registered with the AVS system. Thus, when a vendor says "We cannot verify your credit card" what they really mean is "We cannot verify that the billing/shipping address you provided is the one on file at your bank, because your card is not registered in the AVS system." They often don't say so because the person on the other end of the phone doesn't understand the system either.
Also, the AVS system can be foiled by outdated information at your bank. If you've just moved, or there is an error in your card records, the AVS system will incorrectly fail the card billing address.
Finally, the AVS system deals only with the billing address and is therefore a fairly weak system. If a criminal knows your credit card and home address, his or her purchase will pass AVS verification. The thief could simply specify a different shipping address, and get the goods anyways.
To get around this problem, some vendors only ship to the cardholder's billing address. This almost guarantees that the actual card holder will receive the goods, and not an impersonator. If he (or she) didn't order them, they will send them back to the vendor.
Unfortunately, many legitimate buyers also want items shipped to an alternate address, such as their workplace, a relatives house, or perhaps a hotel where they are staying. These requests cannot be fulfilled under this restriction; a particularly troublesome point for temporary visitors to the U.S.A. or anybody that works away from home.
Fortunately, there are some solutions to these problems:
- Pay by money order or personal cheque. The basic fundamental reason for all these problems is that the vendor is afraid they won't get paid. Pay them, and everything works out just fine. Money orders are not hard to get. Talk to the post office or a courier to find a mailing method that includes letter tracking and delivery verification, so it doesn't get lost before or after delivery, and allow additional time for cheques to be processed through the banking system.
- Call your credit card company, and get them to attach a temporary, validated alternate shipping address to your credit card. This allows the vendor to AVS-verify the card and ship to an alternate address. You may need to provide the vendor with your credit card's customer service number - see below for why.
- Many international customers can provide the customer service number for their credit card company or bank to the vendor. This allows the vendor to call up the card issuer/bank and manually verify that the billing information on the card is legitimate. They can sometimes also verify that an alternate shipping address is on file, provided you remembered to set it up before placing the order - see above for details.
- If you live in another country and make lots of USA purchases, consider getting a USA credit card from a USA bank. The whole AVS-verification problem then goes away. The requirements for getting such a card will vary from bank to bank and country to country. You will probably want to shop around for a card company that can provide a permanent verified alternate shipping address, if necessary - see above for details.
Some of these options may not be available for some vendors. For example, if a vendor is unwilling to take the time to call your credit company, then they won't be able to verify foreign cards. Fortunately, most DSM vendors are more than willing to take the extra step if you make it possible for them to do so. They really are trying to be nice people, they just don't want to get screwed by the dishonest 1% of their clientele. You wouldn't either, if you were in their position.
For more information , visit this explanation of a fraud ring on John Faughnan's Home Page, this explanation of the AVS system fromQuality Merchandise Brokers and this backgrounder on credit card fraud by Paul Lang, hosted by Internet Scambusters.
QA #428
Last Updated:
2016-06-05 09:00
I bought [something] from [a DSM vendor], and I'm having problems with it. What should I do?
[Note: the information discussed below defines a 'DSM vendor' as an established legal business that sells parts or services for DSM cars, and not private individuals selling parts or services.]
Mistakes do happen, and most vendors are dedicated to fixing problems quickly. If you're having problems with a part you purchased from a vendor, you need to do the following:
- Understand the problem. Phoning the vendor with complaints like "It doesn't work!" or "It doesn't fit!" is not helpful.
- Examine the parts you bought. Do they look like the right parts? Do they appear like they should fit your car? Do they have the right model numbers? If not, perhaps you got parts for a different car by accident.
- Obtain the receipt for the purchase, so the vendor knows what you're talking about. If you can't find it, write down exactly what you bought (with model numbers, if you can find them).
- As soon as possible, fax or e-mail the vendor a letter containing details of the purchase, a detailed description of the problem, and your contact information.
- Phone the vendor during their normal business hours after sending the fax. Understand that many vendors are extremely busy and it may take time for them to get back to you. Be patient.
- Explain the problem in detail, referring to the fax you sent. Be prepared to re-fax the letter.
Usually by this time the vendor has enough information to figure out what happened and fix it. Options include exchanging the part for another, returning the part for correction, changing the installation method to make the part work, obtaining missing or corrected hardware to allow proper installation, or returning the part for a refund.
QA #429
Last Updated:
2016-06-05 08:57
I bought [something] from [a DSM vendor], and I wasn't treated very nicely. What should I do?
[Note: the information discussed below defines a 'DSM vendor' as an established legal business that sells parts or services for DSM cars, and not private individuals selling parts or services.]
Complaints about poor service from dealers, shops and speciality vendors are commonplace on the Digest, for the same reason that complaints about problems are commonplace - it is natural for people to write more about the occasional bad thing than the everyday good things that happen to them.
Having said this, some of the smaller DSM specialists are sometimes credited with less-than-stellar customer service. The reasons for this are many, and stem from the fact that these operations are usually consist of 1-3 dedicated DSM racers who sell parts to pay the bills. Please note this is an explanation, not an excuse.
In those cases where you have been treated inconsiderately by a vendor, examine the circumstances. Vendors often take a day or two to return calls - this is not a slight, it is a fact of life. If you called outside of normal business hours, accept that the vendor is doing you a favour by answering and forgive them any percieved rudeness.
In other cases, you are voting with your dollars. If you purchase a part from a vendor that you think is rude, ask yourself why. If it's because of part quality, vendor reputation or price, admit to yourself that you are prepared to pay for these advantages by putting up with less-than-stellar customer service. You can still encourage the vendor to improve their service by pointing out (nicely, mind you) that their business could be made that much better by it.
If you don't buy from the vendor solely because of poor customer service (and not because of price - be honest with yourself) let them know - things start being more important when they affect the bottom line. Don't expect an overnight turnaround, though. You're only one customer - smaller vendors are going crazy trying to keep up with the customers they do have, while larger vendors might be able to afford to ignore you. Be sure to put in your $0.02, though, because if enough customers do so, it will add up fast and make even the largest, busiest vendor think twice.
There are also situations where the vendor was nice prior to a purchase, and not so responsive when problems show up. In these cases, make every effort to work things out with the vendor. Sometimes inevitable circumstances create situations percieved by customers as rude even though nothing of the sort was intended by the vendor. Be patient and accept that it might take some time to resolve problems.
While writing into the Digest with this type of information is not forbidden, it is discouraged. This is because 'bad' behaviour is in the eye of the beholder, and there are usually as any different opinions as there are writers. Reports of poor business practice, incompetence and generally stupid behaviour are encouraged, but please consider that a vendor may simply have been having a bad day before writing about rude behavior.
If you feel that you have been unfairly treated by a vendor - that is, a victim of bad business practice and not just bad manners - be sure to read the next few answers in this file.
The Last Word: Support for DSMs has become virtually nonexistent, even at previously well respected vendors, due to lack of demand. Be prepared for lengthy delays, and discuss availability with the vendor before ordering.
QA #430
Last Updated:
2016-06-05 08:57
I bought [something] from [a DSM vendor], and never got it! What should I do?
[Note: the information discussed below defines a 'DSM vendor' as an established legal business that sells parts or services for DSM cars, and not private individuals selling parts or services.]
If you have been charged for a part but never received it, contact the vendor as soon as possible. Verify the order, the shipping details for the part and the delivery time. Have the vendor locate the shipment via the tracking number, or get the tracking number and shipping company so that you can locate it.
If the order has been delayed, you can either wait for it or cancel your order. If the company has already charged you for the part, cancel your order and have your bank reverse the credit card charges for that order. Situations like these are why you pay by credit card.
Vendors are not supposed to charge you for a part until they have shipped it. If they charged you but did not ship, have them refund your money (immediately, thank you) until they do ship. If they did ship the part but you never got it, contact your credit card company and have them reverse the charges until your order is located.
QA #431
Last Updated:
2016-06-05 08:57
I bought [something] from [a DSM vendor] and I'm having a dispute with them over [cost/part quality/a refund/delivery time/delivery address/a problem]! What should I do?
[Note: the information discussed below defines a 'DSM vendor' as an established legal business that sells parts or services for DSM cars, and not private individuals selling parts or services.]
First, quickly skim though all of the above information (start here), paying particular attention to your responsibilities in the matter. In particular, you should have given the vendor all the relevant information and obtained details of their ordering, shipping and return policies before placing your order. If the vendor has made a mistake because of incorrect or missing information on your part, you can't blame them.
There are several distinct cases where disputes can arise with vendors, such as:
- Cost of parts - shipping (and customs/brokerage fees for foreign customers) will add to order costs. If the actual part prices are different that you were quoted, return the parts and cancel the charges on your credit card.
- Shipping time - delays in material or parts are sometimes unavoidable. Either cancel your order or wait.
- Shipping address - vendors sometimes require that the shipping address be the same as the billing address of your credit card. They do this for protection (theirs AND yours) against the credit card fraud that is prevalent in Internet and telephone sales. You can arrange a temporary, alternate shipping address by calling your credit card company and asking for one.
- Lost shipments - this is between the vendor and the shipping company. If you have been charged for something that never arrived, cancel the charges on your credit card.
- Part fit - in cases where the parts just don't fit, tell the vendor. Often they will refund or replace the part. If they will not, you can still return it.
- Part quality - definitions of 'high quality' parts will vary. If you are unhappy with the construction or finish of your part, sometimes the vendors will repair or replace the parts. If they will not, return it and purchase a different one.
- Part performance - performance on different cars will vary. Vendors cannot be held responsible for any percieved lack of performance on your particular car unless you have objective, unbiased, empirical data that their part does not perform as advertised. If you are unhappy, return the part.
- Part adaptation - if you have purchased a part from a different car to fit onto your DSM, and it doesn't work, that's your own fault. You can't expect the vendor to know if a non-DSM part can be adapted for DSM use.
- Return policies - some vendors charge restocking fees for returned parts, something you should have made yourself aware of before buying. In the cases where the part is incorrect, incomplete, or damaged, sometimes they will waive the fee, but not always.
Every so often, someone will write on a forum / social network complaining of a problem they're having with a dealer. This should be considered a last-resort option when all other (and I mean ALL other) peaceful solutions have been exhausted. A public airing can sometimes result in a resolution, but just as often it results in very bad feelings all around.
QA #432
Last Updated:
2016-06-05 08:58
Has anybody ever installed a stereo system / radio / CD player / cassette player / MP3 player in a [DSM]?
Lots of people. Most stereo shops can handle this.
For do-it-yourselfers, Micheal Hamilton has provided the stereo wiring harness colors for a 1G DSM.
Here is an excellent PDF installation document (archived copy of installation document) for 1G DSMs, made available by The Install Doctor website.
2G owners use the service manual radio section.
Tyler Gibbenhuck has this information to add (edited for presentation):
1. You don't need an installation kit, the new deck bolts in exactly like (either) of the 2 DIN decks did. If you mount the deck in the lower DIN you have a great place to install gauges, or a boost controller (turbo timer), or just a pocket for extra cd's.
2. Get the wiring harness adapter, it saves hours of headache.
3. When running your amp wires, pull off the door scuff panel (4 screws) and lift up the carpet, there's a nice big gap to run the wires in.
4. Pick up some extra pop fastners, you WILL break at least one.
5. Make sure you get someone to help you, although it can be done alone, the job is way easier with two people.
6. If you feel up to it, pull out the passenger seat, it makes life easier, plus you won't have to move it back and forth when you're adjusting things. [Editors note: removing each front seat is simply done by removing four bolts. The rear seat comes out without removing any bolts.]
7. It's not a very hard project, and took me just under 3 hours, save yourself the money, and install everything yourself.
QA #433
Last Updated:
2016-06-05 08:45
I want to install a single-DIN radio. What is the part number of the plastic dash pocket that fits into the other DIN space?
1G DSMers can use Mitsubishi part number MB522082.
2G DSMers can use MR147142.
Each has the required mounting system to fit the corresponding vehicle.Chrysler owners can phone a dealership to get the Chrysler part number. The parts staff should be able to help you. They may now say "What's an Eagle?"
QA #434
Last Updated:
2016-06-05 08:20
How big is a DIN panel?
A panel to fit a DIN space is 2" x 7" (52mm x 179mm).
QA #435
Last Updated:
2016-06-05 08:19
Why do I need a wideband O2 sensor?
While this post is from the Volvo forum: What is a Wideband, and why do I need it? And Basic tuning tips [archive copy], it is a good read and applies to turbo cars.
QA #436
Last Updated:
2016-06-20 12:20
How much does the engine weigh in my [DSM]?
Turbo 4g63 Guesstimates
block- 85-90 lbs (empty)
crank - 35lbs
head with out cams - 35 lbs
longblock (head,rods,pistons....) 275 - 300lbs
QA #437
Last Updated:
2016-06-05 08:18
What size is the axle nut on my [DSM]?
32mm preferrably (1 1/4 Inch in a pinch).
There have been reports of 33mm. These might be aftermarket.
QA #438
Last Updated:
2016-06-05 08:17
I am trying to remove my front axles, but the lower ball joint won't separate. What do I do?
Similar Questions:
My axles are seized into the hub. What do I do?
One trick suggested by Jason Drew is to remove the lower control arm (LCA) to subrame bolt. Then remove the fork to LCA bolt. The arm should swing down and out the way.
If you can't, another suggestion by Jeremy Gilbert is to loosen the top ball joint (do not remove the nut the whole way) and tap the knucle so that it drops a little. This should give you the clearance needed to remove the axle.
If your axle is seized into the hub, it is suggested by Jafromobile to use a big hammer and a big hole punch in the center of the axle to seperate them. (there is a hole there) Penetrating oil helps. So does heating it with torches, but using a torch risks metling the plastic abs sensors.
QA #439
Last Updated:
2016-05-31 03:16
I can spin my fuel injectors a little bit. Shouldn't they be tight?
Similar Questions:
How tight should I bolt the fuel rail on my [DSM]?
They should not be tight. They should have rotational play. (but not in and out).
When changing injectors, use new o-rings and lube with a little motor oil.
When bolting in the fuel rail, just snug is fine. Otherwise you you risk cracking the plastic spacers and breaking the fuel rail. It's only aluminum, so you need to be careful.
QA #440
Last Updated:
2016-06-05 08:17
My turbo bolts keep backing out. What should I do?
Replace whatever non mitsubolts and non mitsu washers you have. (Yes. Even ARP)
Use stock Mitsubishi bolts and turbo washers. (Thanks Salomon Ponte) Also make sure to use Nickel based anti seize on any bolt you put in.
If stock bolts break, they are easier to drill out than some of the stonger non Mitsubishi bolts.
With the extreme temperatures these bolts see, if you want extra peace of mind, do not re-use turbo bolts and can replace with new Mitsubishi stockers every time you crack them loose to remove the turbo (not cheap! 60$).
QA #441
Last Updated:
2016-06-05 08:08
I just bought Evo 8 Recaro seats. Will they fit in my 2G [DSM]?
Short answer? : No. You need custom brackets.
The sliders on the Recaros are 15 7/8ths wide from the center of each bolt hole
The 2G sliders are ~17.5" making the 2G sliders farther apart than the Recaros.
As a result the feet on the 2G will not simply swap over to the Recaros.
Short of making brackets yourself, there are very little options on the web, but a lot of aftermarket seat makers suggest Wedge Engineering.
IF HOWEVER, you are 5'11" or taller, you will find that the C frame brackets make the recaros sit too high, even at the lowest mounting point.
In my case, I had the Recaros welded via the sliders right to the main floor frame, thus allowing the whole seat to sit ~.6" lower.
QA #442
Last Updated:
2016-05-29 09:47
How does the AWD system work?
Similar Questions:
How do I service the AWD system?
Enjoy these retro videos!
Servicing the Dodge Stealth, Colt Vista, Laser AWD system - Part 1 of 4
Servicing the Dodge Stealth, Colt Vista, Laser AWD system - Part 2 of 4
Servicing the Dodge Stealth, Colt Vista, Laser AWD system - Part 3 of 4
Servicing the Dodge Stealth, Colt Vista, Laser AWD system - Part 4 of 4
If you want something a little less dry and covers only the rebuilding of the driveshaft, Jafromobile strikes again with a 5 part series.
Driveshaft 101 - Parts, Tools & Tips
Driveshaft 102 - Remove Universal Joints
Driveshaft 103 - Replacing carrier bearings
QA #443
Last Updated:
2018-11-06 04:36
Can I get replacement carpet for my [DSM]?
Similar Questions:
My carpet is badly worn in my [DSM]. Can I change it?
The best place to order carpet for your [DSM] is www.stockinteriors.com
While it requires a bit of trimming to get to fit, everyone seems pleased with the product. Here are the results of google search for stockinteriors.com dsm which provide many forum links to people who have used this service / product.
QA #444
Last Updated:
2015-08-10 08:32
What size thread is the shifter in my [DSM]?
M10x1.25
QA #445
Last Updated:
2015-08-10 10:06
What size bolts hold down the exhaust manifold heat shield?
M8x1.25
They aren't long. 10-15mm should do the trick.
You can also refer to : What size bolt do I need for X part?
QA #447
Last Updated:
2016-05-31 02:46
QA #448
Last Updated:
2016-04-02 07:46
What clutch should I get for my [DSM]?
This varies wildly. Ask on the forums for assitance in choosing the right clutch for your setup.
Southbend is very popular with ACT Streetlite flywheel. Southbend use Exedy OE Hub and replace the material with their own. RTM Racing has provided some upgrade info for the clutch kits.
Stage 1:
A beefed up version of the stock clutch with more clamping force and a sprung full-face friction disc. This clutch is recommended for a daily driver with stock or near stock power. Pedal pressure similar to stock. Torque rating 300 ft/lbs.
Stage 2 Daily:
Comes with a heavy-duty pressure plate with increased clamping force over stock. Friction disc is an organic disc with a high metal content that increases the co-efficient of friction to twice that of the stock disc. Pedal pressure similar to stock. Recommended for a daily driver that sees occasional track use. Torque rating 320 ft/lbs. (For comparison, this clutch would have similar performance to an ACT 2100 w/street disc.)
Stage 2 Endurance:
Comes with a heavy-duty pressure plate with increased clamping force over stock and with the fulcrum slightly altered for positive disengagement and quick shifts. The friction disc is of a hybrid design: full-face feramic (sintered iron) lining on the flywheel side and high metal content organic lining on the pressure plate side. Engagement is positive yet buffered due to the high graphite content unique to feramic facings. Pedal pressure similar to stock. Recommended for a daily driver that sees occasional drag use but with emphasis on rally or endurance racing. Torque rating 415 ft/lbs. (For comparison, this clutch would have performance characteristics somewhere between an ACT 2100 & 2600 with a lighter pedal.)
Stage 2 Drag:
Comes with a heavy-duty pressure plate with increased clamping force over stock and modified for a puck-style disc. The friction disc is of a 6-puck design which reduces rotational mass while increasing pressure on the surface of the friction material. Additionally, there is no cushion material between friction linings which helps keep clutch pedal travel short and quick. The friction material is graphite-impregnated ceramic. This compound exceeded all other friction materials when tested for durability, reduced chatter, heat transfer and torque capability. Pedal pressure slightly more than stock. While this clutch CAN be used on a street machine, it is designed and is generally recommended for drag racing. Torque rating 465 ft/lbs. (For comparison, this clutch would have similar performance to an ACT 2600 w/6-puck disc with a lighter pedal.)
Stage 3 Daily:
Comes with a heavy-duty pressure plate with significantly increased clamping force over stock. Friction disc is an organic disc with a high metal content that increases the co-efficient of friction to twice that of the stock disc. Pedal pressure about 25% stiffer than stock. Recommended for a daily driver that sees occasional track use. Torque rating 400 ft/lbs. (For comparison, this clutch would have similar performance to an ACT 2600 w/street disc with a lighter pedal.)
Stage 3 Endurance:
Comes with a heavy-duty pressure plate with significantly increased clamping force over stock and with the fulcrum slightly altered for positive disengagement and quick shifts. Friction disc is designed for the special needs of a vehicle with circuit racing in mind. Kevlar friction material is used for its unique static-to-dynamic co-efficient ratio at high energy levels which translates to a perfect transition from one gear to the next. Pedal pressure about 25% stiffer than stock. While this clutch CAN be used for spirited daily driving and occasional drag use, it is designed and is generally recommended for rally, endurance racing, clubsport and autocross. Torque rating 450 ft/lbs. (For comparison, this clutch would have similar performance to an ACT 2600 with a lighter pedal.)
Stage 3 Drag:
Comes with a heavy-duty pressure plate with significantly increased clamping force over stock and modified for a puck-style disc. The friction disc is of a 6-puck design which reduces rotational mass while increasing pressure on the surface of the friction material. Additionally, there is no cushion material between friction linings which helps keep clutch pedal travel short and quick. The friction material is graphite-impregnated ceramic. This compound exceeded all other friction materials when tested for durability, reduced chatter, heat transfer and torque capability. Pedal pressure about 25% stiffer than stock. While this clutch CAN be used on a street machine, it is designed and is generally recommended for drag racing. Torque rating 525 ft/lbs. (For comparison, this clutch would have similar performance to an ACT 2900 w/6-puck disc with a lighter pedal.)
QA #449
Last Updated:
2015-08-12 08:31
I want a more powerful alternator. What should I use?
Use a GM Alternator from any Saturn from 91 to 97 with 1.9L engine (one poster used a 1996 Saturn SC2 dohc alternator). These range from 160 Amps to 200 Amps. Much better than our 90 Amp models.
This DOES require some grinding of parts to make work as well as some rewiring. View the GM Alternator Swap Post on Mitsu Media
1G owners have a two wire just like Saturn Alt.
For 2G owners, the large yellow wire goes to the F(black) wire on the saturn connector and the small black wire goes to the L(black w/ white stripe) on the saturn connector.
If you enjoy running without your lower head shields, Jay Racing makes alternator relocation kits for the alternator. (This will require losing the AC Compressor)
For achival purposes, we have it avalaible as MS Word Mitsu to GM Alternator Swap document
QA #450
Last Updated:
2015-08-14 08:25
I found oil under my CAS (Cam Angle Sensor). What should I do?
Step 1: Replace the o-ring.
Mitsubishi Parts:
MD619648 would be used on a 90-94 Style sensor.
MD622021 is just for the 97-99 DSM/EVO 8/9 sensor.
Aftermarket:
Felpro #: 420
DIY:
CAS o-ring size is P30 (w=3.5mm, ID=29.7mm)
Autozone also sells a small pack of "Distributor O-rings". There is one in there that fits perfectly and has worked for me. It come sin a pack of 8 I believe, varying in sizes.
Go to Lowes / Home Depot and get some pluming o rings
If still leaking after replacing o-ring, keep reading.
Add RTV between the cam position sensor support and the head, and new gasket (MD329503) and or RTV between the support and cover
JNZTuning writes: http://www.dsmtalk.com/forums/showthread.php?t=235353#9
The gasket on the front of the housing (3 bolt) is part number MD329503. If it's not too severely damaged/worn, you could always try a *THIN* coat of RTV to patch it in the meanwhile.
You already have the other seal for the CAS itself (MD622021), so the only other seal is on the back side where it seals to the head. If you're getting leakage out of the front cover, I would probably not only fix the 3-bolt cover gasket, but reseal the RTV on the rear where it sits against the head.
I grabbed a used one that was sitting back in the parts bin (please excuse the child-like use of Paint). You can see in the 2nd picture (arrow) where the groove is that you need to RTV.
Make sure that you clean off both surfaces (head and CAS) to remove the old RTV and oil.
You should be oil-free after that.
QA #451
Last Updated:
2015-08-14 11:14
How do I tune using ECMLINK?
DSMLink Tuning Guide
For those of you that have a DSM and have DSMLink, Nick (NickNorth11) and Shane2GSX wrote this basic tuning guide for the DSMLink community.
It's been reviewed by the experts and creators of DSMLink for accuracy. Figured I'd throw it up on here since we have some DSM's and I think a few of you have asked me about DSMLink.
Basic DSMLink Tuning Guide
(This guide is exactly what the title implies, a basic guide to tuning. It is not intended to teach you, or tell you, everything needed to tune a DSM. Research will be required to fully understand the terms, values, and procedures below. With that said, the people involved with any and all aspects of this guide are NOT responsible for ANY damage done to your car.)
Before You Start:
- Verify that Base Timing is correct
- Verify that Base Fuel Pressure is correct (1g manual = 37 psi; 1g auto = 43.5;2g = 43.5 psi )
- Verify that there are no boost leaks
- Ensure all other components are working correctly
- Swap plug wires to account for different CAS (97-99)
Approximation of desired values:
(Some of these must be obtained manually and some via DSMLink. Others are simply values to monitor and keep within given parameters.)
- A/F Ratio
- (closed loop) 14.7
- (open loop) 11
- AirFlow (compare to specific turbo output)
- AirFlowPerRev (at idle) M/T = .27 ±10% (.24 - .30)
A/T (neutral) = same as M/T
(drive) = .31 ±10% (.28 - .34) - CoolantTmp > 179°, sufficient operating temp. to tune
- if: x < 206°, full timing
- 206° < X
- <224°, -1°>x>224°, -2°
- IdleSw (car off / ecu on) 1
- IntTemp (34°< x <84)
- ISCPosition 30 (at idle)
- LearnedIdleAdj 140 (at idle)
- LTFT Lo x→0, (0 ± 5)
- LTFT Mid x→o, (0 ± 5)
- Front02 cycles around .5 (.05-.95)
- RawThrotPos 32
- ThrotPos if: idle, 0
- WOT, 100
- TPSvolts .63 (when RawThrotPos = 32)
Setting Initial Parameters:
- Setup wideband operation within dsmlink.
- If needed, change BoostEst to your respective engine size. (2.0L, 2.3L)
- Set the A/F Ratio prefs for your injectors.
- If base timing is off, adjust timing sliders across the board to compensate. (if 3, add 2)
- If needed, cancel out any CEL’s due to already known causes. (such as rear O2)
- For safety and if desired, set Knock CEL to 3 degrees knock.
- Set global and dead time parameters according to specifications for injectors.
- Set desired values to be logged.
Closed Loop Tuning (Cruise/Idle):
- Setup DSMLink to Log the following (if available):
- TPS
- STFT
- LTFT Lo
- LTFT Mid (2G) or LTFT Hi (1G)
- MAFRaw
- Wideband
- Boost sensor (GM 3 bar, AEM, etc.)
- Turn on vehicle and let warm properly.
- Drive normally, cruising for at least 10 minutes - Do not go WOT
- Let car idle for 5 minute before shutting it off - Stop logging
- Choose your method of closed loop tuning by determining first if AirflowPerRev is at an acceptable value at idle. If AirflowPerRev is not acceptable, begin tuning using Method 1 until it is at an acceptable value. If AirflowPerRev is acceptable, proceed to Method 2.
Method 1 – Airflow Metering:
- Turn on vehicle and let warm properly.
- Begin logging. Drive normally, cruising for at least 10 minutes - Do not go WOT
- Let car idle for 5 minute before shutting it off - Stop logging
- Compare LTFT for idle (Lo) and cruise (Mid) operations – Strive to get as close to 0% as possible.
- If either is greater than +/- 5 from 0%, proceed to step 6. If not, and your happy with your %, you may stop.
- If LTFT Lo is negative, decrease the 50 Hz slider in the amount of that value. (i.e. If LTFT Lo is -10%, decrease the 50 Hz slider from 0% to -10%).
- If LTFT Mid is positive, increase the 150 Hz slider in the amount of that value. (i.e. If LTFT Mid is 10%, increase the 150 Hz slider from 0% to 10%).
Or: (From method 1) If LTFT Lo is greater than LTFT Mid, increase dead time. If LTFT Lo is less then LTFT Mid, decrease dead time. - If adjustments are made, return to step 1.
Method 2 – Fuel Delivery:
- Turn on vehicle and let warm properly.
- Begin logging. Drive normally, cruising for at least 10 minutes - Do not go WOT
- Let car idle for 5 minute before shutting it off - Stop logging
- Compare LTFT for idle (Lo) and cruise (Mid) operations – Strive to get as close to 0% as possible.
- If either is greater than +/- 5 from 0%, proceed to step 6. If not, and your happy with your %, you may stop.
- If LTFT Lo is greater than LTFT Mid, increase dead time. If LTFT Lo is less then LTFT Mid, decrease dead time.
- If LTFT Lo and LTFT Mid are equal but non-zero, adjust global setting.
- If adjustments are made, return to step 1.
Open Loop Tuning (WOT) Fuel & Timing:
- Choose a desired fuel/octane level.
- Choose a desired boost level that you want to run. Dial your boost in at a lower boost setting to begin with, depending on turbo size, probably no more than 1 bar.
(An alternate to the previous method is to start at your target boost level with conservative settings, i.e. low timing and rich mixture. Make a few pulls before tuning to ensure safe operation before continuing with this method). - Choose a proper A/F Ratio to shoot for in the entire RPM range – Some common A/F ratios are 10:1, 10.5:1, 11:1, 11.3:1, 11.5:1. The proper A/F ratio will depend on your specific vehicle and its setup. While there are too many variables to list when determining a proper A/FR, some of the common ones are fuel octane, intercooler efficiency, and turbo size. In most cases, on a properly running DSM, on pump gas with an efficient intercooler, an 11:1 A/FR is a common and safe ratio to make good power with.
- Ensure that all values you want to log are set. (The following are recommended).
- Wideband
- Boost sensor
- EGT
- After warming the car properly (warm car, drive at cruise for 10 min., idle for 5 min.), data log a 3rd gear pull from 2000 RPM to redline. Keep a very close eye on Knock, A/FR, and EGT’s for anything that might spell trouble.
- If you see ANY Knock, increase fuel sliders. If A/FR is already richer than your target, reduce timing by a degree instead of increasing fuel.
- If no Knock is present and your A/FR is leaner than your target, increase fuel to desired level. If A/FR is richer than your target, and you’re at your target boost PSI, decrease fuel.​
- 6. Allow car to cool down between runs. (Number of runs between cool down periods will be dependant on intercooler efficiency and boost level, among other things. Not doing this will result in inconsistent results).
- Continue logging runs in this manner until you reach your target A/FR with no Knock.
- Once you reach your target A/FR with no knock, raise boost by 5 PSI or less. Repeat steps 5 through 7 until you reach your target boost PSI.
- Once you’ve reached your target boost PSI and desired A/FR with no knock, increase timing by one degree and log another 3rd gear pull from 2000 RPM to redline. Again, keep a close eye on Knock, A/FR, and EGT’s.
- Repeat step 8 until you see one degree of knock retard. At that point, reduce timing by one degree. (Aim for high teens to low 20s for timing advance. Higher is better.)
- Finally, do a full run from 1st through 4th gear, watching Knock, A/FR, EGT’s, and boost. Watch knock especially closely. Ensure you run the car very hard. If you see any Knock, you may need to reduce timing. If you see that your A/FR’s are off, you may need to adjust your fuel.
QA #452
Last Updated:
2020-01-25 04:56
My [2G] Driver/Passenger window rattles. What do I do?
There is a post on DSMTALK 2G Window Rattle Fix about this but it is missing the pictures. I have found the pictures on the interwebs and have incorporated them into this PDF document. (along with some extra information)
PDF w/ Images: DSM 2G Window Rattle Fix
QA #453
Last Updated:
2015-09-02 10:45
My Driver/Passenger door sags. What do I do?
Similar Questions:
My door rubs the fender when opening? What is going on?
Stop sitting on your open doors. Your door is out of alignment.
The doors are roughly 70lbs with everything installed.
Step 1. Remove front fender (or buy the tool that gets around the door hinges)
Step 2. Open door halfway and support it midway using a jack with 2ft long piece of wood with padding on top (old towel). Jack up gently to get weight off the door.
Step 3. Loosen hinge to body bolts.
Step 4. Jack up about 1 inch higher than level.
Step 5. Retighten. Lower jack, GENTLY try and close door. Readjust up or down as required..
QA #454
Last Updated:
2015-11-20 08:17
I have ECMLINK V3. Now What?
Similar Questions:
What is Speed Density (SD) Tuning?
This section only covers Speed Density tuning. If you have great resources for MAF tuning, let us know and we will add it.
Getting started with ECMLink is a LOT easier if you begin with the basics.
http://www.ecmtuning.com/wiki/ecmlink101
This SD assistance assumes you have Wideband, MAP Sensor and IAT sensor.
How to setup your wideband using LINEARWB. (YouTube)
Make sure you have your IAT and MAP sensor logging correctly.
Get ready to tune!
How To Tune a 1G V3 SD ECMLink with no MAF (PDF) (Archive Copy)
Written By Aaron Ruppert AKA Dr Turbo
EMCLink v2 Tuning DSM ECU w/ MAF (Requires ECMLINK forum membership)
http://www.dsmlink.com/forums/attachment.php?s=&postid=513
QA #455
Last Updated:
2016-06-05 09:50
What is the 70-90 Dash?
The basic idea here is to compare the time it takes you to accelerate from 70-90mph to others and their 1/4 mile ET and MPH to get some rough idea what you might expect to be running.
Data compilation courtesy of mtxeclipse
| ET | MPH | 70-90 time | Notes |
|---|---|---|---|
| 12.9 | 107 | 2.89 | |
| 12.6 | 2.75 | ||
| 12.7 | 108 | 2.76 | shifing at 7k in 2nd |
| 12.4 | 111 | 2.4 | |
| 12.8 | 119 | 2.1 | |
| 12.2 | 115 | 2.4 | |
| 12.0 | 118 | 2.0 | |
| 11.9 | 116 | 2.57 | shifted 2nd over 8k |
| 11.7 | 125 | 1.64 | |
| 11.6 | 125 | 2.0 | |
| 11.3 | 125 | 1.85 | |
| 11.3 | 125 | 1.69 | |
| 11.0 | 132 | 1.43 |
QA #456
Last Updated:
2015-09-22 10:28
What is MCCC Treatment?
Similar Questions:
What is Seafoam and what can it do for my DSM?
MCCC = Mopar Combustion Chamber Cleaner
Seafoam is another brand of Combustion Chamber Cleaner
A combustion chamber cleaner cleans carburetors, intake manifolds, intake and exhaust valves, pistons and combustion chambers. It also removes deposits, eliminates carbon knock and restores performance.
Some people swear by it, others are on the fence. YMMV.
Short Description of how to use MCCC
Mopar Combustion Chamber Cleaner/Conditioner is really good for removing carbon deposits, but the directions on the can are not so useful. The following directions outline the way that professional mechanics have been using the cleaner for years -- they were finally published in TSB 18-31-97 for 1996-98 Jeep 4.0 Liter misfire conditions:
De-carbonizing Procedure
- Operate the vehicle until the vehicle reaches operating temperature.
- Remove the air tube from the throttle body.
- With the engine at an idle, spray the entire contents of Mopar Combustion Cleaner, p/n 04318001, directly into the throttle body. Allow the vehicle to load up with the cleaner to the point of almost stalling out.
- Shut the engine OFF after the entire can is ingested.
- With the hood closed and the vehicle parked inside the garage, allow the vehicle to soak for two to three hours. This will ensure that the engine will maintain its temperature and will allow proper solvent penetration.
- Drive the vehicle on a highway/freeway that will allow the vehicle to be driven safely at the posted speed limit. Upon entering the highway/freeway, accelerate hard to the posted speed limit and maintain speed. Slow down and then perform 5 to 10 Wide Open Throttle (WOT) upshifts. Continue driving at the maximum speed limit for 1-2 miles (if conditions allow).
QA #457
Last Updated:
2016-06-06 11:55
What bulbs do my 2g [DSM] take?
(1995-1999 DSMs)
Low beam headlamp
9006
High beam headlamp
9005
Parking light
1157
Front turn signal
1157
Rear turn signal
2057
Tail light
2057
Stop light
2057
High mount stop light
3497
Fog/Driving light
H3-55W
License plate
168
Back up light
1156
Front sidemarker
168
Rear sidemarker
2057
Dome light
DE3175
Step/Courtesy light
74
DE3022
Trunk/Cargo area
DE3022
Instrument-general
74
QA #458
Last Updated:
2015-09-29 06:58
Can I control a Meth Injection kit with ECMLink?
Here is Dacowgod's post from the DSMLink nitrous controls + meth injection thread from on DSMTuners
By far the best way to engage Methanol with ECMLink is to first upgrade to V3 Full if you do not have it...
1. Dial your car in WITHOUT methanol first. Get the tune right w/ Low boost.
2. Wire up your Methanol pump's relay to engage with the FPS or EGR solenoid wire. (Remember the ECU switches this wire to Ground so you will want to wire this to the ground side of the Relay)
3. I have found it is best to engage based on Load.. Engagement point will be determined by what kind of turbo you have how efficient your intercooler/fuel is, etc. You need to figure out at which Loadfactor you normally start seeing knock and engage it a few points earlier. Sometimes its a little simpler for people to do it by RPM but Full boost really depends on load, so RPM will change. Its also good to point out that LoadFactor tracks Boost pretty well.
4. I usually set MPH range from 5-315 ... This makes the Methanol not engage while on Launch control.
5. Make sure Knock is set from 0 - 20 ... You do not want this to EVER turn off because of too much knock.
6. I usually deactivate with clutch switch and Rev limit.... to try to prevent backfires.. State change limit of 100ms works fine.
Now that your Controls are configured you need to go do a pull... You will notice your AFR's are Much richer (if its working properly) than they were before.... This is where V3 full comes in... Go in to the AuxMaps tab and enable secondary fuel adjustments.
7. Enable Secondary Fuel Adjustments and subtract a % of global fuel to bring your AFR's back down to where they are supposed to be (remember you are adding fuel with meth, so this is basically telling the ECU about it) so it will still run your target AF/R ...Test and Repeat until you are running your expected AF/R
8. Dont forget to tick the box To tell it when to apply the Secondary Fuel Adjustment (i.e. When Custom FPS is active if you have Meth wired to the FPS)
That is it if you are engaging with ECMLink. But what if you are not engaging with ECMLink?
I've found it best for your Tunes sake to still inform the ECU that you are adding a secondary fuel source. So what you need to do here is wire up a relay to switch to ground when your Fuel pump turns on... Then wire that "switched ground" To your Idle Switch wire. You can then apply the secondary fuel adjustment for the Meth via IdleSw input... so your tune will still line up accordingly with Meth enabled and spraying.... Progressive controllers will cause a lean dip here though so you should watch the tune and maybe play with the delay a little bit as ramp rate is usually pretty quick with progressive controllers for it to matter much.
If you're still using DSMLink V2 for FPS control... Then you do not get the AuxMaps and Secondary Fuel Adjustment feature... You will be forced to lean it out manually by RPM with the sliders... which will work..I did it for a long time...but it will throw your AFRatioEst right out the window and can cause some odd issues because your engagement point will change based on load.
QA #459
Last Updated:
2016-06-01 07:25
My car sounds like it is running on 2 cylinders and the RPM gauge is way off. What should I do?
Similar Questions:
I have no power, rough idle, and rpm gauge is acting weird. What should I do?
There are quite a few things that could cause this.
#1. Check the Power Transistor Unit. (located on the intake manifold generally) This provides signal to coil from ECU and also provides RPM for tach.
#2. Check the Coil Pack.
#3. Your ECU might be taking a dump. Get it tested.
#4. Bad ground or a short.
QA #460
Last Updated:
2015-11-16 06:53
My DSM won't start. What do I do?
Diagnosing a No-Start
This guide is obviously not meant to offer a complete list of things that could be keeping your car from starting. However, checking these things BEFORE posting your problem will help us better understand your situation, and give you a better chance of getting the right advice very quickly.
If you donÂ’t have a Factory Service Manual, check out this link: http://www.lilevo.com/mirage/
And we beginÂ…
So, you go out to your car one morning, and, lo and behold, it wonÂ’t start. The DSM Gods must be angry with you. Â…Time to start the diagnostic process. For quick reference, I have sectioned this article off into the basic problem areas by symptom. Find the area (highlighted in Bold) that most closely matches your problem area(s)Â….or just read the whole thing, so youÂ’ll know what to look for on that fateful day, whenever it may occur.
I – Does the car NOT crank, or crank slowly?
If the car doesnÂ’t crank at all, or cranks very slowly, areas to investigate include the following, in order of likelihood:
1. Check your battery terminals and cables. Loose, corroded, or broken battery terminals or cables will drain your battery. If the car cranks very slowly, your battery may have some juice left. If not, it may be completely dead.
2. Using a DVOM (Digital Volt/Ohm Meter), check the voltage on your battery. Red probe goes to the positive post; black probe goes to the negative post. If battery voltage reads low (anything lower than 12 volts is low!), your battery has been drained. This could be due to any number of things. Did you leave an interior light on by mistake? Are your battery terminals loose or corroded? Did your battery ground out on an aftermarket strut bar? Is your alternator going bad? Take your battery to your local AutoZone, OÂ’Reilly, Advance Auto, or similar parts house. Most of these chains offer free battery testing and free charging (especially if you bought your battery from them).
3. If you have an Automatic, is the car in Park or Neutral? If you are M/T, are you depressing the clutch all the way when starting the car? If yes, your Neutral Safety Switch or Clutch Safety Switch (respectively) may be faulty. Refer to FSM for proper testing procedure, or just unplug it.
4. When you turn the key, do you hear the starter click? If not, time to check it. Refer to FSM for complete testing procedure. Check the starter relay first. On a 1g, this is located under the dash, to the immediate left of the steering column. There are three relays down there – the starter relay is the one in the middle. With KOEO and clutch depressed, battery voltage should be present at the relay. On a 2g, the starter relay is located near the radio.
5. Check the Alternator fuse (80A in a 1g, 100A in a 2g). This is located in the main fuse box under the hood, and should be the largest fuse in there, making it easy to spot. Careful – it’s also the only fuse that is secured by a bolt, so keep this in mind when attempting to remove it. (See image below for location)
6. Pull the upper cover off of your timing belt and make sure you have not snapped or damaged the timing belt. If you are at all in doubt about the condition of the belt, pull it out and replace it. If there is any possibility that you could have jumped timing, run a compression test to verify if (or, more likely, how many) valves were bent.
II – The car cranks, but just won’t start.
There are four main things a car needs to run: Fuel, Fire (Spark) at the right time (Engine Timing), and Compression. Once the car has all of these things, it really has no choice but to start – remember, cars are just machines. With a car that cranks but doesn’t run, the first thing you need to do is diagnose which one(s) of these four basic necessities you’re lacking.
1. Checking for Fuel: The DSM fuel system is fairly straightforward. Sparing you the painstaking details, there are a couple of things you will need to do to verify that youÂ’re getting fuel. Try spraying some starter fluid into the cylinders and try to turn the car over. If the car will start, you are most likely not getting fuel.
Start by removing the fuel line from the filter (passenger) side of the rail (Careful! The fuel system is under pressure, and since you canÂ’t start your car, you canÂ’t relieve the pressure in the lines. Keep your face away from the fuel line, and wear protective eye gear. Imagine sticking your face in front of a bottle of champagne before uncorking it. Get the idea?)Â…Stick the end of the fuel line into a clear container and have a friend crank the car (or turn on the fuel pump via the check connector behind the battery). In a normally operating fuel system, plenty of clean gasoline should fill the bottle pretty quickly.
If you don’t see a lot of fuel, or if it looks nasty, change your fuel filter (refer to VFAQ). If nothing comes out at all, you will need to make sure your fuel pump is turning on. Open the fuel filler door and remove the filler cap. Have a friend put his or her ear up to the filler hole and listen as you crank the car (in a 1g, you have to crank it! Putting the key in “ON” will accomplish a whole lot of nothing). You can also power the fuel pump via the check connector. Stock fuel pumps will emit a faint buzzing or whining noise when they turn on. Larger aftermarket pumps (especially Walbro) will usually be loud enough for you to clearly hear inside the car yourself. If you don’t hear the “whine”, that’s your problem – your fuel pump isn’t powering on. Possible reasons for this include a faulty fuel pump, disconnected or damaged wiring to the pump, or a faulty MPI relay, among a few other things.
If you are getting fuel to the fuel rail and your fuel pump is operating, but the car still doesn’t start, it’s time to consider fuel pressure. Pull the return hose from the Fuel Pressure Regulator and see if it’s wet with fuel after cranking the engine. If it’s dry, your Fuel Pressure Regulator could be faulty. Buy or borrow a fuel pressure gauge (these are fairly inexpensive, and can be purchased from any AutoZone, O’Reilly, or Advance Auto, etc.). Follow the manufacturer’s directions and refer to FSM to check the fuel pressure. Remember to remove the vacuum line (small rubber vac line going to the Fuel Pressure Solenoid – the one your Boost Gauge should be T’d to) from the fuel pressure regulator and pinch it closed with your fingers (or an adequately sized bolt). The specs you’re looking for are as follows:
1g N/T: 47-50 psi
1g Turbo (A/T): 41-46 psi
1g Turbo (M/T): 36-38 psi
2g N/T 4G63: 47-50 psi
2g Turbo: 42-45 psi
Next, check to make sure your injectors are firing. Measure the resistance at the injector clips with your DVOM. Resistance should read 2-3 ohms at the injectors, and the clips should be receiving battery voltage while cranking. Take a long, rubber-topped screwdriver and place the metal end on top of each injector, and your ear on the other. Crank the car, and listen for a sharp metallic “clicking”. You’ll hear the clicking each time the injector fires. If your injector’s aren’t firing, try swapping out your Injector Resistor Pack with a known good unit. These don’t usually go bad, but when they do, they’ll keep the injectors from firing. The ECU may also be at fault here, or the wiring to the injectors may be damaged.
2. Checking for Spark: Before checking for spark, first remove and inspect your spark plugs. Are they improperly gapped or have they been fouled by age, improper fuel mixture, etf? If so, replace them and try to start the car again.
To check for spark, disconnect one of the spark plug wires and attach a spare spark plug (it’s always good to have a spare handy – you can use a cheap-o one from Wal-Mart for testing purposes). Place the plug and plug wire onto the valve cover and have a friend crank the car. Do you see spark arcing onto the valve cover? Sometimes it’s best to do this test at night – this makes it easier to see the spark. Repeat this test on all 4 cylinders to verify that you’re getting spark all the way across. If you’re not getting spark on some or all of the cylinders, first check the condition of the spark plug wires – does the spark try to arc through the wire while you’re testing? If so, the wires are damaged and must be replaced. Next, check resistance at the coil. Specs differ by year, so refer to your FSM for the specs for your particular vehicle. If everything tests out okay and you’re still not getting spark, pull the ECU and check the board for damage due to capacitor leakage. DSMs are not getting any younger, and are notorious for leaking ECU capacitors. One final culprit could be the CAS. These differ by year as well, so again, refer to FSM for appropriate testing procedure and specifications. First, however, you might want to make sure the CAS is not turned 180* out (i.e. “on backwards!”).
3. Checking Engine Timing: The procedure for checking and setting engine timing is fairly complex, so I will let you refer to the VFAQ for this one. HereÂ’s the link:
http://www.plymouthlaser.com/timin.htm
4. Checking Compression: Checking compression is another thing that is best covered in the VFAQ. Here you go: http://www.dsmgrrrl.com/FAQs/compression.htm
III – Fuel, Spark, Timing and Compression are good, but the car still won’t start!
We’ve narrowed it down this far, and we’re definitely making progress. There are a couple of things we can check now that will usually “seal the deal”.
1. Has your car been sitting for any length of time? If youÂ’ve stored your car, or itÂ’s been down for a while, and now wonÂ’t start, you can bet that the gas in the tank has gone bad. Drain the gas tank via the drain plug on the bottom of the tank, and remove the tank (refer to FSM for exact removal instructions. Remember to remove the fuel pump and all related electrical connectors first. Dropping the fuel tank will take about an hour if youÂ’ve never done it before). Clean the fuel tank with high pressure water and let it air dry IN A SAFE LOCATION (away from any possible danger of sparks or extreme temperatures) for at least 24 hours. Fill the tank with a few gallons of high octane gas, as well as a bottle of Fuel System Cleaner (like Seafoam) and/or Octane Booster.
2. Does the car eventually start, or act like itÂ’s trying to start? Is the problem especially bad after the car has sat overnight, or on a cold day? This is likely your ECT (Coolant Temperature Sensor). The ECT is the first sensor the ECU looks at when you start your car. The ECU asks it "How cold is it outside today?" and the Temp Sensor responds. The ECU takes that information and decides how much fuel to send to the injectors. If your ECT is faulty, the ECU will either get an incorrect reading back, or no reading at all, and will stay in open-loop, dumping fuel into your cylinders, making your car excessively hard (or impossible in some cases) to start.
The Coolant Temp Sensor is located on your thermostat housing, towards the bottom, on the left/front. It is a two-prong male connector (one prong on a 2g). Inspect the wires going to the sensor first – there is a lot of heat down there, and wires can become brittle and snap off of the connectors due to age and extreme temperatures. The following information demonstrates how to check the operation of the ECT on a 1g. For 2g, refer to FSM.
Testing the Coolant Temperature Sensor on a 1g:
Unplug the black plastic clip and turn the key ON (do not start the car). Connect the negative probe of your DVOM to a good ground on the car, and the positive to one of the plugs in the clip. With key ON you should see approx. 4.5-4.9 volts. You may have to try both of the plugs until you find the one that sees voltage – one sees voltage and the other does not.
Assuming this checks out okay (99% of the time it will), we will now move on to resistance. Basically speaking, as the temperature of the coolant INcreases, the resistance value will DEcrease.
With the engine cold and the sensor unplugged, turn your DVOM to resistance (ohms) and connect the probes to each of the two prongs on the sensor. The prongs on the ECT will form a sort of "T" shape: kind of like this: | \
With engine cold, resistance should read somewhere between 2,200 to 2,700 ohms (if it's a little higher, it is due to extremely cold ambient temperatures. Somewhere close to this range is okay though).
The next step in this test would normally involve starting the car and getting it up to operating temperature. However, if the car will not start at all (probably the case if youÂ’re reading this), you can replicate this part of the test in a heated dish of water. See below for instructions and necessary water temperatures. If you can get the car to start, plug the sensor back in and start the car now. Get the engine up to operating temperature, and turn it back off. Unplug the sensor again, and repeat the resistance test. (BE CAREFUL, it is VERY HOT down there now). The resistance should now read approx 280 to 350 ohms.
If the car will not start at all, or if you can't quite reach the sensor, you can unbolt the sensor unit and reproduce the testing procedure with a dish of water. If you do this, have a rag or bolt handy to plug the hole you make by removing the sensor -- lots of coolant will come out. You can drain the coolant first if you want to avoid this.
Put the bottom of the sensor (round, gold metal part) into a dish of room temp water (50-80*) and measure resistance. Then, heat the water to approx. 180-200* (not quite boiling), and repeat, using the same resistance values stated above.
If resistance is not within specs, replace the sensor.
Related resistance specs for 2g Turbo engine:
Cold (68*F): 2.1 - 2.7 kOhms
Hot (176*F): 0.26 - 0.36 kOhms
Testing procedure is similar for 2gs. Refer to FSM for complete testing procedure.
Coolant Temp Sensor on a 1990 GSX Circled in Picture (Pay no attention to the letters. But if you’re interested, “A” is the Coolant Temp Fan Switch for the A/C, and “C” is the Temp Gauge Sending Unit).
There you have it. Chances are, if youÂ’ve tried everything listed here and your car still wonÂ’t start, itÂ’s time to post your problem in the forums for some detailed advice.
QA #461
Last Updated:
2015-11-22 04:18
Can I put a 1G 6 bolt motor in my 2G DSM?
Short answer: Yes.
For more details on this, Magnus has created a great document 1Gina2G (PDF)
If that link does not work, we have archived the document 1Gina2G Archive (PDF)
QA #462
Last Updated:
2015-12-19 05:18
What is my [DSM] maintenance schedule?
There are a lot of threads on mods and upgrades, but it is very important to make sure that all the maintenance is done on your car. Check your repair manual for the complete list, here is the minimum list that I recommend:
Every week or every 250 miles or when you get gas/fuel:
1) Check engine oil level
2) Check brake fuild level
3) Check tires and tire pressures
Every 3000 miles or 3 months
1) Change engine oil and oil filter
- The most commonly used oil is synthetic 10W30, 10W40 and 15W50.
Every 6000 miles or 6 months
1) Rotate tires
Every 15000 miles or 12 months
1) Change PCV valve. (When you buy it, blow on one end and then blow on another, you should only be able to blow one side. If you can blow on both sides, it is bad, get another one)
2) Change spark plugs
- If you have no or mild mods get - NGK BPR6ES or Autolite 63 Copper
- If you have moderate mods get - NGK BPR7ES or Autolite 62 Copper
- If you have a LOT of mods get - NGK BPR8ES
Gap plugs to 0.028 to 0.031". Use no other plugs. No platinum or dual electrode stuff.
If you are experiencing stuttering from high boost, try to gap plugs in the range of 0.020" to 0.024"
Every 30000 miles or 24 months
1) Replace air filter
2) Spark plug wires - (I use NGK premium wires: part# ME77, stock# 8100)
3) Coolant flush - 50/50 (with one or 2 bottles of water wetter if you want to use it)
4) Change the tranny fluid - most commonly used on manual transmissions is Pennzoil Synchromesh, which is a cheaper alternative to BG Synchroshift. After having issues with Synchomesh for a while (it is too thin), I switched to a combo of Redline heavy and light.
5) Change the transfer case and rear diff fluid (if you have AWD) - most commonly used gear oil is Redline Heavy Shockproof gear oil.
Every 60000 or 48 months
1) Replace fuel filter
2) Timing belt change: A complete list of 60k timing belt service would include all these:
- Timing belt
- Balance shaft belt
- Timing Tensioner
- Water pump
- Timing belt tensioner pulley
- Balance shaft tensioner pulley
- Idler pulley
- Crank seal
- Oil pump seal
- Balance shaft seal
- 2 Cam seals
- Harmonic balancer
- All other belts
Get only MITSUBISHI parts for the list above. OEM part does not always mean that the part is made by MITSUBISHI. If you don't know where to but parts from, this is a good start - Where Can I Buy OEM Parts Besides Junkyards and Ebay? - DSM Forums.
If your car is old, go ahead and replace all the vacuum hoses. RRE makes a good kit here - RRE's Larson Silicone Hose Kit
QA #463
Last Updated:
2016-05-25 09:55
What should the camber / toe be on my [DSM]?
Michael Lee from ca.dsm.org posted this image from his alignment. See the specifications columns.
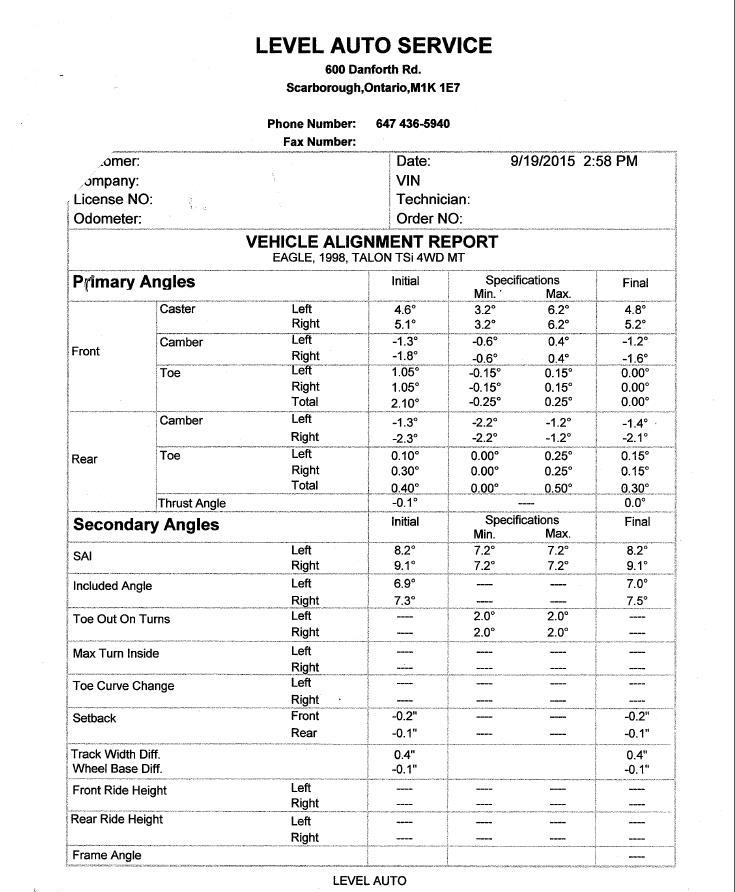
QA #464
Last Updated:
2016-03-31 01:25
What are the flow rates of 1G / 2G heads?
Similar Questions:
What are the flow rates of ported heads vs stock heads?
|
||||||||||||||||
| Manufacturer Part Number |
Port/Vol Int/Exh |
Valve Size Int/Exh | Combust. Chamber Vol | .100 | .150 | .200 | .250 | .300 | .350 | .400 | .450 | .500 | .550 | .600 | Average | |
| Eclipse SOHC | N/A | - | N/A | - | - | - | - | - | - | - | - | 240/125 | - | - | - | |
| Eclipse SOHC CNC M2 Race Systems | N/A | 35.25mm/ 25.7mm 3.575 |
N/A | - | - | - | - | - | - | - | - | 275/195 | - | - | - | |
| 4G63 Gen I | N/A | 34mm/ 30.5mm | N/A | - | - | - | 229/187 | 237/188 | - | - | - | - | - | - | - | |
| 4G63 Gen I '89-94 CNC M2 Race Systems | N/A | 35mm/ 30.5mm 3.575 |
N/A | - | - | - | - | 251/202 | - | 283/240 | 284/249 | - | 286/260 | - | - | |
| 4G63 Alaniz Cyl Heads | N/A | 34mm/ 30.5mm | N/A | 77/75 | 117/117 | 154/151 | 187/174 | 206/189 | 216/197 | 220/199 | 221/200 | 223/202 | - | - | - | |
| 4G63 Ported Level 4 Polk | N/A | 35mm/- | N/A | 106/- | 161/- | 188/- | 241/- | 270/- | 298/- | 309/- | 320/- | 334/- | 346/- | 357/- | - | |
| 4G63 AMS SF600 | N/A | 34mm/ 30.5mm | N/A | 81/67 | 119/105 | 153/138 | 183/173 | 201/192 | 209/203 | 211/208 | 205/209 | 206/211 | - | - | - | |
| 4G63 Ported AMS SF600 | N/A | 34mm/ 30.5mm | N/A | 107/88 | 151/134 | 189/193 | 222/229 | 244/245 | 258/249 | 269/255 | 274/261 | 277/265 | - | - | - | |
| 4G63 1G Ported Fox Lake SF600 | N/A | - | N/A | - | - | - | - | - | - | 280/- | 289/- | 291/- | - | - | - | |
| 4G63 2G Ported Fox Lake SF600 | N/A | - | N/A | - | - | - | - | - | - | 272- | 281/- | 287/- | - | - | - | |
| 1G | N/A | 34mm/30.5mm | N/A | 78/84 | - | 150/170 | - | 204/205 | 218/206 | 225/- | - | - | - | - | - | |
| 1G Mild Port | N/A | - | N/A | 83/- | - | 157/- | - | 222/- | 235/- | 244/- | - | - | - | - | - | |
| Manufacturer Part Number |
Port/Vol Int/Exh |
Valve Size Int/Exh | Combust. Chamber Vol | .100 | .150 | .200 | .250 | .300 | .350 | .400 | .450 | .500 | .550 | .600 | Average | |
| 1G Ported | N/A | - | N/A | - | - | - | - | - | - | 275/- | - | - | - | - | - | |
| 1G Ported Mike +1mm valves | N/A | 35mm/31.5mm | N/A | 87/78 | - | 169/166 | - | 230/208 | - | 257/227 | - | 270/239 | - | - | - | |
| 2G | N/A | 34mm/30.5mm 3.37 No Pipe |
N/A | 80/73 | - | 155/146 | - | 211/181 | - | 227/183 | 229/183 | - | - | - | - | |
| 2G Ported | N/A | - 3.37 No Pipe |
N/A | 91/73 | - | 173/147 | - | 226/210 | - | 254/234 | 269/240 | - | - | - | - | |
| EVO 4G63 CHW Alum | N/A | 34mm/30.5mm - No Pipe |
43.3 | 74/75 | - | 147/142 | - | 195/176 | - | 200/179 | - | 196/182 | - | 198/181 | - | |
| EVO 4G63 Ported CHW Alum | N/A | 35mm/31.5mm - No Pipe |
45 | 87/85 | - | 164/159 | - | 215/211 | - | 239/227 | - | 246/229 | - | 252/231 | - | |
| EVO Ported Fox Lake SF600 | N/A | - | N/A | - | - | - | - | - | - | 265- | 276/- | 280/- | - | - | - | |
| EVO 1 Sabre Heads JS | N/A | 34mm/30.5mm | N/A | 80/72 | 122/120 | 161/163 | 197/189 | 225/198 | 238/202 | 246/205 | 251/205 | 252/205 | - | - | - | |
| EVO 1 Ported Sabre Heads SF110 | N/A | 34mm/31.5mm | N/A | 78/79 | 118/132 | 159/172 | 197/194 | 225/207 | 240/219 | 251/224 | 257/227 | 261/231 | - | - | - | |
| EVO 4G63 Cosworth | N/A | 34mm/ 30.5mm | N/A | - | - | - | - | - | - | - | - | 282/257 | - | - | - | |
| EVO 4G63 Ported Cosworth | N/A | - | N/A | - | - | - | - | - | - | - | - | 335/282 | - | - | - | |
| EVO 8 4G63 David B | N/A | 34mm/30.5mm | N/A | - | 177/135 | - | 221/197 | - | 224/218 | - | 228/218 | - | - | - | - | |
| Manufacturer Part Number |
Port/Vol Int/Exh |
Valve Size Int/Exh | Combust. Chamber Vol | .100 | .150 | .200 | .250 | .300 | .350 | .400 | .450 | .500 | .550 | .600 | Average | |
| EVO 9 Kelford Cams | N/A | 34mm/ 30.5mm | N/A | 81/70 | 122/110 | 158/142 | 188/162 | 211/175 | 225/186 | 236/192 | 239/196 | - | - | - | - | |
| EVO 9 Mild Port Kelford Cams +1mm valves | N/A | 35mm/ 31.5mm | N/A | 89/81 | 131/121 | 169/160 | 200/179 | 227/193 | 245/204 | 257/213 | 266/221 | - | - | - | - | |
| EVO 9 CNC Heads UK | N/A | 1.377/1.24 100mm Pipe |
N/A | 77/72 | 115/- | 154/161 | 188/- | 211/202 | 219/- | 222/219 | 226/- | 227/226 | - | - | - | |
| EVO 9 Ported CNC Heads UK | N/A | 1.377/1.24 100mm Pipe |
N/A | 89/85 | 133/- | 177/186 | 213/- | 240/239 | 263/- | 278/271 | 286/- | 291/294 | - | - | - | |
| EVO IX Ported AMS +1mm valves SF600 | N/A | 35mm/ 31.5mm | N/A | 107/88 | 151/134 | 189/193 | 222/229 | 244/245 | 258/249 | 269/255 | 274/261 | 277/265 | - | - | - | |
| EVO X AMS SF600 | N/A | 34mm/ 30.5mm | N/A | 101/74 | 147/128 | 186/157 | 216/161 | 235/183 | 252/186 | 266/189 | 275/191 | 280/193 | - | - | - | |
| EVO X Ported AMS | N/A | - | N/A | 97/86 | 139/141 | 183/199 | 225/226 | 251/233 | 274/235 | 293/238 | 305/239 | 315/240 | - | - | - | |
| EVO X 4B11 David B | N/A | 34mm/ 30.5mm | N/A | - | 141/142 | - | 202/197 | - | 242/212 | - | 256/219 | - | - | - | - | |
| EVO X 4B11 | N/A | 34mm/ 30.5mm | N/A | 85/71 | 131/121 | 173/154 | 208/170 | 231/177 | 250/181 | 265/183 | 273/185 | 277/187 | - | - | - | |
| EVO X 4B11 Mild Ported Kelford Cams | N/A | 34mm/ 30.5mm | N/A | 86/80 | 131/127 | 173/157 | 209/178 | 235/189 | 256/194 | 272/197 | 283/198 | 292/200 | - | - | - | |
| G54B Ported Marnal | N/A | 1.80/1.50 | N/A | 58/51 | - | 114/91 | - | 170/118 | - | 211/141 | - | 223/155 | - | 229/160 | - | |
| NT PPE LLC | N/A | - | N/A | 84/73 | - | 169/156 | - | 220/185 | - | 233/191 | - | - | - | - | - | |
| Manufacturer Part Number |
Port/Vol Int/Exh |
Valve Size Int/Exh | Combust. Chamber Vol | .100 | .150 | .200 | .250 | .300 | .350 | .400 | .450 | .500 | .550 | .600 | Average | |
| NT Port PPE LLC | N/A | - | N/A | 91/96 | - | 175/183 | - | 242/211 | - | 260/219 | - | - | - | - | - | |
| TT | N/A | - | N/A | 86-93/77-80 | - | 165-179/151-164 | - | 223-230/191-200 | - | 246-262/195-216 | - | 249-256/196-219 | - | - | - | |
| VR4 | N/A | - | N/A | 95/98 | - | 174/168 | - | 226/201 | 240/209 | 249/212 | - | - | - | - | - | |
QA #465
Last Updated:
2013-02-07 08:14
How do I best cool my [DSM]?
Similar Questions:
Where can I find coolant Information for my [DSM]?
If you are reading this, chances are you are either having a problem with your cooling system, or would like to make it more efficient. Below is a list, both 1G and 2G specific, that can help when making your decision and troubleshooting a failed cooling system. This FAQ focuses on stock-style cooling systems.
Your cooling system consists of 5 major components. They are your Radiator, Thermostat, Radiator Cap, Water Pump and Cooling Fans. We will discuss these in detail throughout this FAQ.
To sum it up, there are only 3 reasons why your cooling system will fail.
1: Lack of flow
Typically this is caused by a failed water pump, a stuck thermostat, a blocked or clogged radiator. A failed water pump will have the tell tale sign of coolant seeping out of the weep hole. You will typically notice a large pool ofcoolant below your timing belt cover area. Barring any broken hoses from your Oil Cooler, this is usually a sign of a failed water pump.
A stuck thermostat will reveal itself when your car is at operating temperature, your coolant is full, however your upper radiator hose is cold. Eventually the pressure inside the system will exceed the radiator cap's spring and you will start pushing coolant into your overflow. Change your thermostat.
A clogged radiator will reveal itself when all others fail. Usually, you can visually see debris in between the fins of your radiator. If there is enough of it, it will impede airflow past your radiator, and the efficiency of your radiator will not be sufficient enough to cool your engine. Flushing your radiator is as simple as removing it, pressure washing or hitting it with compressed air to blow the fins clean, then flushing the internals with water. Introducing aftermarket equipment in front of the radiator such as an FMIC or oil cooler without proper ducting will also impede airflow.
2: Lack of Coolant/Incorrect mixture
Typically this is due to a leak of some form. Find it and repair it. Your cooling system travels through a number of areas including your water pipe, turbo (if applicable), Oil cooler, water pump, throttle body, heater core and overflow container.
The ideal mixture is 50/50. That's 50% Coolant (Ethyl Glycol) and 50% distilled water. This mixture works for most driving habits under most conditions, however, most of us do not fall under this "Average" driving habit, and increase of water into your cooling system will allow it to perform better. Water does a fantastic job of removing heat, so the more of it you have, the better. Do not run straight water, your cooling system requires coolant to lubricate and increase the boil temperature of water. A great additive for your cooling system is a product called "Water Wetter", and is found at your local Canadian Tire, Autozone, Part Source, Napa etc.
3: Pressure.
As your cooling system heats up, the water in your system expands and your radiator cap keeps this expansion pressure in your system, raising the boil point of the water. As you drive your car, coolant will be pushed out into your overflow as the system creates pressure. Albeit a small amount, this amount returns to your cooling system once the car shuts off. As the engine cools, it creates a vacuum and barring all the funky Fluid and Thermo Dynamics, replenishes the cooling system by sucking it in back through the overflow via syphon.
There are mainly 2 reason why your coolant will not be sucked back into the system:
1. Radiator Cap: A poorly functioning radiator cap will allow for too much coolant to be pushed out and/or not enough seal to allow for the syphoning of coolant back into the system.
2. Overflow bottle/hoses: The overflow bottle should be below or at level with your theromostat housing, and a line inside the overflow bottle that goes down past the normal cold level for your coolant. Cracks or tears in the hose between the overflow bottle and thermostat housing will also impede a suction of coolant, and will pull in air.
Pressure can also come from the combustion chamber. A failed headgasket will either allow for coolant to enter the combustion chamber and be burned, or push air into the cooling system. Typically, the signs of a failed headgasket would be one or more of the following:
1. Foaming of coolant
2. Burning of coolant (White smoke)
3. Oil in Coolant/Coolant in Oil
4. Overheating condition within 10 or so minutes of driving
5. Overflow bottle filling up/overflowing at operating temperature
6. Coolant being pushed out of the rad cap under boost
7. Lack of return from overflow bottle to cooling system
8. Increase of pressure in cooling system/pushing coolant to overflow. (This can also be attributed to a failed radiator cap)
Lets discuss the 5 components, what they do, how they do it and how to maintain/increase their efficiency.
Radiator
Arguably the most important part of the system, the radiator is a heat transfer device and allows for flowing air through the fins to transfer heat from the engine to the air and dissipate. There are three things you need to remember about your radiator.
1. Airflow
2. Coolant flow
3. Airflow
In order for coolant to pass through your radiator, it must not be clogged. Ensuring your radiator is free from contaminants will ultimately keep it working as efficiently as possible. Your radiator hoses are also a must-maintain part of this important system. Cracked, worn, or soft radiator hoses are just a few heat cycles away from failing. I have personally seen a car cooling after a run down the track and the upper rad hose splitting open before my eyes!
Airflow is also THE key to a properly working radiator. We add FMIC's, Oil Coolers, Transmission Coolers, Power Steering coolers all in front of the engine cooler and then wonder why our coolant temperatures start to skyrocket. If you look at a stock DSM, you'll notice there are many plastic shrouds all around the radiator. These are there to direct air directly to the radiator, and not let it bleed off from around the car. When adding upgraded components to your car, it is crucial that you imitate these factory shrouds by building your own ductwork to direct air to the radiator. Without airflow, the radiator cannot do it's job. A great test for this is to turn on your fans with the hood closed and see if it will suck a piece of paper to your FMIC. If it can, chances are your airflow is pretty good.
Thermostat and Radiator Cap
These two critical parts of the cooling system can be the difference between overheating and overcooling. The thermostat keeps the pressure in the system, upping the boil point and keeping all that nice expensive coolant in the car.
Quote:
There are three seals in the rad cap. One on the outside that seals the water neck housing. Second seal is on the inside that is spring loaded and seals inside the water neck housing. This one maintains the pressure in the cooling system. Once pressure builds past 11 lbs with a stock rad cap from the coolant heating and expanding, its pushes past this seal into the over flow until pressure falls back below the rad cap specs.
How does it come back in when it cools ? There is a third seal or valve which works in the opposite direction. Its the round metal thing in the middle of the second seal. When coolant contracts, this valve opens and allows coolant from the overflow to flow back into the coolant system. Under pressure and expansion, this metal valve is sealed shut against the second seal. The cooling system constantly goes through this cycle of expansion and contraction which your driving, the rad cap needs to be functioning properly on order for it to do so.
A 16lb rad cap will cause all your lines to be a little more pressurized than a stock rad cap, but will increase boiling point. You'll notice your overflow coolant level fluctuate more with a 11 lb rad cap than a 16 lb rad cap. I like to keep my cooling system a little more "loose" with the stock rad cap.
-- Credits to Reza Mirza
The thermostat is what regulates your temperature, and oddly enough, the pressure in the system as well. Pressure is defined as a resistance to flow, and the thermostat creates just that. Without a thermostat, you will eventually overheat due to lack of pressure, so keep it in there. Your thermostat can fail both open and closed, and it's pretty easy to figure out what will happen in either circumstance. Installing too low of a temperature thermostat will cause an overcooling condition, which can be just as harmful as overheating. Your ECU depends on the engine getting to a certain temperature for normal operation, and if the car does not get to that temperature, the ECU will always think it's simply still warming up, keeping it in openloop mode. In openloop, the ECU depends on it's internal tables to tell how much fuel to introduce, and typically, this is a rich mixture. Also, the ECU depends on thecoolant temperature to begin learning fuel trims. This temperature is around 180 degrees for a 2G, and 190 for a 1G. Also, using a colder "racing" thermostat to try and combat an overheating problem is rarely the solution. A car that overheats will overheat no matter at what temperature the thermostat opens, it will just take longer for it to happen.
Water Pump
A variable displacement pump, the water pump's job is simple; Keep the coolant moving through the system. The water pump rides on a sealed bearing and is spun by the crankshaft via the alternator/water pump belt. The "weep hole" is a small hole at the top of the water pump and in a failed bearing/pump circumstance, coolant will drip out of this hole. Typically it is best to replace the water pump every time you do a timing belt job, as you need to remove the timing belt in order to do it. Ensuring a good seal between the pump and block as well as between the water pipe and pump will prevent you from having to do the job more than once. Take your time!!
Cooling Fans
Properly installed, shrouded and working cooling fans are critical to not overheating in stop and go traffic. A 1G has a thermoswitch at the bottom passenger side of the radiator that controls the fans on/off, whereas the 2G has an ECU controlled setup. Different combinations of setups can both do the job equally (2 pullers, 2 pushers or one of each). The OEM fans work great, and if you can keep them, do so, however most of our upgrades prohibit such an idea, so they came out with slim fans. In this scenario, bigger IS better. If you can cram a 14" slim fan in there, do it. The more airflow you can provide to your radiator, the better.
Hoses
Last but not least are all the coolant lines and hoses. As your car ages, so do the parts, and with the expansion/contraction of your coolant lines, the eventually will begin to deteriorate. Check your lines every so often to ensure there are no soft spots, cracks or tears as these are signs of impending failure. The smallest soft spot will eventually lead to a leak or split in the line.
Coolant Mixture
Lets take a look at the coolant mixture. What is the best mixture? Some will say 80/20 water/coolant, some say 70/30, some will say 50/50, but it's all in what works for you and your area/driving style. If you live in a hot area, a 75/25 mix might work, but colder areas require more coolant than water, so a 50/50 is best. Ensuring your coolant mixture is correct, and that the system is full at all times will ensure your car cools itself properly. Air is the enemy to your cooling system, and it ALWAYS comes from somewhere. Be it a cracked line, failed rad cap or improperly burped system, air will cause all sorts of heating/cooling conundrums that can drive a person mad. If everything above is in good working order, you will never get air in the system, period.
So, there you have it, a basic writeup about a typical DSM Cooling System configuration, how it works and where to start when that temperature gauge starts creeping up on you in 30*C weather in stop&go traffic. I hope this thread has been helpful for you.
QA #466
Last Updated:
2016-05-25 09:39
How do I fix the hot start problem?
After hearing this problem discussed a hundred times on the list, and recieving a lot of mail, I figured I'd whip up a quick FAQ on what you should look for when you encounter this common problem. 99 times out of 100, it's one of these fixes. Hopefully you're not among the 1% that has to go to the dealer to have them fit one of those UGLY black "kludge boxes" onto your ECU.
Here are a few things to try:
1) Block off your EGR valve. Sometimes these fail, and when they do, this is what happens. It happened on my car, then I put in a block-off plate and everything was great. They also cool your intake noticably, and you'll never have to clean your TB ever again! To get one of these great little things, send some email to my mentor, Frank Szymkowski.
2) Change your vaccum hoses, especially the one going to the fuel-pressure regulator. Sometimes this one leaks and creates problems for the FPR.
3) Change your plug wires. I'd use some MagnaCore wires. They're less $$$ than the stock ones, and they're 8.5mm opposed to the stock 6mm. The stock wires are no good, especially when raising the boost.
4) Clean your throttle body REALLY well. Make it spotless, including both sides of the throttle plate.
5) Clean out your intercooler. Do this by taking it out, dump about a gallon of gasoline into it, then shake it around and dump out. Repeat process until gas coming out is clean.
Do all of these, and your car will run better than new!!
QA #467
Last Updated:
2016-05-29 04:36
Where can I buy a shop manual?
Similar Questions:
How good is a shop manual?
What's the difference between the Mitsu/Chryco shop manual and the [other brand] manual?
How much is a shop manual?
The original factory "shop manual" for DSMs is actually two manuals: a mechanical book and an electrical book. These items are almost always purchased together, so a "shop manual" usually means both books.
Click here for some information on the Chilton's manual, brought to you by Edmunds. Additionally, both the Haynes and Chilton's manuals for 1G cars are available from Amazon.com, an online bookseller, for roughly $20 each plus shipping. Still another option is the Alldata/Popular Mechanics Automotive Repair CD-ROMs, which include the TSBs. They are available from Alldata for about $25.
It must be noted that opinions on the aftermarket manuals vary - most people recognize that the Haynes manual is superior in some respects, while the Chilton's is better in other areas.
The Last Word: Getting the CD should be fine, as nobody will care now about possible copyright violations on the factory manuals. Notice I said "should".
Speaking of possible copyright violations, if you are looking for service manuals, dig throuh this site: http://www.lilevo.com/mirage/
QA #468
Last Updated:
2016-05-30 08:36
Why would I want to delete the ABS on my [DSM]?
Theres a number of reasons we delete ABS on our cars. One, more control. Theres no ABS on my dirt modifieds is there? Two, and maybe the biggest reason, to clean up the engine bay and make more room for bigger aftermarketparts. Three, the ABS in dsms dont work half the time. Four, weight savings. If I remember correctly, its 34lbs all together.
Read more: http://eatsleepdsm.proboards.com/thread/180/abs-delete-guidance#ixzz4AH3Yq2bJ
Courtesy of SpooledSOHC
QA #469
Last Updated:
2016-05-31 03:14
What is an O2 Simulator?
Some people have issues with a CEL coming from Rear O2. (Failed Cat?)
Here is an O2 Simulator you can build. This gets very hot so be carefull. Mount it outside the car.
It has also been menrtioned that you should use 4 resistors instead of 3 for better heat dissipation.
QA #470
Last Updated:
2016-05-31 09:22
What is an E316G Turbo?
E316G acronym stands for "Evo 3 16g" Turbo
This 16g turbo is good for a well tuned car to hit 310-350WHP @ 20PSI
QA #471
Last Updated:
2016-06-01 10:46
What are some good links to read up on Handling / Power of my DSM?
Forums first and foremost have large range of information.
​Club DSM Canada
DSMTuners
DSMTalk
With that said, they have speculation, trolls and drama.
Here are a list of sites that we have bookmarked over the years and provide valuable information without any of the mess.
#1: Far North Racing
QA #472
Last Updated:
2016-06-01 12:54
What clutch should I use in my [DSM]?
Visit Jack's Transmissions DSM Clutch Selection page.
Two clutches that are gaining popularity are Southbend Clutch w/ XACT Streetlite Flywheel or an ACT Twin Clutch Setup.
QA #473
Last Updated:
2016-06-02 12:15
Credits
Many people should be given props for all the work and research they have done for the DSM community. While there are too many to list, we will name some of the top names in Alphabetical order
Andrew Billiant - AMB Aero
Brent Rau and Marco Passante - Magnus Motorsports
David Buschur - Buschur Racing
Dennis Grant - Far North Racing
John Sheppard - Sheppard Racing
QA #474
Last Updated:
2016-06-02 10:03
How many DSMs were made?
1g Production Numbers
Laser production figures
1990 42,105
1991 30,198
1992 24,094
1993 14,300
1994 5,284 (production stopped mid-year)
Total 115,981
Eagle Talon production figures
1990: 32,708
1991: 33,537
1992: 27,945
1993: 26,740
1994: 24,040
Mitsubishi Eclipse production figures
Unknown as of now, if anyone wants to add something, please pm me.
Totals
1988: 2,409
1989: 90,741
1990: 148,379
1991: 153,936
1992: 139,783
1993: 136,035
1994: 169,829
Total: 841,112
2g Production Numbers
Eagle Talon production numbers
1995: 25,066
1996: 15,100
1997: 9,788
1998: 4,307 (Chrysler wanted to kill off Eagle)
Mitusbishi Eclipse production numbers
Totals
1995: 218,161
1996: 192,961
1997: 189,086
1998: 157,139
1999: 161,844
Total:919,191
Eclipses exported to Japan
1994: 81
1995: 1,276
1996: 1,090
1997: 858
1998: 304
1999: 88
QA #475
Last Updated:
2016-06-02 11:29
What is a dogbox?
Similar Questions:
What is the difference between syncromesh and dogbox transmissions.
Dog Box Transmissions
Dog engagement is normally used in racing applications where fast, precise shifting is needed. Dog gear engagement is facilitated by numerous large teeth (dogs) that mate into matching openings machined into the opposite surface of the drive gear. Unlike the synchro engagement, there is no synchronizing mechanism to assist in equalizing speed. Ideal gear selection—e.g. minimal clashing and wear of the dog rings—is achieved by quick shifts; the motto here is “the quicker the better”, so bang away.
Synchromesh Transmissions
Most modern cars are fitted with a synchronized engagement gearbox from the factory to deliver smooth, reliable, and quiet operation, which is paramount for a daily driven vehicle. Synchromesh transmissions operate using a collar that applies force to a cone-shaped clutch attached to the gear. The collar allows the shaft speed of the gearset and the input shaft to be matched or “synched” to the output shaft prior to the collar locking into place and initiating a shift.
Synchromesh gear engagement is best at lower engine speeds and requires a bit more time compared to a dog box, to facilitate shifts. Limitations of synchromesh gearboxes in high-performance applications include slow upshifting at very high engine speeds—e.g. 9,000 rpm—and slow downshifting, as well as the need to fully use the clutch.
Full article here: Gearbox Beatdown - Synchromesh vs. Dog Box
QA #476
Last Updated:
2016-06-02 05:16
What is an EPROM?
Similar Questions:
What is an EPROM ECU?
An EPROM is an electrically programmable read-only memory, or a type of computer memory that can be programmed only once, but read an unlimited number of times. EPROM ECUs have such a memory IC installed in them. This memory holds the program code that controls the ECU behavior. The EPROM is a separate chip from the microcontroller (computer chip) that actually runs the program. This makes it easy to change the ECU programming, since only the EPROM need be replaced, and EPROMs and their associated programming tools are relatively common.
The alternative, a non-EPROM ECU, does not have an EPROM. Instead, the program is stored inside the microcontroller itself (technically, in embedded EPROM memory that is part of the microcontroller). This makes it hard to change the ECU programming, because the microcontroller needs to be replaced. These are difficult to get, and require special programming tools that are equally difficult to find.
QA #477
Last Updated:
2016-06-03 09:31
Why are there no pictures in the answer section?
We avoid displaying pictures inside of the answers to help speed up the delivery of content and to reduce bandwidth usage. (We are looking at you mobile phone users)
There are usually links to posts with images as well as we occasionally will host images or PDF/WORD documents containing more detailed images and wording.
QA #478
Last Updated:
2016-06-03 01:55
Any YouTube channels I should be following for DSMs?
There are a few. Jafro and BoostedBeaver have the most DSM content.
Jafromobile
MAJORITY DSM CONTENT
"I fix things that I enjoy breaking, & for some reason you guys love to watch, so I film it. Each video covers hours of work in minutes. If you're a gear head, watch a few videos & see if you don't feel like subscribing!"
BoostedBeaver
COMPLETE DSM CONTENT
"The inner workings of a motor fascinate me and I thoroughly enjoy working on my DSM. The reward and sense of accomplishment is overwhelming and can never be replaced. I hope to share the knowledge that I learn throughout my journey and I hope to learn from you in the comments. I have been documenting this process for some time now in a blog format. In case you are interested here is a link to that blog. http://www.dsmtuners.com/forums/dsm-build-journals/427853-1990-eagle-talon-sleeper.html This blog includes hundreds of Pictures, a full engine build, a transmission build and much more. I have decided to try and document this process on video and share it with you here. Lets see just how fast we can make the "Beast" go!!!! While this channel will be based on a 1990 Eagle Talon and the work that I do to it, I am open to any and all comments/suggestions and thanks for taking the time to view my channel."
TurboTomsGarage
LIMITED DSM CONTENT
"I'm Tom and my channel is all about the love of cars. Whether it's taking on a DIY project, bolting on some more horsepower, racing or just having some fun in the garage, you'll find it all here. As you'll see, I love all sorts of cars, but especially turbocharged ones. Thanks for visiting!"
VelocityLabs
LIMITED DSM CONTENT
"Your place for all things cars. New videos every month! Custom rides, mods, racing and more. Want to know how to change injectors on a specifc car? Repair an oil leak? Put a turbo on your daily driver? If you have something you'd like to see, let us know in the comments! Velocity Labs is free and will always be free! If you want to help support us, the best thing you can do is share our videos and subscribe to our channel! We also have some tshirts and stickers if you want to sport some Velocity Labs clothing, but sharing our videos helps us the most"
QA #479
Last Updated:
2016-06-03 10:47
Can I vent my BOV?
Similar Questions:
Can I venting my BOV to the atmosphere?
You can vent your BOV to make the cool woosh sound but be warned, there may be problems.
If you are running a standalone / ecmlink ecu in Speed Density mode everything will be fine. If not (you are running a chip or SAFC), you may experience very rich conditions along with stalling or stumbling.
QA #480
Last Updated:
2018-11-03 05:53
Where can I find manuals for my DSM?
Similar Questions:
Is there a parts Catalogue for my DSM?
1G Manuals
1990 - 1994 Eagle Talon Parts Catalogue
2G Manuals
2G DSM Technical manual 2G TM
2G Engine/Chassis/Body 95-96ECB 97-99ECB
2G Electrical 95-96EL 97-99EL
QA #481
Last Updated:
2018-11-03 05:48
How do I lighten my DSM?
Similar Questions:
What parts can I remove to lighten my DSM?
- 37 lbs - Spare tire, spare tire cover, any tools, jack
- 6 lbs - Removable Carpets
- 15 lbs - Full Carpet
- 50 lbs - Seat Belt Equip. (add Harness)
- 26 lbs - switch to Odyssey battery
- 70 lbs - Remove the front and back bumper
- 72 lbs - Switch to lightweight racing seats
- 30lbs - Rear seats
- 35lb - AC
- 3 lbs - Charcoal canister
- 6 lbs - Cruise
- 10 lbs - Manual Steering
- 15 lbs - Stereo
Total: 375 lbs removed.
Conventional wisdom is that for every 100 pounds you remove from your ride, you shave 1/10th of a second off your ¼ mile E.T. That 12.1 just became and 11.8
QA #482
Last Updated:
2016-06-03 10:34
My AC broke. Can I cut the belt?
Yes. There is no damage by not running the belt.
If you want, remove your whole AC system to lighten your DSM, you can shave off 35lbs.
QA #483
Last Updated:
2016-06-03 10:42
What is the best way to bleed a clutch?
Get some tubing to put of the bleeder vavle on the slave cylinder. Put a little clutch fluid in a small jar and submerse the end of the tube into it.
Have your assistant pump clutch 3 times. Open valve, Close Valve when it's done pushing fluid out.
Rinse and repeat.
Every 3 times you crack the valve, check to make sure resevoir is not low on fluid or you will need to start all over again.
The fluid in the jar prevents air from being sucked back up into the system. Stop once you are confident there is no more air in the system.
QA #484
Last Updated:
2016-06-04 09:50
What head gasket / head studs should I use?
This depends on what your end goals are. You can't go wrong with the following for up to 35 PSI:
Setup #1:
Head gasket: Felpro Permatorque MLS
Head studs: Standard ARP or L19
Setup #2: (Shep and John Wigger use and recommend)
Head Gasket: OEM MLS
Head Studs: Standard ARP or L19
Head O Rings: Steel
Important: The difference between the Felpro 1153-1 and OEM MLS is the Felpro has a built in o-ring and the OEM does not.
A note on L19 and A1 studs
As far as the L19, A1 head studs vs. standard ARP... I would suggest that the L19's and A1's can offer higher clamping loads, but that requires you to apply more torque to the studs to acheive this. Our cylinder heads can not really take the increase load. To be honest, at those loads, you begin to crush the seats around the studs. The structure simply cant take all that the L19 and A1's have to offer. I would really suggest saving the money and going with standard ARPs. A lot of the 8 and 9 second cars run the standard ARPs without issue.
AWDDSM95 @ DSMTuners
Headgasket for 35-40psi??
You must ensure that your block and head mating surface are pristine if you want to run really high boost.
Anything sub-par and it does not matter what headgasket / studs you use.
Aim for as smooth a finish as you can get. (around 10 micro-inch)
It must be under 30 micro-inch finish.
QA #485
Last Updated:
2016-06-05 11:58
What turbo should I run my [DSM]?
Quick Turbos are 18g or under. (11 - 14 sec)
Fast Turbos are 20g or larger. (11 seconds or less with Traps higher than 125)
For city in town fun, you will have the most fun with an E316G. (Has run high 11's with 122 trap)
Estimate 10 crankHP per 1lb / min of flow.
Mitsubishi:
14b = 30 lb/min
16g = 34lb/min
Big 16g = 36lb/min
18g = 40lb/min
EVO III Big 16g = 42lb/min
20g = 44lb/min
Forced Performance:
Big28 = 37lb/min
FP2544 = 44lb/min (56trim/ dual BB)
Sleeper 16g = 44lb/min
Green = 49lb/min (50 trim)
FP49 = 49lb/min (50 trim, T31 turbine)
Red = 60lb/min (60-1 trim, dyno 520whp)
FP3052 = 52lb/min (dyno 504whp)
FP3065 = 65lb/min (dyno 585whp)
FP58 = 65lb/min (GT40 56 trim comp. wheel, .49A/R PTE, T350 turbine)
AGP:
T28 = 36lb/min (TB03 compressor)
RS43 = 43lb/min (46 trim T04E)
SS44 = 44lb/min (It is a 44lb/min but not a 48trim. It is not a GT30 at all. It's special, topsecret, Kevin)
RS49 = 49lb/min (50 trim T04E)
RS60 = 60lb/min (60-1 trim) (claimed 534whp)
RS65 = 65lb/min (56 trim GT40)
DSM Performance/Extreme Turbo:
ETA12 = 36lb/min (S-trim, ETA comp housing)
ETA32 = 48lb/min (50 trim, ETA comp housing)
ETE32 = 48lb/min (50 trim, T04E comp housing)
ETE42 = 50lb/min (60 trim, TO4E)
ETE52 = 55lb/min (60-1 trim, TO4E)
ETE53 = 55lb/min (60-1 trim, T04E)
ETE73 = 72lb/min (T66 comp wheel, T04E)
Buschur Racing:
BR-BIG28 = (claimed 350hp)
BR20G = (TD05/6 hybrid)
BR475 = (No info as of yet)
BR57 = (Garrett T3/T4)
BR500 = (claimed 504whp)
BR580 = (claimed 575whp)
BR675 = (No info as of yet)
Slowboy Racing:
SBR-M50 = 48lb/min (50 trim)
SBR-M60 = 60lb/min (60-1 trim)
SBR-GT10 = 44lb/min (48 trim, dual BB)
SBR-GT11 = (No info as of yet)
SBR-GT12 = 55lb/min (56 trim, dual BB)
SBR-GT13 = 60lb/min (60 trim, dual BB)
SBR-GT14 = 65lb/min (56 trim, dual BB)
SBR-GT35R = (No info as of yet)
SBR-GT30R = (No info as of yet)
SBR-G50 = 48lb/min (50 trim, T04E)
SBR-G57 = 55lb/min (56 trim, T04E)
SBR-60-1 = 60lb/min (60-1 trim, T04E)
Frankenstein Turbos:
Frank 1 = 46 trim, 20*clipped TD05H turbine, TD05H 7cm2 housing
Frank 2 = 46 trim, unclipped TD06 turbine, TD05H 7cm2 housing
Frank 50 = 50 trim, unclipped TD06 turbine, TD05H 7cm2 housing
Frank 3 = 54 trim, unclipped TD06 turbine, TD05H 7cm2 housing
Frank 57 = 57 trim, unclipped TD06 turbine, TD05H 7cm2 housing
Frank 4 = 60 trim, 10*clipped TD06 turbine, TD05H 7cm2 housing
Frank 5 = 60 trim, unclipped TD06H turbine, TD05H 7cm2 housing
Frank 6 = 60 trim, unclipped TD06H turbine, TD05H 8cm2 housing
Frank 7 = 60 trim, 10*clipped TD06H turbine, TD05H 8cm2 housing
The following is from the Garrett Catalog:
"R" = Ball bearing; "S" = Special
GT12 = 10lb/min (50trim, .43a/r turbine)
GT15 = 15lb/min (60trim, .35a/r turbine)
GT20 = 20lb/min (55trim, .46a/r turbine)
GT22 = 18=22lb/min (52trim, .56a/r or 60trim, .67a/r turbine)
GT25R = 22lb/min (60trim, .64a/r turbine)
GT28R =24lb/min (60trim, .64a/r turbine)
GT28RS =28lb/min (62trim, .86a/r or .64a/r turbine)
GT30R =55lb/min (56trim, 1.06a/r or .82a/r turbine)
GT32 =35lb/min (52trim, .78a/r or .69a/r turbine)
GT35 = 35lb/min (52trim, 1.18a/r turbine)
GT35R =45lb/min (56trim, 1.06a/r or .82a/r turbine)
GT37 = 36lb/min (52trim, 1.12a/r turbine)
GT40 = 65lb/min (50 or 54trim, .94a/r or 1.34a/r turbine)
GT42 = 75lb/min
GT42-1 = 85lb/min
GT42-2 = 96lb/min
GT60 = 125lb/min (56trim, 1.47a/r turbine)
The following is from Turbonetics Catalog:
On TO4E Compressor housings:
50-trim = 47lbs/min
54-trim = 45lbs/min
57-trim = 49lbs/min
60-trim = 50lbs/min
T-100 = 180lbs/min
TO4B compressor housing:
60-1 = 65lbs/min
62-1 = 70lbs/min
Holset:
HX35 Compressors: (Est: 60lb/min)
50mm / 78mm 7-blade
52mm / 78mm 7-blade
54mm / 78mm 7-blade
54mm / 83mm 8-blade
56mm / 83mm 8-blade
Turbine: 70mm / 60mm
HX40:Compressors: (Est 70lb/min)
56mm / 86mm 6-blade (cast & billet)
60mm / 86mm 6-blade (cast & billet)
60mm / 86mm 7-blade (cast & billet)
58mm / 83mm 8-blade (cast & billet)
60mm / 83mm 8-blade
Turbine: 76mm / 64mm
Missing Holset Flow Information.
Due to various housings, this information may be hard to nail down.
------------------------------------------------------------------------------------
Turbine Conversion:
Mitsu = Garrett
6cm2 = .41 a/r
7cm2 = .49 a/r
8cm2 = .57 a/r
9cm2 = .65 a/r
10cm2 = .73 a/r
11cm2 = .81 a/r
12cm2 = .89 a/r
QA #486
Last Updated:
2016-06-05 12:37
What is OBD?
Similar Questions:
What is OBD-I?
What is OBDII?
OBD is an acronym for "On Board Diagnostics". OBD-I was version 1, OBD-II is version 2.
It is an industry-standard method of communicating with the onboard engine computer. It was created so that ECUs from different manufacturers would have a standardized communication protocol instead of several different proprietary versions.
Sometimes pre-OBD cars (such as 1G DSMs) are referred to as OBD-I cars. This is not accurate, since they use the ALDL interface. 1995 cars might be OBD-I rather than OBD-II, but since most OBD tools support both I and II the difference is usually not important.
There are actually three different possible interfaces within the OBD-II standard: PMW, ISO, and PMZ. [So much for standardization....] All 2G DSM's use the ISO version of the interface, so any diagnostic equipment used must also support the ISO version of OBD-II.
QA #487
Last Updated:
2016-08-08 01:29
Has anybody ever installed "Altezza" brake lights on their [DSM]?
Similar Questions:
Are "Altezza" brake lights legal for use in [my location]?
Are clear brake lights legal for use in [my location]?
Legality varies from state to state, as well as country to country. You would need to check with local law enforcement or motor vehicles department to determine if the "Altezza" lamps are legal for use in your area.
At the very least, any aftermarket lamps installed within the USA should be Department of Transportation (DOT) certified. Many also have SAE (Society of Automotive Engineers) certification. Very generally speaking, if a lamp is SAE/DOT certified, it may be legal for use in your area, but this is no guarantee.
Many "Altezza" styles are illegal. Some are missing side marker functionality that is required for OEM lamps. Also, many 'clear' tail lamps lack red reflectors and appropriate side markers, making both styles less than fully compliant with state or federal laws.
In recent years, many manufacturers have been forced to recall "Altezza" and clear tail lamps for offering lamps that violate federal or state standards. Affected makes include APC, CK Motoring, JKL Auto Accessories, OBX, Pilot Automotive and Robocar. Verficiation of these recalls is easily available from the NHTSA's recall database.
Those interested in a more thorough perusal of automotive lighting standards may find the privately-run Motor Vehicle Lighting Standards page a good place to start.
Legal questions aside, many DSMers have installed Altezza brake lights on their cars. 2G owners have several vendors selling "Altezza" style lamps. 1G brake lamp configuration does not appear to lend itself to the "Altezza" style, but a few vendors have nevertheless managed to create them for 1Gers as well.Autosupermart.com did offer them for the 1G Eclipse at one point. And if all else fails, there's always eBay.
Many Altezza users complain that the aftermarket lamps are not sealed properly, and therefore leak or collect water.
QA #488
Last Updated:
2016-08-09 08:52
How much weight can I reduce my [DSM] by?
Similar Questions:
How much do car parts weigh?
There are tons of great weight savings posts on DSM Tuners.
Here is an extreme Weight Loss: http://www.dsmtuners.com/threads/dsm-extreme-weight-loss.261692/
The below weights are copied from DSM Curb Weight FAQ/breakdown post by Aovsi on DSM Tuners.Obviously some parts are required, but this gives you rough idea of parts weight.
A/C:
Full System, 90 TSi AWD: 35lbs
Full System, 99 GSX: 42lbs
Cooling System:
1G Stock metal radiator fan: 6lbs
1G Stock plastic radiator fan: 5lbs
Carpeting, sound deadening material, etc:
Sound Deadening Material Inside Car: 25lbs
Spare tire cover + privacy cover: 20lbs
1G rug in rear hatch: 2.5lbs
Each floor mat: 3lbs
Tools, etc:
Spare Tire and Jack: 35lbs
1G Stock tool bag and tools: 2lbs
Under hood, hood itself:
Hood, 1G Hood: 44lbs
Hood, 2G Hood: 42lbs
LS1 MAF With MAF Ends: 1.5lbs
Charcoal Canister, 90 DSM Turbo: 3lbs
Fog Lights: 5lbs
Stock 2G battery: 42lbs
Oddessy Battery: 14lbs
Crankshaft: 6 bolt stock crank 35.5lbs
Cruise Control: 90 DSM Turbo With brackets and bolts and lines 6lbs
Various Brackets: Firewall brackets, Intake, air can, heat shields etc 10lbs
1G rubber intake with BOV return hose (from turbo to MAS): 3lbs
1G starter: 8lbs
1G Intake Manifold, With EGR Block off plate: 10.5lbs
1G intake manifold with ALL sensors/ICS motor + support bracket + throttle body: 23 lbs
Drivetrain
1G AWD Transmission, Complete: 125lbs
1G FWD Transmission: 85lbs
DSM 7 Bolt Flywhee, unlightened: 19lbs
DSM 7 Bolt Flywheel, lightened: 14lbs
ACT 2600 Clutch Disc: 3lbs
ACT 2600 Pressure Plate: 10.5lbs
Exhaust/turbo related:
APEXi N1 Silencer: 0.5lbs
Tial 40mm wastegate, With Metal o-ring: 1.5lbs
2G AWD Catback, No muffler: 17.5lbs
2G AWD Catback, Full Catback with Muffler: 37lbs
2G AWD Muffler 19.5lbs
16G turbine housing, ported (made few years back or less time ago): 9lbs
1G 14b original turbine housing, unported: 11 lbs
Evo III exhaust manifold, ported: 12 lbs
Evo III o2 housing, unported: 6.5lbs
1G original o2 housing, unported: 6lbs
1G original exhaust manifold, unported: 10lbs
14b turbo, only center cartridge with wheels+comp. housing, no turbine housing: 5.5 lbs
Seats, safety belts, etc:
1G OEM Front fabric seat plus slider and belt buckle. No belts: 50lbs
1G OEM Front Seat Belt Assembly: 30lbs
1G OEM Rear Seat Belt Assemblies, Speakers and mounting plates: 18lbs
1G OEM Rear Seats (upper and lower, leather): 40lbs
1G OEM Drivers Seat (Leather Adj lumbar): 50lbs
1G OEM Rear seat bottom: 12lbs
1G OEM Split rear seat back: 18lbs
2g OEM seat, cloth, no power: 43lbs
1G middle rear seatbelt mount: 2.5lbs
Suspension/wheels/steering:
1G Stock Shocks, each: 12lbs
1G AWD KYB AGX rear struts, each: 5lbs
1G KYB AGX front struts, each: 8.5lbs
1G Stock Springs. each: 6lbs
5-spoke wheel, 1996 GS: 20lbs
95-96 Talon Swirl Rims, With 205-55-16 tire: about 42lbs
97 GSX wheels, 17x6.5, no tires, each: 25lbs
90 Laser stock 16" steel wheels w/very bald Sumitomo Srixon-4, 205/55 tires: 45lbs
90 Talon stock 16" aluminum swirl wheels w/70% tread, Goodyear Eagle RS-A 205/55 tires: 42lbs
Electrical, sound, etc:
Stock Radio/CD Player/Amp: 10lbs
DSM Turbo ECU 1.5lbs
Exterior:
1G Bumper, Stock Metal Bumper Rear 32lbs
1G Bumper, Stock Bumper Front 35lbs
1G License Plate w/bracket: 2lbs
Tail light ('90-'91 Talon): 2 lbs
Rear center piece ('90-'91 Talon): 2 lbs
1G ('90-'91) clear pass/flash-through front headlight trim, with bulb and socket: 1.5 lb
1G ('90-'91) corner/side marker, with bulbs and sockets: under 1.5 lb
Interior:
Center storage compartment door: 2 lb
Center console one-piece that surrounds the shiftter: 2 lb
Passenger side dash storage compartment door: 2+ lb
Metal brackets that hold up the wood in rear hatch: 2.5lbs
Misc:
Rear Wiper Assembly: 5lbs
Sunroof, Entire 2G glass sunroof assembly w/screws + brackets: 32lbs
QA #489
Last Updated:
2016-08-10 08:38
I need to replace my timing belt. What other parts should I replace?
There are many things in and around the timing belts that should be checked when doing a timing belt job, especially if replacements are done infrequently. (Owners who perform timing belt changes on a more frequent basis (perhaps as part of engine rebuilds or other work associated with motorsports) need not necessarily check everything each time, and will of necessity have the experience to judge what to replace and what not to.)
The following is a list of parts that should be checked, repaired and/or replaced during a timing belt replacement. The list is based off of experience with 1G cars. 2G owners can still use this as a guide, but 2Gs may have certain other specific problems not mentioned here.
For more information on why belts are so important on DSMs, read the section Why is it so important to change the timing belt on a [DSM]? in this FAQ.
| Part | Reason for check |
| All 5 belts | Broken accessory belts can hit the timing belt, causing it to jump or break. |
| Timing belt tensioner | Tensioner can wear out or separate, leading to timing belt failure. [Search for 'tensioner'] |
| Balance shaft belt tensioner | Same reason as timing belt tensioner. |
| Water pump | Replacing the pump requires removing the timing belts. Do it while the belts are off anyway if there is any chance the water pump might fail, or if it is near the date for scheduled replacement. Read this post to see what can happen if you don't replace it. |
| Oil pump sprocket and nut | The oil pump sprocket nut can come loose, and damage the sprocket. It can also spray oil over the belts, causing them to fail prematurely. Also, loose nuts can chew through the timing belt cover and may eventually hit the timing belt, causing it to break or jump. |
| Seals for the following: oil pump, balance shaft, crankshaft, and the o-ring under the balance shaft plug. | They get old and brittle, and no longer seal well. |
| Timing belt tensioner bearing, timing belt idler pulley bearing, and balance shaft tensioner bearing | The bearings get dried out. They can be repacked, but are inexpensive to replace. You can also replace the pulleys, but there have been some redesigns and new timing belt pulley may not fit quite right. |
| Crankshaft accessory pulley/harmonic balancer | The rubber portion of the pulley can become old and brittle, and can eventually separate, causing the pulley to fall apart. |
Note that after a timing belt job has been performed by an outside source, it is important to check and/or adjust the base engine timing. Not an alignment issue, this involves taking a timing light and double-checking that the base timing has not gotten screwed up.
This is not as straightforward as it may seem, since the ECU generally controls the timing and can 'fool' the mechanic into believing the base timing is ok. It is necessary to ground the timing adjustment connector in the engine bay to disable the ECU control and allow the engine to run at its true base timing. Otherwise, the ECU will do it's best to dynamically adjust the timing to the 'correct' value, even though the base timing is messed up.
Failure to do this check may result in the ECU lacking sufficient range to advance the timing as far as it should go, leading to a loss of power. Some Digesters have (belatedly) checked their base timing only to find that their timing was set all the way back, presumeably when a timing belt recall was done on their car. Once they reset the timing to the correct value, the car 'wakes up' and runs stronger than ever.
QA #490
Last Updated:
2016-08-15 09:27
What is a boost leak test?
Similar Questions:
What is a BLT?
How do I do a boost leak test?
Read this post by GAS_MAN on DSMTuners first.
http://www.dsmtuners.com/threads/boost-leak-test-how-to-with-boostpro-net-tester.169435/
If you want to build your own boost leak tester that won't scare the crap out of you if it blows apart,
check out this video Ultimate Boost Leak Tester
Then follow Oldman on DSMTuners list.
1. Disable your mbc.
2. Turn your motor to 30* ATDC to avoid valve overlap. (you will lose pressure if any valves are open)
3. Start your test at the TB elbow and focus on area behind the TB first.
4. Spray soapy water at TB gasket, BISS, TB shaft on both sides, IM gasket, injector insulators, brake booster, afpr and all vacuum lines/connections.
5. Open your oil cap and listen for leaks. (PCV, valve seals/guide, rings)
5. Listen to your tailpipe for leaks. (EGR, valve overlap, jumped timing, bent/unseated valves)
6. Once all leaks are fixed, move the tester back to the turbo inlet.
7. Spray down the compressor cover (known leak), BOV return/flange (DO NOT TAP YOUR BOV LINE FOR YOUR MBC!!!), IC end tank/fins and all connections. Re- test.
8. Note that you will leak air into the crankcase through the turbo seal but do not panic, this is normal during a static pressure test as long as there are no shaft play.
The desired test result from the begining of the LICP (bypassing turbo) is around 20psi (on boost gauge) with the compressor set at 30psi, while taking no less than 30 seconds to bleed down to 0.
As a reference, my last test on my 500 mile new engine, I was able to pressurize the system to 25psi, bled down to about 16psi (my 1G bov) in about 30seconds, then took about 3 mins to 6psi and just kinda lingered there for a while. It's not easy to do but the point is it's possible. My next goal is 30psi After motor break in and Dodge modding my BOV. A boost leak test is one of most pita but important regular maintenace task, the key is patience and endurance
QA #491
Last Updated:
2016-08-14 07:59
What CAS (Cam Angle Sensor) can I use for a 6Bolt Motor?
Similar Questions:
What CAS (Cam Angle Sensor) can I use for a 1G Motor?
HYUNDAI ELANTRA (1992 - 1994)
HYUNDAI ELANTRA GL (1992 - 1994)
HYUNDAI ELANTRA GLS (1992 - 1994)
HYUNDAI ELANTRA (1994 - 1995)
HYUNDAI ELANTRA GL (1994 - 1995)
HYUNDAI ELANTRA GLS (1994 - 1995)
HYUNDAI SONATA (1994 - 1995)
HYUNDAI SONATA GL (1994 - 1995)
HYUNDAI SONATA GLS 1994
DODGE 2000 GTX 1990
MITSUBISHI GALANT 1990
MITSUBISHI GALANT GS 1990
MITSUBISHI GALANT GSX 1990
MITSUBISHI GALANT LS 1990
EAGLE TALON 1990
EAGLE TALON TSI 1990
MITSUBISHI ECLIPSE GS 1990
MITSUBISHI ECLIPSE GSX 1990
MITSUBISHI GALANT 1989
MITSUBISHI GALANT GS 1989
MITSUBISHI GALANT LS 1989
PLYMOUTH LASER RS 1990
Great thread on CAS here: http://www.dsmtuners.com/threads/how-to-test-1g-cas.394020/
QA #492
Last Updated:
2016-11-21 10:05
How to I remove the ECU?
2G
- Remove both kick panels in the driver/passenger area.
- You will see the ECU tucked in behing the radio.
- Remove 1x10mm bolt from passenger side ECU mount.
- Unplug the ECU connectors
- Remove 2x10mm bolts from drivers side.
- Pull the ECU out drivers side.
QA #493
Last Updated:
2016-11-21 09:59
How do I properly break in a turbo?
Once installed, prevent the engine from firing and crank it over until the oil pressure gauges moves (or oil light goes out). Once you have built up oil pressure, undo your engine firing prevention and start it up.
Get the car up to temp (idle) and look for leaks.
Go out for a spin and slowly spool the turbo and watch your boost gauge and for any visible signs of issues (smoke out the tail pipe, not able to build boost, etc)
Happy boosting!
QA #494
Last Updated:
2016-11-23 07:41
My front brake rotors keep warping! Is there a fix?
This is a common problem on DSMs. The consensus is that improper tightening of the wheel lug nuts is often to blame. Nobody really knows if it is caused by overtightening (excessive force) or unequal tightening (uneven force). Most people put the blame on the widespread use of impact or air tools to do routine wheel operations, as well as inattentive or careless operation of said tools, which result in poorly done lug nuts.
While having correctly tightened lug nuts is always a good idea, personal driving habits may contribute towards warped rotors.
The most likely answer is:
- Periods of hard driving, followed by long periods of brake application (such as at stoplights) may contribute towards uneven cooling of the rotors, promoting rotor warpage.
- Track driving can also be a problem, especially if the parking brake is engaged before the rotors have cooled down. The parking brake holds the rear brake pads to the hot rotors, again causing uneven cooling. Dirty pads, which can develop hot spots, may also be a factor.
Those who experience persistent warping problems on pre-1993 cars may wish to upgrade to the Big Brakes, but be warned - even Big Brakes will not necessarily prevent rotors from warping.
The Last Word: Some shuddering may be caused by uneven deposits on the rotors - Audi owners often blame this for problems. Also, while lug nut torque may be a contributing factor, most actual auto techs I've talked to sneer at this idea. The Subaru guys probably had it right decades ago - the rotors are just a bit small for this size of car, and get overheated easily.
QA #495
Last Updated:
2016-11-28 06:33
How do I rebuild my throttle body?
Similar Questions:
How does the throttle body come apart?
Another great video by Jafromobile takes an hour to explain Rebuild DSM Turbo Throttle Bodies from 90-99.
QA #496
Last Updated:
2018-11-01 06:57
What are the first mods I should do to my DSM?
Here is a list of items you should mod on your DSM.
FIrst and foremost. Make sure that your DSM is in top shape by ensuring all maintenance has been done and dealing with any other issues. If your tranny/driveline makes noise, adding 200 extra horsepower will probably break it.
Now that your DSM is ready to accept mods, here they are in order of importance.
Fuel Pump (Rewire+Upgrade)
Air Filter (High Flow) + Pipe
ECM Link (ECU Flashing) (go light version if you want to save some money right now)
Boost Controller
Injectors
Turbo + Spark Plugs (May require hotter plug to avoid blow out) Choose a turbo for your end goal.
- 16G (250HP), 20G (300HP), 50TRIM (400-500HP), 60TRIM (500-600HP), etc etc.
3" Exhaust (turbo back)
Intercooler
Fuel Pressure Regulator
Cams
By now.. you should be breaking stuff. Upgrade each piece that breaks with something meant to take the punishment. Don't replace a stock transmission on a 500HP talon with another stock transmission. Look at getting hardened transmission.
Have fun and enjoy your forever empty wallet! This is only a suggestion. Take a look at forums and see what other people have done
QA #497
Last Updated:
2018-11-03 08:15
Why does my DSM rev to redline at idle?
Similar Questions:
Why does my DSM idle really high?
This is most likely due to unmetered air entering the cylinders. There a few things for you to check
- #1 Always. Check for Boost Leaks In case you forgot how : https://www.youtube.com/watch?v=fdjadhUP1u4
- If you can not find the leak, use a smoke tester.
- Ensure throttle plate is not stuck and is not bent.
- Check the trottle cable to ensure it is not stuck or too tight.
- What is the TPS volt value at idle position? (Aim for 0.63)
- Blocked off your FIAV? That can cause an internal leak that bypasses the throttle body.
- Biss screw set properly?
QA #498
Last Updated:
2020-01-25 06:19
Can I get ECMLink to control a Boost Control Selenoid? (BCS)
Similar Questions:
Can I get the ECU to control a Boost Control Selenoid? (BCS)
Using ECM Link: Yes. There is a write up on how to hook up the BCS to the ECU allowing ECM Link to control the boost values. You can set boost by gear, rpm, etc.
Guide on everything related to ECU Boost Control using ECMLink: https://www.ecmtuning.com/wiki/boostcontrol
Here is now to install the BCS: https://www.ecmtuning.com/wiki/bcsinstall
QA #499
Last Updated:
2020-01-25 06:15
Should I get an aftermarket fuel rail?
Typically, the stock fuel rail on the 4G63T engine is designed to handle the fuel demands of the factory power output. In its original configuration, with stock fuel injectors and fuel pressure, the stock fuel rail can typically support horsepower levels in the range of 250 to 300 horsepower.
If you are planning to modify the engine and increase its power output significantly, it is generally recommended to upgrade the fuel system components, including the fuel rail, to ensure adequate fuel supply. Aftermarket fuel rails with larger internal diameters, improved flow characteristics, and higher fuel capacity are available for the 4G63T engine. These aftermarket options can better support increased horsepower levels, especially when combined with larger fuel injectors and a higher-capacity fuel pump.
QA #500
Last Updated:
2023-05-23 07:53
What is double clutching?
Similar Questions:
How do I double clutch?
Iimagine yourself behind the wheel. In a normal shift, you would depress the clutch, move the shifter to the next gear, and then release the clutch. But in the double clutching dance, there are a few more steps. You first depress the clutch and move the shifter into neutral. Then, you release the clutch, rev the engine to match the RPMs for the next gear, depress the clutch again, shift into the next gear, and finally release the clutch. It's a symphony of synchronizing shaft speeds inside your transmission.
The purpose of this maneuver? It's all about harmonizing the rotational speeds of the input and output shafts in the transmission, allowing gears to mesh smoothly. Not a small task, but one that can be beneficial for the health of your vehicle.
Bear in mind, while double clutching can be beneficial in certain scenarios, it's not a panacea for all gear shifting concerns. It's not the same as rev-matching ( What is rev matching? ), which is another technique used in manual transmissions. Also, for most drivers of modern cars, the additional step of double clutching is often unnecessary, as the synchronized transmission does this work for you. But for those in the driver's seat of a cars with dog box transmissions or driving a big rig, it can be a critical skill to master.
QA #501
Last Updated:
2023-05-23 10:21
What is rev matching?
Rev matching, an often-discussed technique amongst drivers of manual transmission vehicles, is a process designed to smooth gear changes and protect the drivetrain from unnecessary wear. Despite the fact that many modern vehicles now offer automatic rev-matching systems, understanding the intricacies of this technique can be beneficial for those seeking a deeper connection with their vehicle.
In essence, rev matching involves synchronizing the engine speed (RPM) with the rotational speed of the transmission's input shaft before a downshift. This harmonization prevents the vehicle from lurching and mitigates the stress on the clutch and transmission. The procedure may sound complex, but let's break it down.
To perform a rev-match, you're going to follow a slightly altered sequence from the standard shift. First, depress the clutch and shift into neutral. Now comes the magic: blip the throttle to increase the engine RPMs, essentially 'revving' the engine. Your aim is to match the engine's speed to that of the lower gear you're about to engage. Once you've achieved this, depress the clutch again, shift into the lower gear, and release the clutch. The result should be a much smoother shift, without the jarring jerk that can accompany a poorly executed downshift.
However, it's important to draw a distinction here. Rev matching is not the same as double clutching ( What is double clutching? ). While they both involve manipulation of the engine's RPM during a shift, double clutching is a more involved process, specifically used for older, non-synchronized transmissions. Rev matching, on the other hand, is primarily used during downshifts in modern manual transmission vehicles to improve the smoothness and longevity of the drivetrain.
QA #502
Last Updated:
2023-05-23 10:17
What turbo should I get?
** This list may be outdated **
In ideal conditions: You can roughly get engine HP from multiplying lbsx10
Ex: 30 lb/min = 30 * 10 = 300 hp.
Mitsubishi:
14b = 30 lb/min
16g = 34lb/min
Big 16g = 36lb/min
18g = 40lb/min
EVO III Big 16g = 42lb/min
20g = 44lb/min
Forced Performance:
Big28 = 37lb/min
FP2544 = 44lb/min (56trim/ dual BB)
Sleeper 16g = 44lb/min
Green = 49lb/min (50 trim)
FP49 = 49lb/min (50 trim, T31 turbine)
Red = 60lb/min (60-1 trim, dyno 520whp)
FP3052 = 52lb/min (dyno 504whp)
FP3065 = 65lb/min (dyno 585whp)
FP58 = 65lb/min (GT40 56 trim comp. wheel, .49A/R PTE, T350 turbine)
AGP:
T28 = 36lb/min (TB03 compressor)
RS43 = 43lb/min (46 trim T04E)
SS44 = 44lb/min (It is a 44lb/min but not a 48trim. It is not a GT30 at all. It's special, topsecret, Kevin)
RS49 = 49lb/min (50 trim T04E)
RS60 = 60lb/min (60-1 trim) (claimed 534whp)
RS65 = 65lb/min (56 trim GT40)
DSM Performance/Extreme Turbo:
ETA12 = 36lb/min (S-trim, ETA comp housing)
ETA32 = 48lb/min (50 trim, ETA comp housing)
ETE32 = 48lb/min (50 trim, T04E comp housing)
ETE42 = 50lb/min (60 trim, TO4E)
ETE52 = 55lb/min (60-1 trim, TO4E)
ETE53 = 55lb/min (60-1 trim, T04E)
ETE73 = 72lb/min (T66 comp wheel, T04E)
Buschur Racing:
BR-BIG28 = (claimed 350hp)
BR20G = (TD05/6 hybrid)
BR475 = (No info as of yet)
BR57 = (Garrett T3/T4)
BR500 = (claimed 504whp)
BR580 = (claimed 575whp)
BR675 = (No info as of yet)
Slowboy Racing:
SBR-M50 = 48lb/min (50 trim)
SBR-M60 = 60lb/min (60-1 trim)
SBR-GT10 = 44lb/min (48 trim, dual BB)
SBR-GT11 = (No info as of yet)
SBR-GT12 = 55lb/min (56 trim, dual BB)
SBR-GT13 = 60lb/min (60 trim, dual BB)
SBR-GT14 = 65lb/min (56 trim, dual BB)
SBR-GT35R = (No info as of yet)
SBR-GT30R = (No info as of yet)
SBR-G50 = 48lb/min (50 trim, T04E)
SBR-G57 = 55lb/min (56 trim, T04E)
SBR-60-1 = 60lb/min (60-1 trim, T04E)
Frankenstein Turbos:
Frank 1 = 46 trim, 20*clipped TD05H turbine, TD05H 7cm2 housing
Frank 2 = 46 trim, unclipped TD06 turbine, TD05H 7cm2 housing
Frank 50 = 50 trim, unclipped TD06 turbine, TD05H 7cm2 housing
Frank 3 = 54 trim, unclipped TD06 turbine, TD05H 7cm2 housing
Frank 57 = 57 trim, unclipped TD06 turbine, TD05H 7cm2 housing
Frank 4 = 60 trim, 10*clipped TD06 turbine, TD05H 7cm2 housing
Frank 5 = 60 trim, unclipped TD06H turbine, TD05H 7cm2 housing
Frank 6 = 60 trim, unclipped TD06H turbine, TD05H 8cm2 housing
Frank 7 = 60 trim, 10*clipped TD06H turbine, TD05H 8cm2 housing
The following is from the Garrett Catalog:
"R" = Ball bearing; "S" = Special
GT12 = 10lb/min (50trim, .43a/r turbine)
GT15 = 15lb/min (60trim, .35a/r turbine)
GT20 = 20lb/min (55trim, .46a/r turbine)
GT22 = 18=22lb/min (52trim, .56a/r or 60trim, .67a/r turbine)
GT25R = 22lb/min (60trim, .64a/r turbine)
GT28R =24lb/min (60trim, .64a/r turbine)
GT28RS =28lb/min (62trim, .86a/r or .64a/r turbine)
GT30R =55lb/min (56trim, 1.06a/r or .82a/r turbine)
GT32 =35lb/min (52trim, .78a/r or .69a/r turbine)
GT35 = 35lb/min (52trim, 1.18a/r turbine)
GT35R =45lb/min (56trim, 1.06a/r or .82a/r turbine)
GT37 = 36lb/min (52trim, 1.12a/r turbine)
GT40 = 65lb/min (50 or 54trim, .94a/r or 1.34a/r turbine)
GT42 = 75lb/min
GT42-1 = 85lb/min
GT42-2 = 96lb/min
GT60 = 125lb/min (56trim, 1.47a/r turbine)
The following is from Turbonetics Catalog:
On TO4E Compressor housings:
50-trim = 47lbs/min
54-trim = 45lbs/min
57-trim = 49lbs/min
60-trim = 50lbs/min
T-100 = 180lbs/min
TO4B compressor housing:
60-1 = 65lbs/min
62-1 = 70lbs/min
------------------------------------------------------------------------------------
Turbine Conversion:
Mitsu = Garrett
6cm2 = .41 a/r
7cm2 = .49 a/r
8cm2 = .57 a/r
9cm2 = .65 a/r
10cm2 = .73 a/r
11cm2 = .81 a/r
12cm2 = .89 a/r
((CM x 8) - 7) / 100 = a/r ratio
QA #503
Last Updated:
2023-05-23 10:24
My car won't shut off
If you have no aftermarket items like a turbo timer, check under the drivers seat. There is a connection there that may have come loose.
QA #504
Last Updated:
2023-05-23 10:32

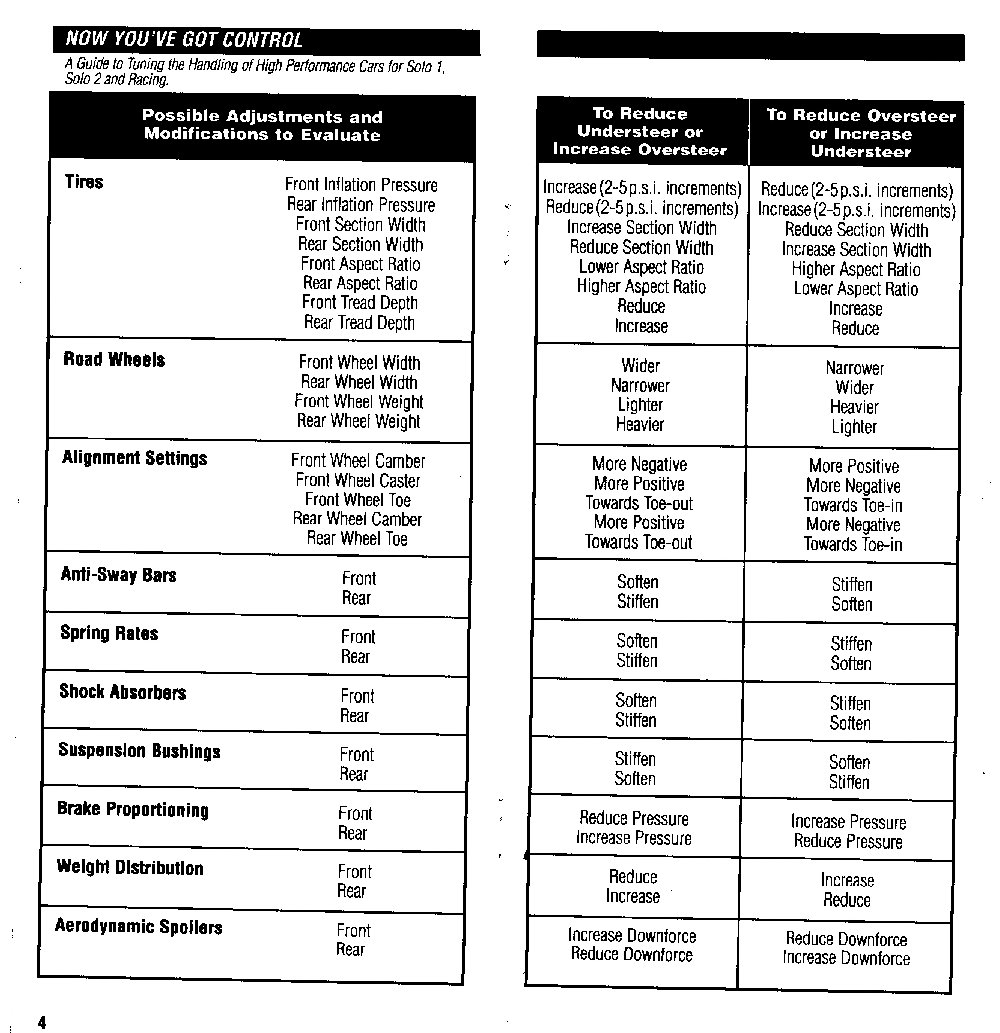